How to Underline in Google Sheets
Formatting
May 16, 2024
Underlining text in Google Sheets is a fundamental skill that can enhance the readability and organization of your data. Whether you're emphasizing key figures, denoting titles, or simply trying to make certain entries stand out, understanding how to underline effectively is essential for anyone using this versatile spreadsheet tool.
Understanding the Basics of Underlining
To start underlining text, you first need to open your Google Sheets document and select the cell or range of cells where you want the underlining to appear. This can be done by clicking on a single cell or by clicking and dragging to select multiple cells.
How to Underline Text in Google Sheets
Applying Underline to Text
Once your cells are selected, you can apply underlining in two primary ways. The quickest method is to just press cmd + u (on Mac) or ctl + u (on PC) on your keyboard.
If you prefer using menus, you can also underline text through the Format menu. Click on 'Format' in the menu bar, then hover over 'Text' and select 'Underline' from the submenu that appears:
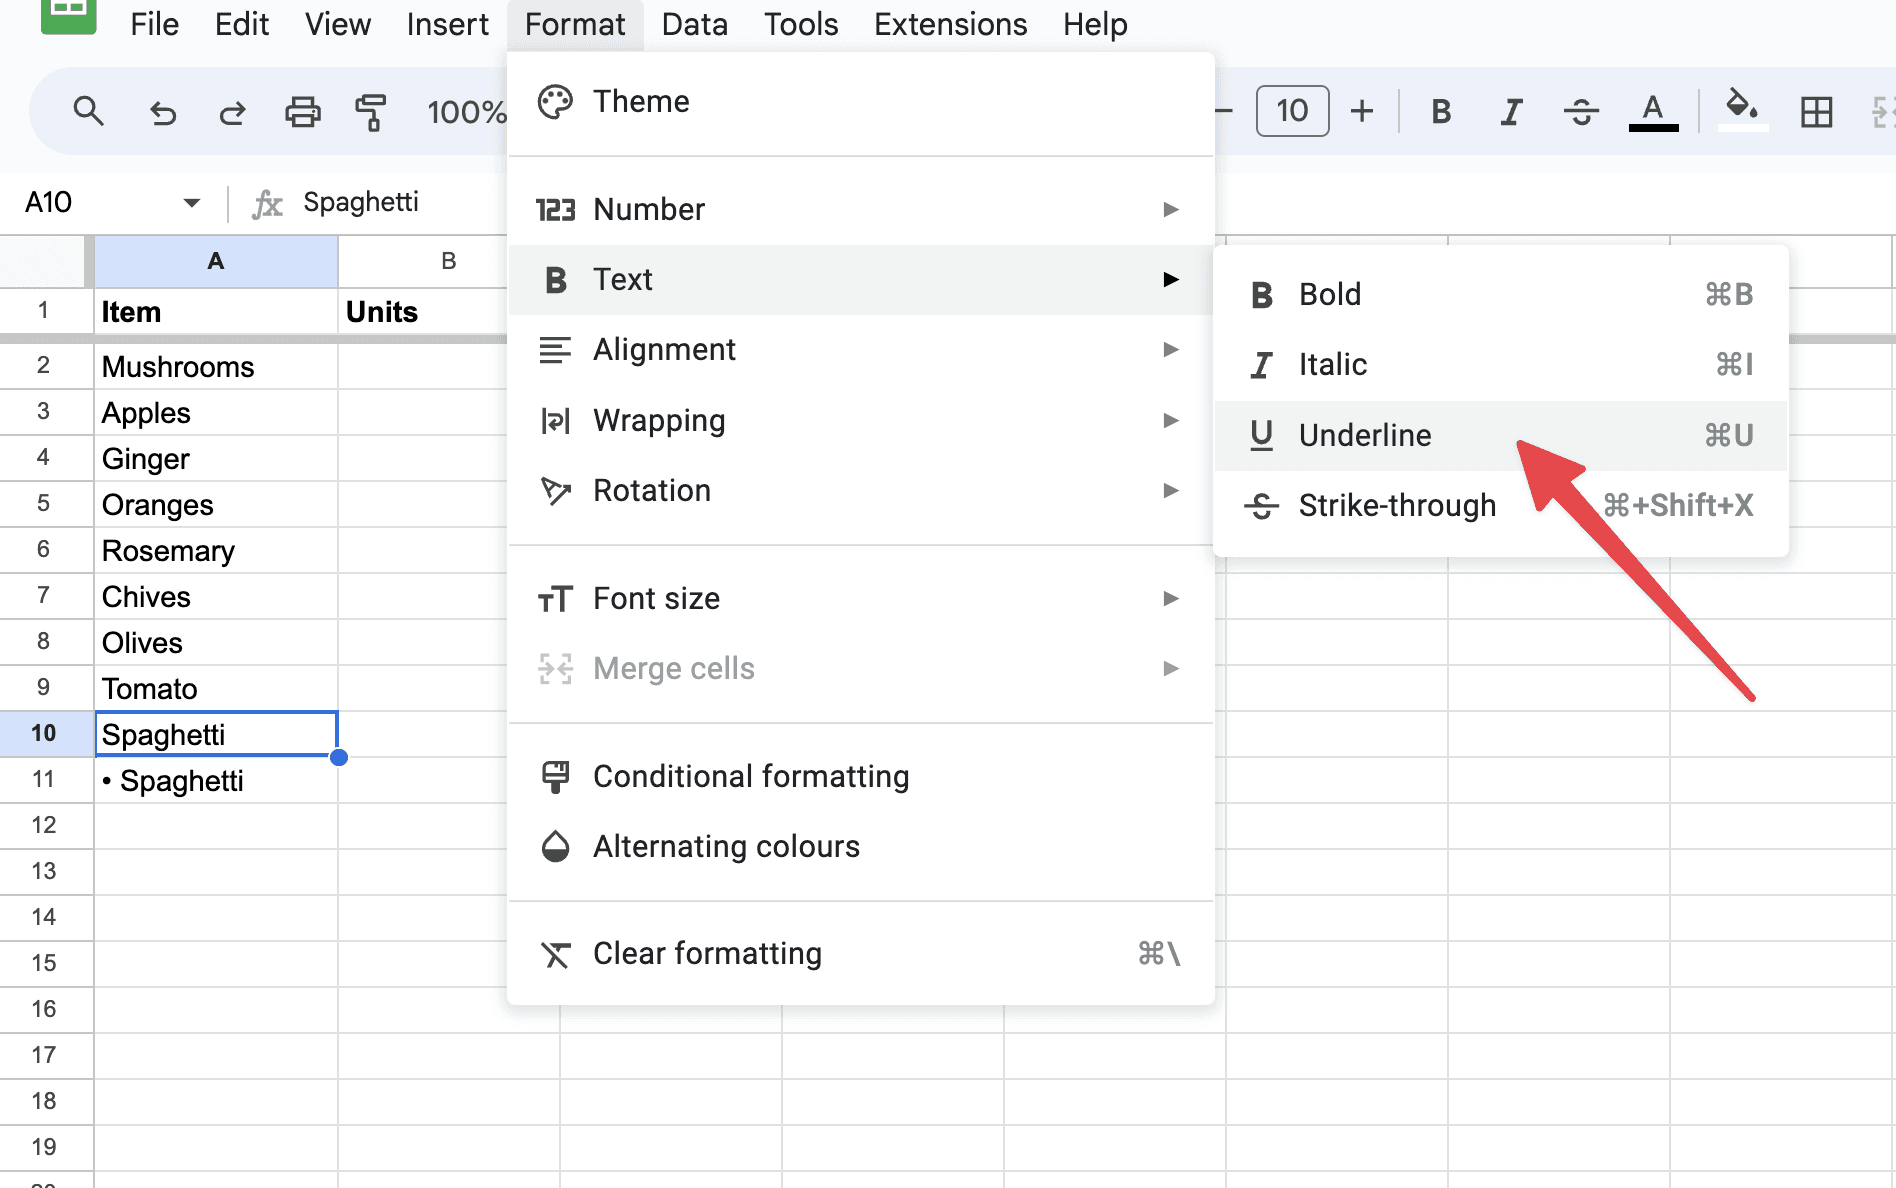
This method provides the same result as using the toolbar button, offering an alternative for those who favor menu navigation over direct toolbar interaction.
Customizing Underline Styles
While Google Sheets does not offer as many underline styles as some other text editing programs, it still provides options for basic customization. If you want to change the color or style of your underline, for instance, you will need to explore using cell borders as an alternative to traditional underlining.
To customize using borders, select your cells, then navigate to the 'Borders' icon in the toolbar. This icon typically displays various border options, allowing you to choose a bottom border. By selecting a bottom border, you effectively create a line under your text. You can customize the color and style of this border by choosing from the options presented in the dropdown that appears when you click the borders icon.
How to Get Rid of an Underline in Google Sheets
When working with Google Sheets, you may find the need to remove underlines from your text, whether to clean up the appearance of your data or adjust the formatting for clarity. Removing underlines is as straightforward as applying them, and you can accomplish this task using either the toolbar or the Format menu. Here's how you can efficiently remove underlines from your text in Google Sheets.
Using the Format Menu
You can remove underlines using the Format menu. Start by selecting the cells with the underlined text. Then, click on 'Format' in the top menu bar, hover over 'Text,' and you will see 'Underline' listed among other options. If the text is currently underlined, clicking on 'Underline' will remove the formatting. This method gives you a bit more control and visibility over the formatting options available and is just as effective as using the toolbar.
Removing Custom Underline Styles
If your underline was applied using the borders function as a custom underline style (which might involve a border at the bottom of the cell), removing it follows a similar but slightly adjusted process. First, select the cell or cells where you've applied a bottom border as an underline. Then, click on the 'Borders' icon in the toolbar and look for the option that applies to removing the bottom border (often represented by a line at the bottom of a cell icon with no line). Clicking this will remove the border, effectively removing your custom underline.
Whether you're using the direct underline function or a customized border to underline text, removing this formatting in Google Sheets is straightforward. Both the toolbar and Format menu provide easy-to-use options for toggling off underlines, allowing you to adjust the presentation of your data as needed. Regularly revising and updating your formatting choices, including the use of underlines, ensures that your spreadsheets remain clear, readable, and visually appealing.
Why Would You Want to Underline?
Underlining in spreadsheets like Google Sheets can be a practical and impactful way to draw attention to specific data. A good example of where underlining might be necessary is in financial reporting, specifically within an income statement.
Example: Underlining in an Income Statement
In an income statement, various categories of revenues and expenses are listed to calculate the net income of a business. It's common practice to underline key figures to highlight their importance and to indicate subtotals or totals. For example, you might have different revenue streams like sales revenue, service revenue, and returns or allowances. Below these figures, you’d typically show a subtotal of all revenues, which would be underlined to indicate its significance as a subtotal.
Here's a breakdown of how underlining is used in this context:
Subtotals: After listing individual items under revenues and expenses, a subtotal of each category might be underlined. This helps in distinguishing the sum of individual elements from other figures in the list. For instance, if you have multiple lines of revenue, the subtotal of all these revenues is underlined to visually separate it from subsequent expense entries.
Final Total: The most important figure in any income statement is the net income, which represents the profit or loss after all revenues and expenses have been accounted for. This figure is typically bolded and underlined, emphasizing its importance as the final takeaway of the document.
Visual Hierarchy and Clarity: Underlining serves a functional purpose by creating a clear visual hierarchy. It guides the reader's eye and helps in quickly navigating through the financial figures to understand the financial health of the business.
By using underlining in these ways, the document becomes more organized and easier to interpret, which is crucial for financial documents where precision and clarity are paramount.
TLDR
Underlining text in Google Sheets is a straightforward process that can significantly aid in highlighting important data. Whether through direct underlining or using borders for a more customized approach, these techniques are essential tools in making your spreadsheet both functional and visually appealing. Remember, the key to effective underlining—and spreadsheet management in general—is experimentation and practice, so don't hesitate to try different methods to find what best suits your needs.
About the Author

Kris Lachance
Managing Editor
How to Underline in Google Sheets
Formatting
May 16, 2024
Underlining text in Google Sheets is a fundamental skill that can enhance the readability and organization of your data. Whether you're emphasizing key figures, denoting titles, or simply trying to make certain entries stand out, understanding how to underline effectively is essential for anyone using this versatile spreadsheet tool.
Understanding the Basics of Underlining
To start underlining text, you first need to open your Google Sheets document and select the cell or range of cells where you want the underlining to appear. This can be done by clicking on a single cell or by clicking and dragging to select multiple cells.
How to Underline Text in Google Sheets
Applying Underline to Text
Once your cells are selected, you can apply underlining in two primary ways. The quickest method is to just press cmd + u (on Mac) or ctl + u (on PC) on your keyboard.
If you prefer using menus, you can also underline text through the Format menu. Click on 'Format' in the menu bar, then hover over 'Text' and select 'Underline' from the submenu that appears:
This method provides the same result as using the toolbar button, offering an alternative for those who favor menu navigation over direct toolbar interaction.
Customizing Underline Styles
While Google Sheets does not offer as many underline styles as some other text editing programs, it still provides options for basic customization. If you want to change the color or style of your underline, for instance, you will need to explore using cell borders as an alternative to traditional underlining.
To customize using borders, select your cells, then navigate to the 'Borders' icon in the toolbar. This icon typically displays various border options, allowing you to choose a bottom border. By selecting a bottom border, you effectively create a line under your text. You can customize the color and style of this border by choosing from the options presented in the dropdown that appears when you click the borders icon.
How to Get Rid of an Underline in Google Sheets
When working with Google Sheets, you may find the need to remove underlines from your text, whether to clean up the appearance of your data or adjust the formatting for clarity. Removing underlines is as straightforward as applying them, and you can accomplish this task using either the toolbar or the Format menu. Here's how you can efficiently remove underlines from your text in Google Sheets.
Using the Format Menu
You can remove underlines using the Format menu. Start by selecting the cells with the underlined text. Then, click on 'Format' in the top menu bar, hover over 'Text,' and you will see 'Underline' listed among other options. If the text is currently underlined, clicking on 'Underline' will remove the formatting. This method gives you a bit more control and visibility over the formatting options available and is just as effective as using the toolbar.
Removing Custom Underline Styles
If your underline was applied using the borders function as a custom underline style (which might involve a border at the bottom of the cell), removing it follows a similar but slightly adjusted process. First, select the cell or cells where you've applied a bottom border as an underline. Then, click on the 'Borders' icon in the toolbar and look for the option that applies to removing the bottom border (often represented by a line at the bottom of a cell icon with no line). Clicking this will remove the border, effectively removing your custom underline.
Whether you're using the direct underline function or a customized border to underline text, removing this formatting in Google Sheets is straightforward. Both the toolbar and Format menu provide easy-to-use options for toggling off underlines, allowing you to adjust the presentation of your data as needed. Regularly revising and updating your formatting choices, including the use of underlines, ensures that your spreadsheets remain clear, readable, and visually appealing.
Why Would You Want to Underline?
Underlining in spreadsheets like Google Sheets can be a practical and impactful way to draw attention to specific data. A good example of where underlining might be necessary is in financial reporting, specifically within an income statement.
Example: Underlining in an Income Statement
In an income statement, various categories of revenues and expenses are listed to calculate the net income of a business. It's common practice to underline key figures to highlight their importance and to indicate subtotals or totals. For example, you might have different revenue streams like sales revenue, service revenue, and returns or allowances. Below these figures, you’d typically show a subtotal of all revenues, which would be underlined to indicate its significance as a subtotal.
Here's a breakdown of how underlining is used in this context:
Subtotals: After listing individual items under revenues and expenses, a subtotal of each category might be underlined. This helps in distinguishing the sum of individual elements from other figures in the list. For instance, if you have multiple lines of revenue, the subtotal of all these revenues is underlined to visually separate it from subsequent expense entries.
Final Total: The most important figure in any income statement is the net income, which represents the profit or loss after all revenues and expenses have been accounted for. This figure is typically bolded and underlined, emphasizing its importance as the final takeaway of the document.
Visual Hierarchy and Clarity: Underlining serves a functional purpose by creating a clear visual hierarchy. It guides the reader's eye and helps in quickly navigating through the financial figures to understand the financial health of the business.
By using underlining in these ways, the document becomes more organized and easier to interpret, which is crucial for financial documents where precision and clarity are paramount.
TLDR
Underlining text in Google Sheets is a straightforward process that can significantly aid in highlighting important data. Whether through direct underlining or using borders for a more customized approach, these techniques are essential tools in making your spreadsheet both functional and visually appealing. Remember, the key to effective underlining—and spreadsheet management in general—is experimentation and practice, so don't hesitate to try different methods to find what best suits your needs.
About the Author
Kris Lachance
Managing Editor

Spreadsheet Secrets
Helping you get better at all things spreadsheets. From learning functions to helpful tips and tricks. Microsoft Excel, Google Sheets, Apple Numbers, Office 365, whatever you use we can help you with.
Contact us here: ssheetsecrets@gmail.com
© 2024 Spreadsheet Secrets.
Spreadsheet Secrets
Helping you get better at all things spreadsheets. From learning functions to helpful tips and tricks. Microsoft Excel, Google Sheets, Apple Numbers, Office 365, whatever you use we can help you with.
Contact us here: ssheetsecrets@gmail.com
© 2024 Spreadsheet Secrets.
Spreadsheet Secrets
Helping you get better at all things spreadsheets. From learning functions to helpful tips and tricks. Microsoft Excel, Google Sheets, Apple Numbers, Office 365, whatever you use we can help you with.
Contact us here: ssheetsecrets@gmail.com
© 2024 Spreadsheet Secrets.