How to Add Check Boxes in Google Sheets: A Step by Step Guide
Basics
May 3, 2024
One nice feature of Google Sheets is that you can add check boxes to your spreadsheet. This is a great way to organize, track and interact with your data.
In this guide we’ll walk you through how to add and customize check boxes in Google Sheets. If you’ve ever wondered how to make a check box in Google Sheets then keep reading.
Why add a check box to Google Sheets?
Check boxes provide a clear visual indicator for tracking progress on tasks. This lets you easily toggle between complete and incomplete states. If you put a checkmark in your Google Sheet, you’ll find it’s easier to create to-do lists, manage project milestones, or set up dynamic checklists where you can visually and interactively keep track of what has been done or what’s still outstanding. In other words, check marks help you make better spreadsheets!
How to add a check box?
Step 1: Open your Google Sheet
The first step is to open the Google Sheets document where you want to add check boxes.
Step 2: Select the cells you want to add check boxes to
Once your sheet is open, decide where you want to place the check boxes. You can add check boxes in a single cell, a range of cells, or across non-adjacent cells. Click on a cell to select it, or click and drag your mouse to select a range of cells.
Step 3: Insert the check boxes
Now that you’ve selected the cells, it’s time to insert the check boxes. Go to the menu bar, click “Insert,” and then select “Checkbox” from the drop-down menu. Now check boxes appear in the cells you’ve selected:
How to customize check boxes?
Google Sheets lets you customize the values associated with the checked and unchecked states of the boxes. By default, a checked box is associated with the value TRUE, and an unchecked box is associated with FALSE.
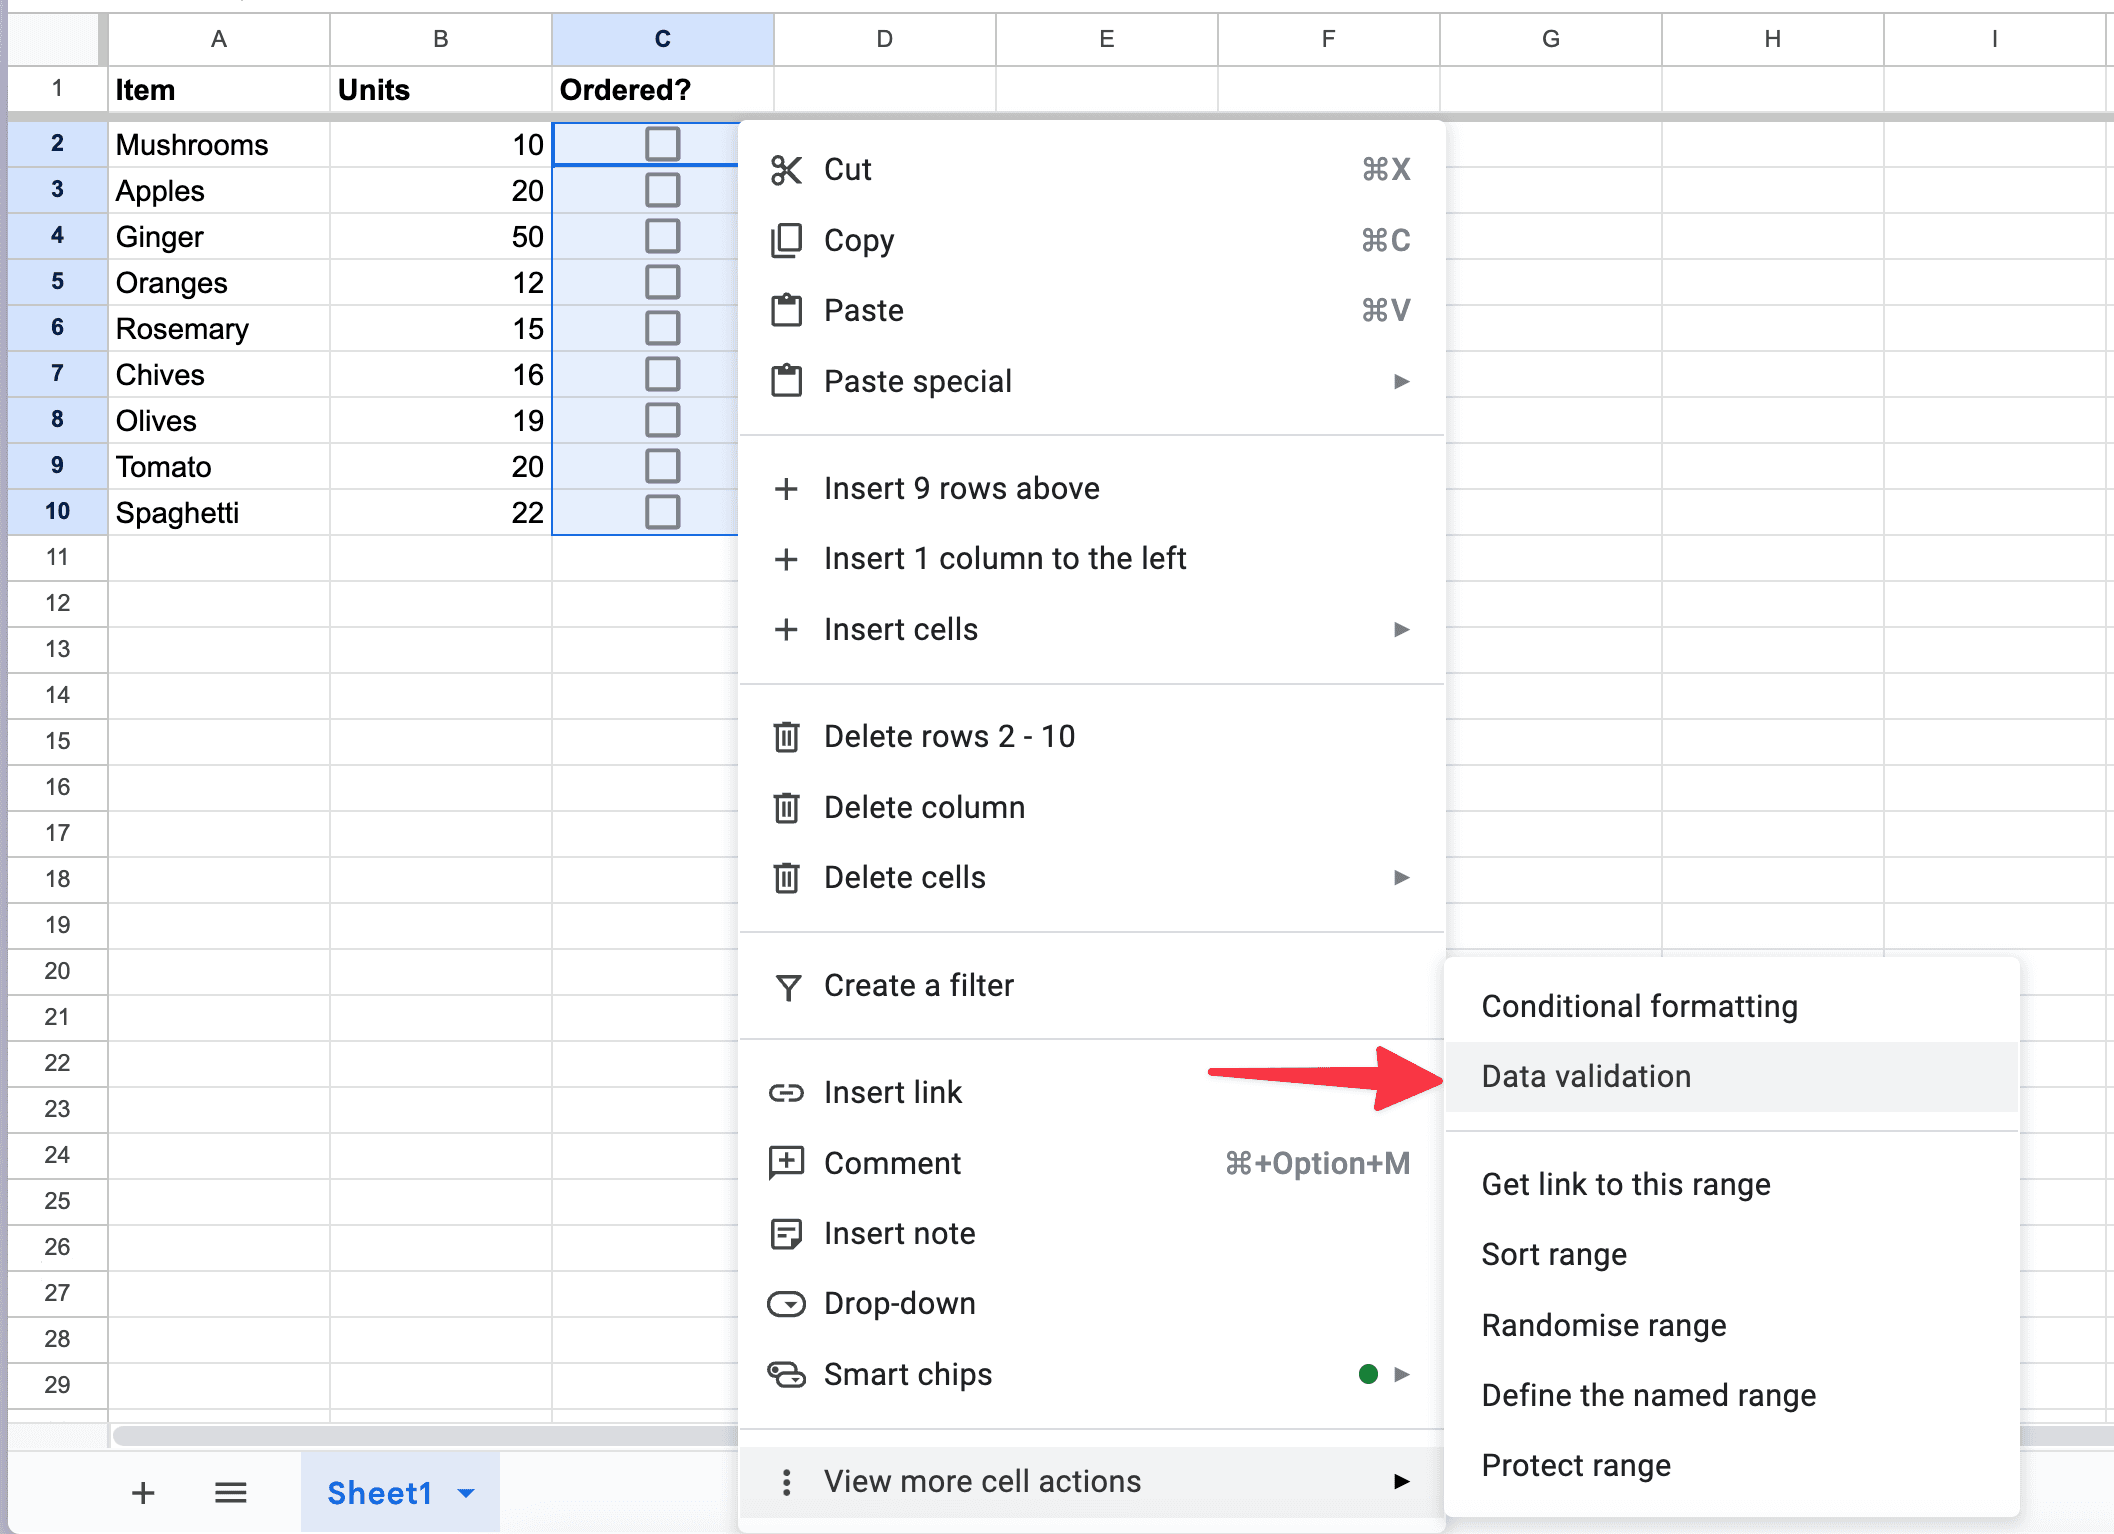
To change these, select the cells with check boxes, right-click, and choose “Data validation.” In the Criteria dropdown, choose “Checkbox” and then customize the “Checked” and “Unchecked” values to your preference:
How to use conditional formatting with check boxes?
You can use conditional formatting to make your check boxes look and work better. This changes the formatting of cells based on their contents—in this case, whether a check box is checked or not. To apply conditional formatting, select the cells with check boxes, go to the “Format” menu, and choose “Conditional formatting.” Set the format rules based on the values of the check boxes (TRUE or FALSE, or your custom values) and choose the formatting style you want to apply.
Integrating check boxes with formulas
You can integrate check boxes with Google Sheets formulas. For instance, you can use the IF function to display specific information based on the state of a check box:
=IF(A1 = TRUE, "Completed", "Pending")
This formula will display "Completed" if the check box in cell A1 is checked, and "Pending" if it's not.
How to add up check boxes in Google Sheets?
You can use the COUNTIF function to add up checkboxes in Google Sheets. Checkboxes in Google Sheets are usually Boolean values, where a checked box is TRUE and an unchecked box is FALSE.
In a new cell, where you want to display the total count of checked boxes, use the COUNTIF function. The syntax of the function is =COUNTIF(range, criterion). Since a checked box is TRUE, your formula would look something like =COUNTIF(C2:C10, TRUE), assuming your checkboxes are in cells C2 to C10.
This formula counts the number of checked (TRUE) checkboxes in the range you specified. Now press enter. Voila! The cell will now display the number of checked boxes in your specified range.
For example, if you have checkboxes in cells C2 through C10, and you want to count how many of them are checked, you would enter =COUNTIF(C2:C10, TRUE) in another cell. This cell will then show the number of checked boxes:

Remember, if you add or remove checkboxes, or check/uncheck them, the count will automatically update (assuming you properly set up the formula).
Managing check boxes
You can easily copy, cut, or delete check boxes as you would with any other cell content in Google Sheets.
How to add check boxes to Google Sheets on iPad?
Unlike the desktop browser version, the mobile version of Google Sheets doesn’t let you directly insert checkboxes into your spreadsheets. There is a workaround, however. You’ll need to insert a symbol or use a character that looks similar to a checkmark.
Here’s one example. Open your sheet in the Google Sheets iOS app. Tap on the cell and choose the option to edit the cell by tapping the pencil icon or double-tapping the cell.
To insert a symbol, tap on the text field, then tap on the globe icon or emoji icon on your iPad’s keyboard to bring up emojis and symbols. Find a checkmark symbol (✓) and insert it.
You can also type in a character like "X" or any other symbol that you want to use as a representation of a checkmark.
Conclusion
Adding check boxes in Google Sheets is a straightforward process that can way more organized and productive. You should definitely use them if it makes sense for your project. Whether you’re a project manager, a student, or someone looking to organize daily tasks, mastering the use of check boxes in Google Sheets is a must! Hopefully this helps you make better use of them!
About the Author

Kris Lachance
Managing Editor
Kris is the Managing Editor of Spreadsheet Secrets. He is a finance professional, writer and entrepreneur based in Canada.
How to Add Check Boxes in Google Sheets: A Step by Step Guide
Basics
May 3, 2024
One nice feature of Google Sheets is that you can add check boxes to your spreadsheet. This is a great way to organize, track and interact with your data.
In this guide we’ll walk you through how to add and customize check boxes in Google Sheets. If you’ve ever wondered how to make a check box in Google Sheets then keep reading.
Why add a check box to Google Sheets?
Check boxes provide a clear visual indicator for tracking progress on tasks. This lets you easily toggle between complete and incomplete states. If you put a checkmark in your Google Sheet, you’ll find it’s easier to create to-do lists, manage project milestones, or set up dynamic checklists where you can visually and interactively keep track of what has been done or what’s still outstanding. In other words, check marks help you make better spreadsheets!
How to add a check box?
Step 1: Open your Google Sheet
The first step is to open the Google Sheets document where you want to add check boxes.
Step 2: Select the cells you want to add check boxes to
Once your sheet is open, decide where you want to place the check boxes. You can add check boxes in a single cell, a range of cells, or across non-adjacent cells. Click on a cell to select it, or click and drag your mouse to select a range of cells.
Step 3: Insert the check boxes
Now that you’ve selected the cells, it’s time to insert the check boxes. Go to the menu bar, click “Insert,” and then select “Checkbox” from the drop-down menu. Now check boxes appear in the cells you’ve selected:
How to customize check boxes?
Google Sheets lets you customize the values associated with the checked and unchecked states of the boxes. By default, a checked box is associated with the value TRUE, and an unchecked box is associated with FALSE.
To change these, select the cells with check boxes, right-click, and choose “Data validation.” In the Criteria dropdown, choose “Checkbox” and then customize the “Checked” and “Unchecked” values to your preference:
How to use conditional formatting with check boxes?
You can use conditional formatting to make your check boxes look and work better. This changes the formatting of cells based on their contents—in this case, whether a check box is checked or not. To apply conditional formatting, select the cells with check boxes, go to the “Format” menu, and choose “Conditional formatting.” Set the format rules based on the values of the check boxes (TRUE or FALSE, or your custom values) and choose the formatting style you want to apply.
Integrating check boxes with formulas
You can integrate check boxes with Google Sheets formulas. For instance, you can use the IF function to display specific information based on the state of a check box:
=IF(A1 = TRUE, "Completed", "Pending")
This formula will display "Completed" if the check box in cell A1 is checked, and "Pending" if it's not.
How to add up check boxes in Google Sheets?
You can use the COUNTIF function to add up checkboxes in Google Sheets. Checkboxes in Google Sheets are usually Boolean values, where a checked box is TRUE and an unchecked box is FALSE.
In a new cell, where you want to display the total count of checked boxes, use the COUNTIF function. The syntax of the function is =COUNTIF(range, criterion). Since a checked box is TRUE, your formula would look something like =COUNTIF(C2:C10, TRUE), assuming your checkboxes are in cells C2 to C10.
This formula counts the number of checked (TRUE) checkboxes in the range you specified. Now press enter. Voila! The cell will now display the number of checked boxes in your specified range.
For example, if you have checkboxes in cells C2 through C10, and you want to count how many of them are checked, you would enter =COUNTIF(C2:C10, TRUE) in another cell. This cell will then show the number of checked boxes:
Remember, if you add or remove checkboxes, or check/uncheck them, the count will automatically update (assuming you properly set up the formula).
Managing check boxes
You can easily copy, cut, or delete check boxes as you would with any other cell content in Google Sheets.
How to add check boxes to Google Sheets on iPad?
Unlike the desktop browser version, the mobile version of Google Sheets doesn’t let you directly insert checkboxes into your spreadsheets. There is a workaround, however. You’ll need to insert a symbol or use a character that looks similar to a checkmark.
Here’s one example. Open your sheet in the Google Sheets iOS app. Tap on the cell and choose the option to edit the cell by tapping the pencil icon or double-tapping the cell.
To insert a symbol, tap on the text field, then tap on the globe icon or emoji icon on your iPad’s keyboard to bring up emojis and symbols. Find a checkmark symbol (✓) and insert it.
You can also type in a character like "X" or any other symbol that you want to use as a representation of a checkmark.
Conclusion
Adding check boxes in Google Sheets is a straightforward process that can way more organized and productive. You should definitely use them if it makes sense for your project. Whether you’re a project manager, a student, or someone looking to organize daily tasks, mastering the use of check boxes in Google Sheets is a must! Hopefully this helps you make better use of them!
About the Author
Kris Lachance
Managing Editor
Kris is the Managing Editor of Spreadsheet Secrets. He is a finance professional, writer and entrepreneur based in Canada.

Spreadsheet Secrets
Helping you get better at all things spreadsheets. From learning functions to helpful tips and tricks. Microsoft Excel, Google Sheets, Apple Numbers, Office 365, whatever you use we can help you with.
Contact us here: ssheetsecrets@gmail.com
© 2024 Spreadsheet Secrets.
Spreadsheet Secrets
Helping you get better at all things spreadsheets. From learning functions to helpful tips and tricks. Microsoft Excel, Google Sheets, Apple Numbers, Office 365, whatever you use we can help you with.
Contact us here: ssheetsecrets@gmail.com
© 2024 Spreadsheet Secrets.
Spreadsheet Secrets
Helping you get better at all things spreadsheets. From learning functions to helpful tips and tricks. Microsoft Excel, Google Sheets, Apple Numbers, Office 365, whatever you use we can help you with.
Contact us here: ssheetsecrets@gmail.com
© 2024 Spreadsheet Secrets.