How to Change Cell Size in Google Sheets
Formatting
Apr 24, 2024
This guide covers everything you need to know about how to change the size of a cell in your Google Sheets spreadsheet.
Introduction to adjusting cell size in Google Sheets
Google Sheets helps you organize and present your data. One way it does this is the ability to adjust the size of cells. The main reason to do this is honestly just that it makes your spreadsheets look nicer. This guide will explain how to change cell sizes in Google Sheets, covering both width and height adjustments for rows and columns.
What is cell size adjustment in Google Sheets?
When working with data in Google Sheets, you might find that the default cell sizes don't perfectly fit your content. For instance, longer text entries may be clipped, or numerical data might look cramped. Adjusting the cell size lets you tailor the spreadsheet layout to better accommodate your data, making it more accessible and easier to analyze.
How to change column width in Google Sheets?
To change the width of a column in Google Sheets, first place your cursor on the line between two column headers (e.g., between columns A and B). Your cursor will transform into a double-sided arrow. Click and hold the line, then drag it left or right to decrease or increase the width of the column on the left. Release the mouse button once you're satisfied with the new width:
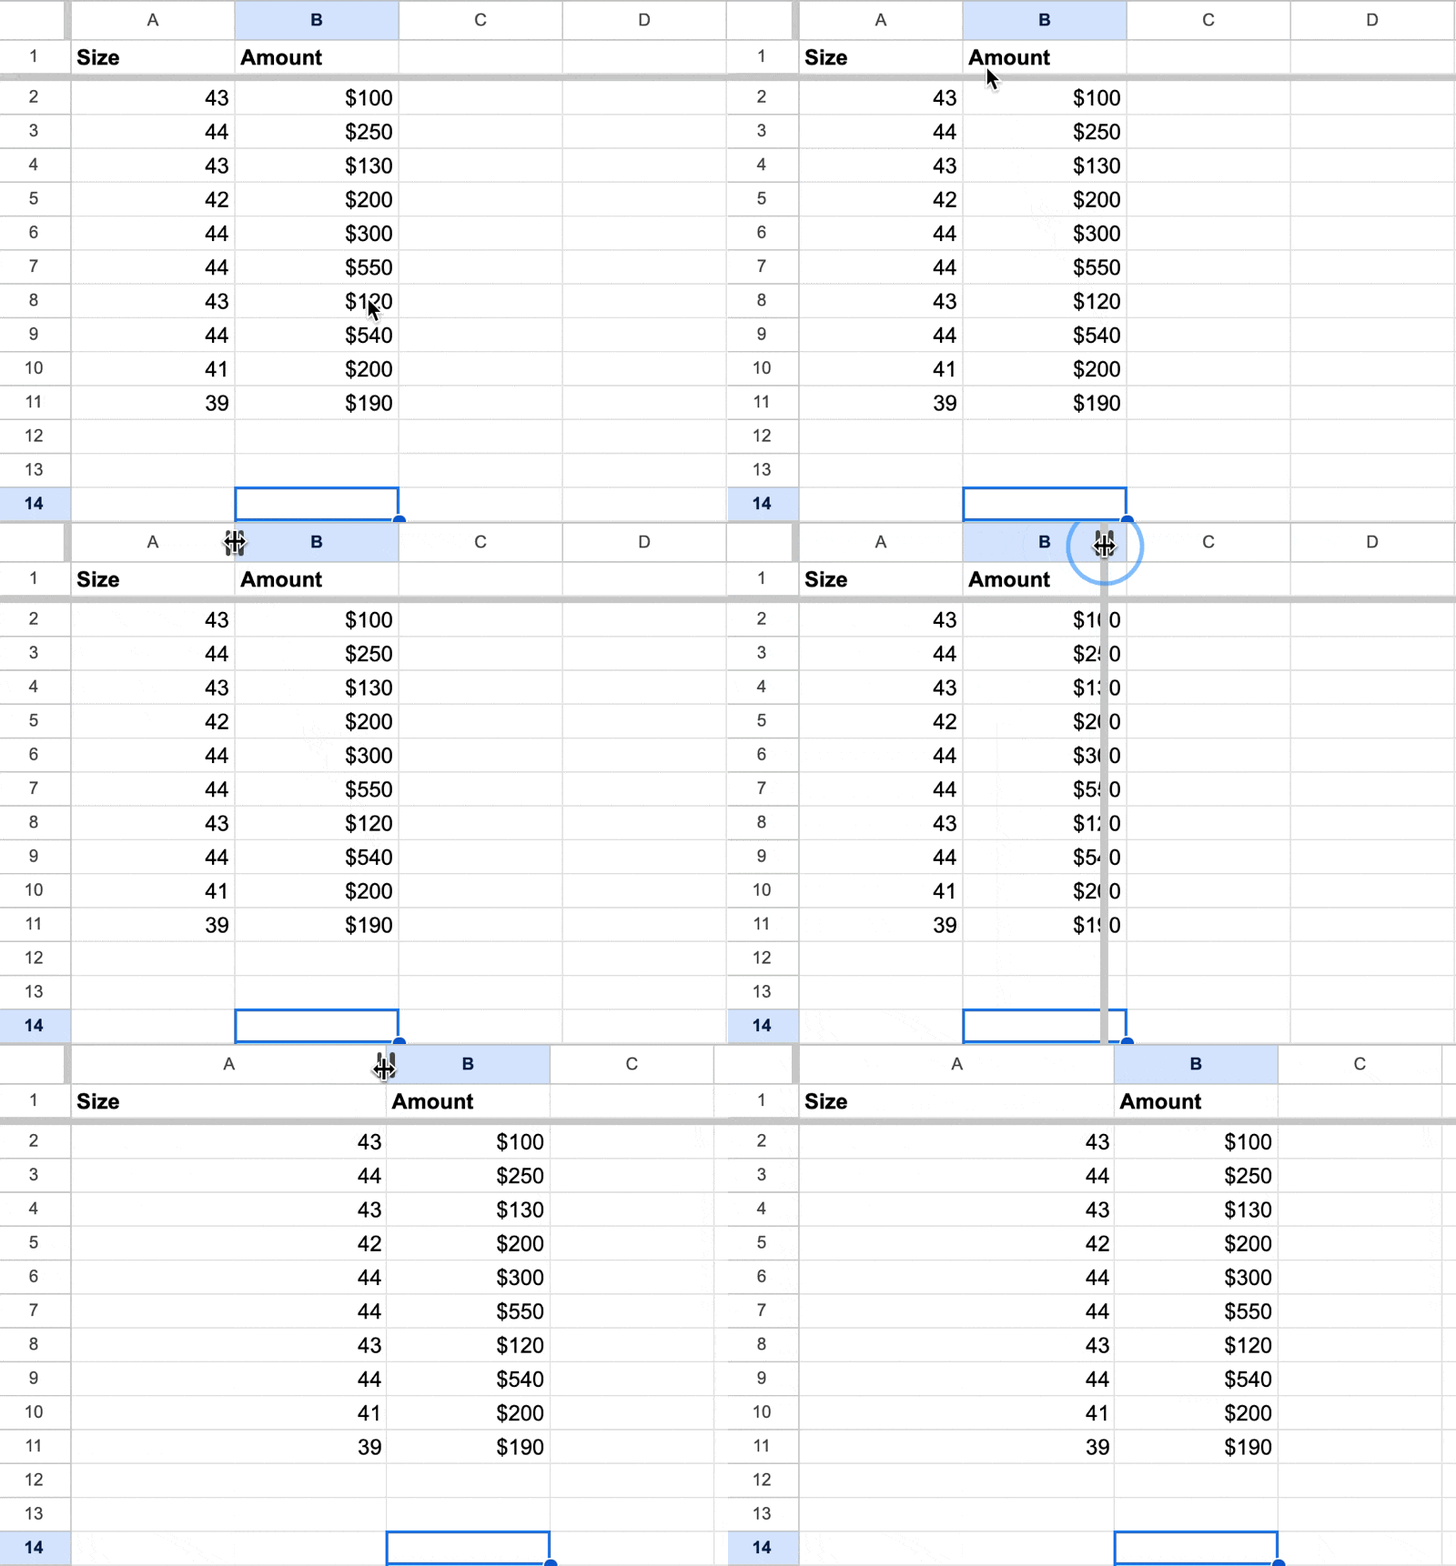
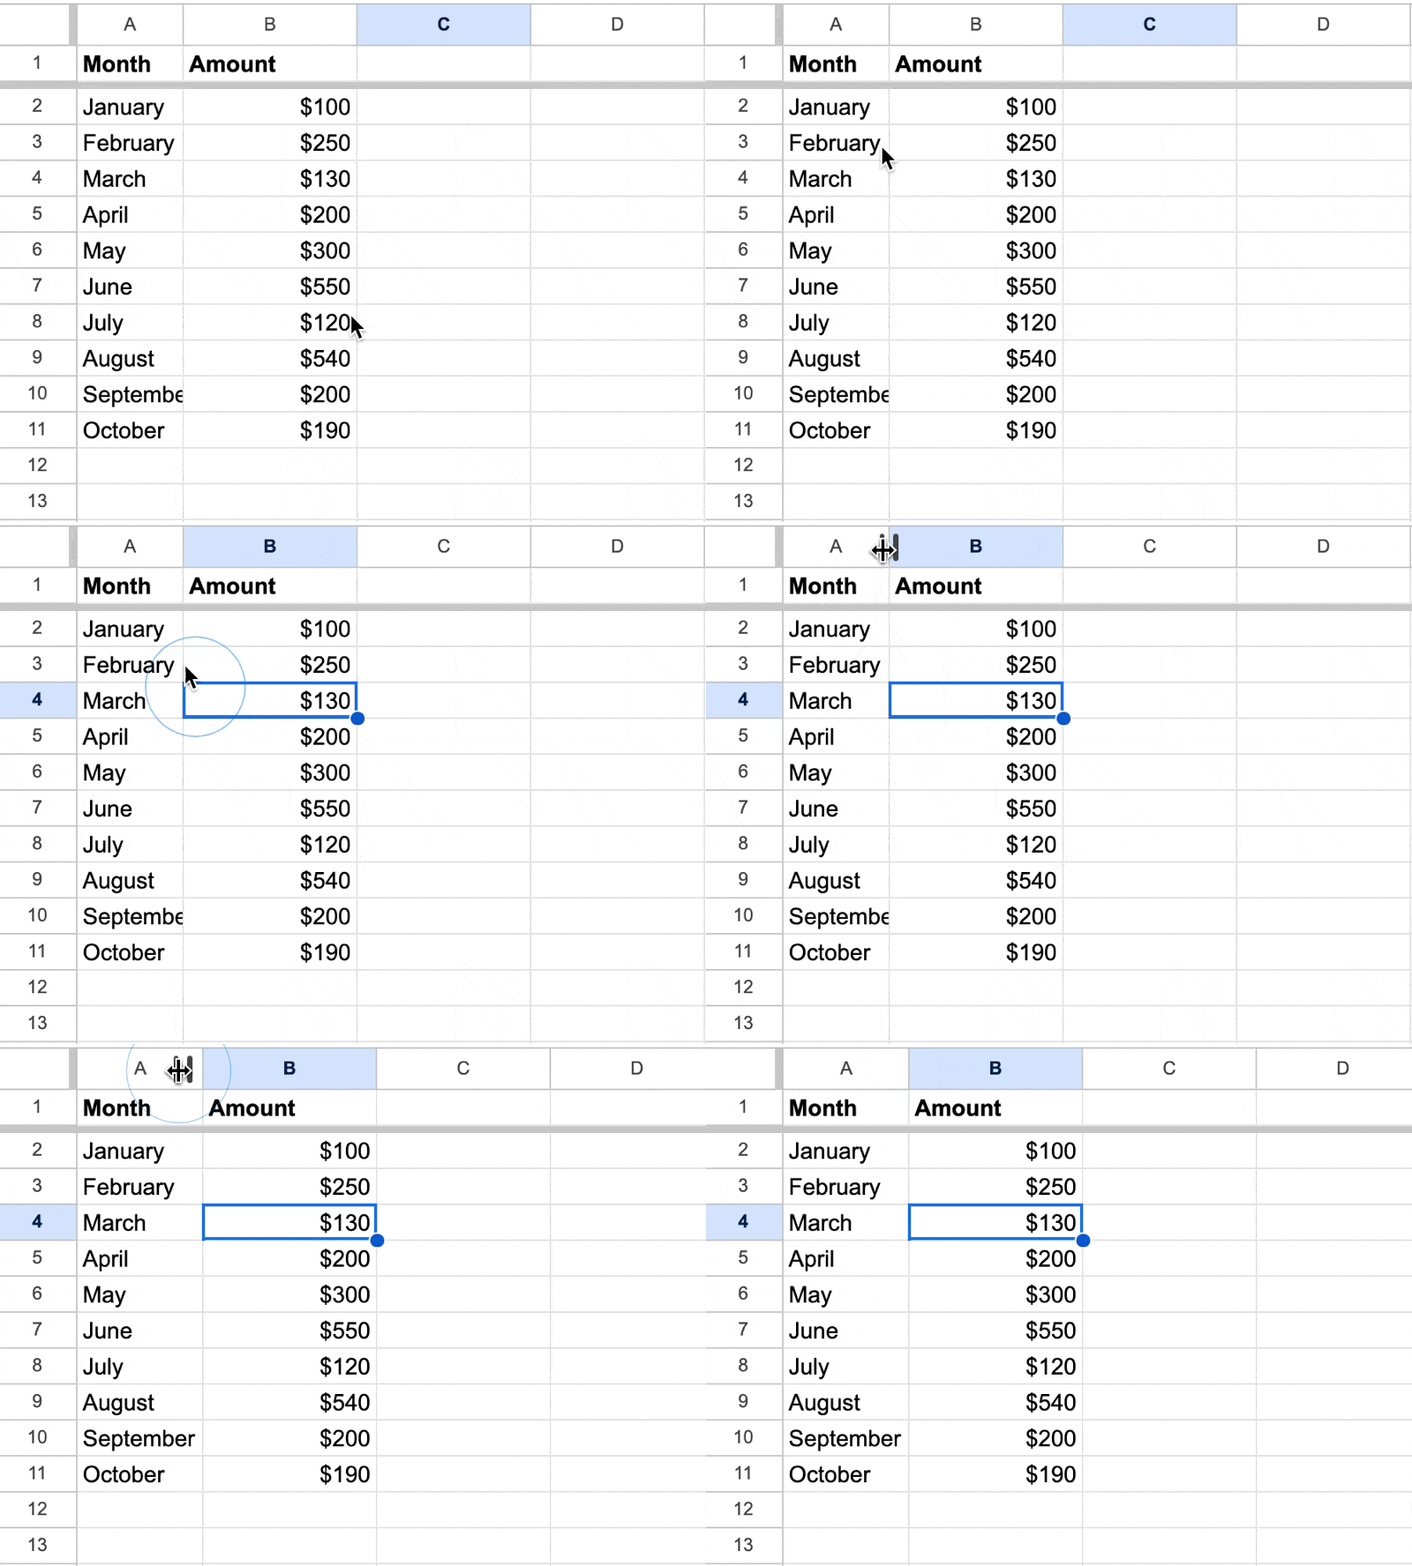
Alternatively, you can adjust column width to fit your content automatically. Double-click the boundary line between two column headers. Google Sheets will automatically resize the column on the left to accommodate the longest piece of data in that column:
How to adjust row height in Google Sheets?
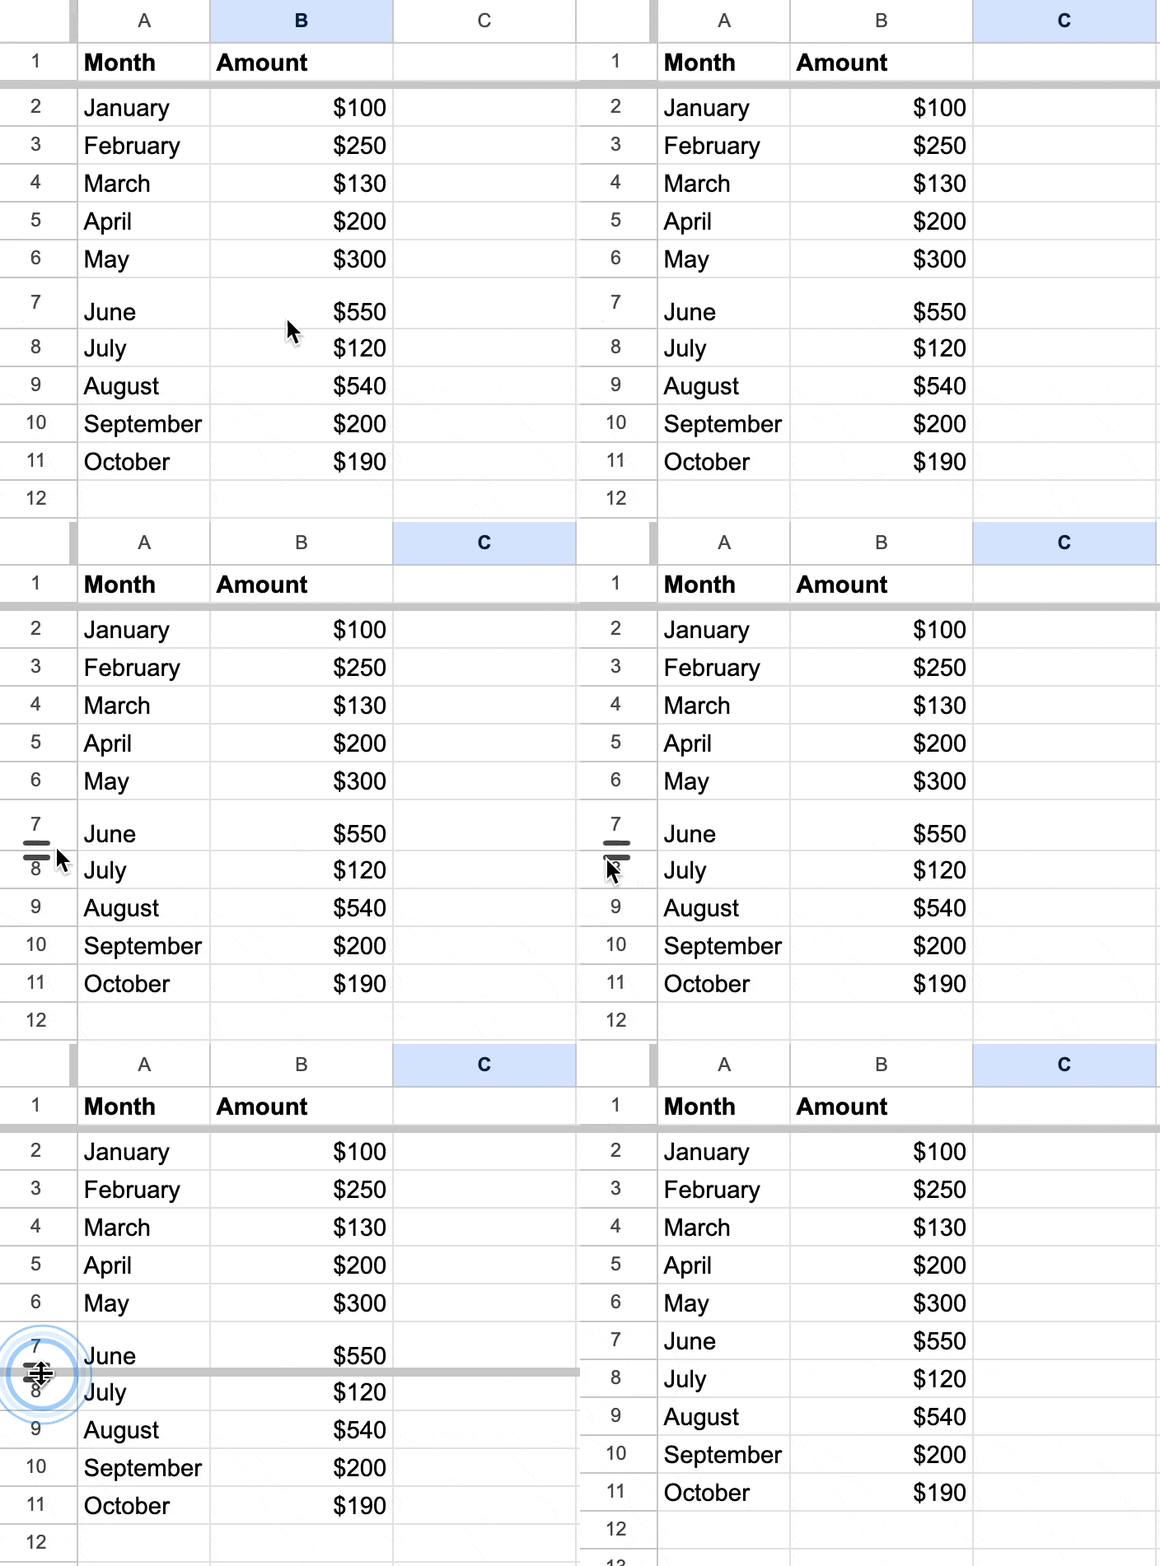
Modifying the height of rows in Google Sheets is similar to adjusting column widths. Hover your cursor over the boundary line between two row numbers (e.g., between rows 1 and 2). When the cursor changes to a double-sided arrow, click and drag the line up or down to change the height of the row above it. This manual adjustment allows you to make precise modifications to row height, ensuring that all types of content, from text to images, fit neatly within the cell:
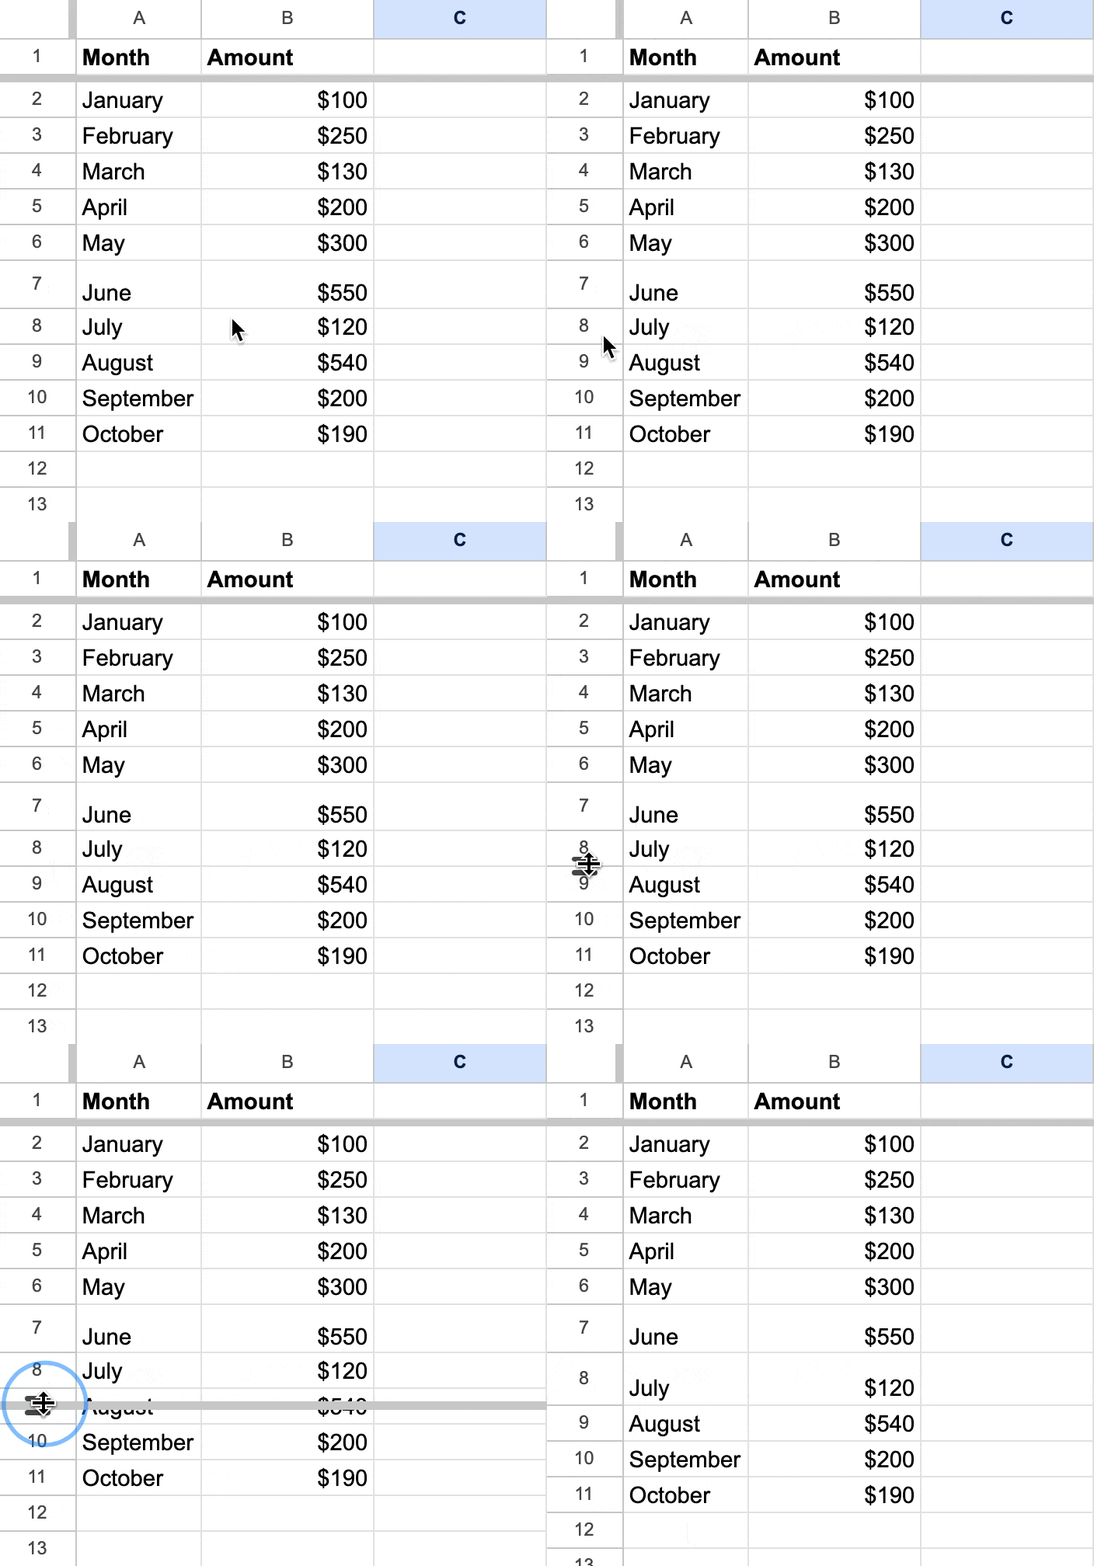
For automatic adjustment, double-click the boundary line between two row numbers. Google Sheets will expand or contract the row height based on the tallest content in that row:
How to change all cell size in Google Sheets?
To change the size of all cells in a Google Sheets document simultaneously, you can adjust the width of all columns and the height of all rows in one go. This is particularly useful if you want a uniform appearance for your entire spreadsheet.
Changing the width of all columns
Select all columns
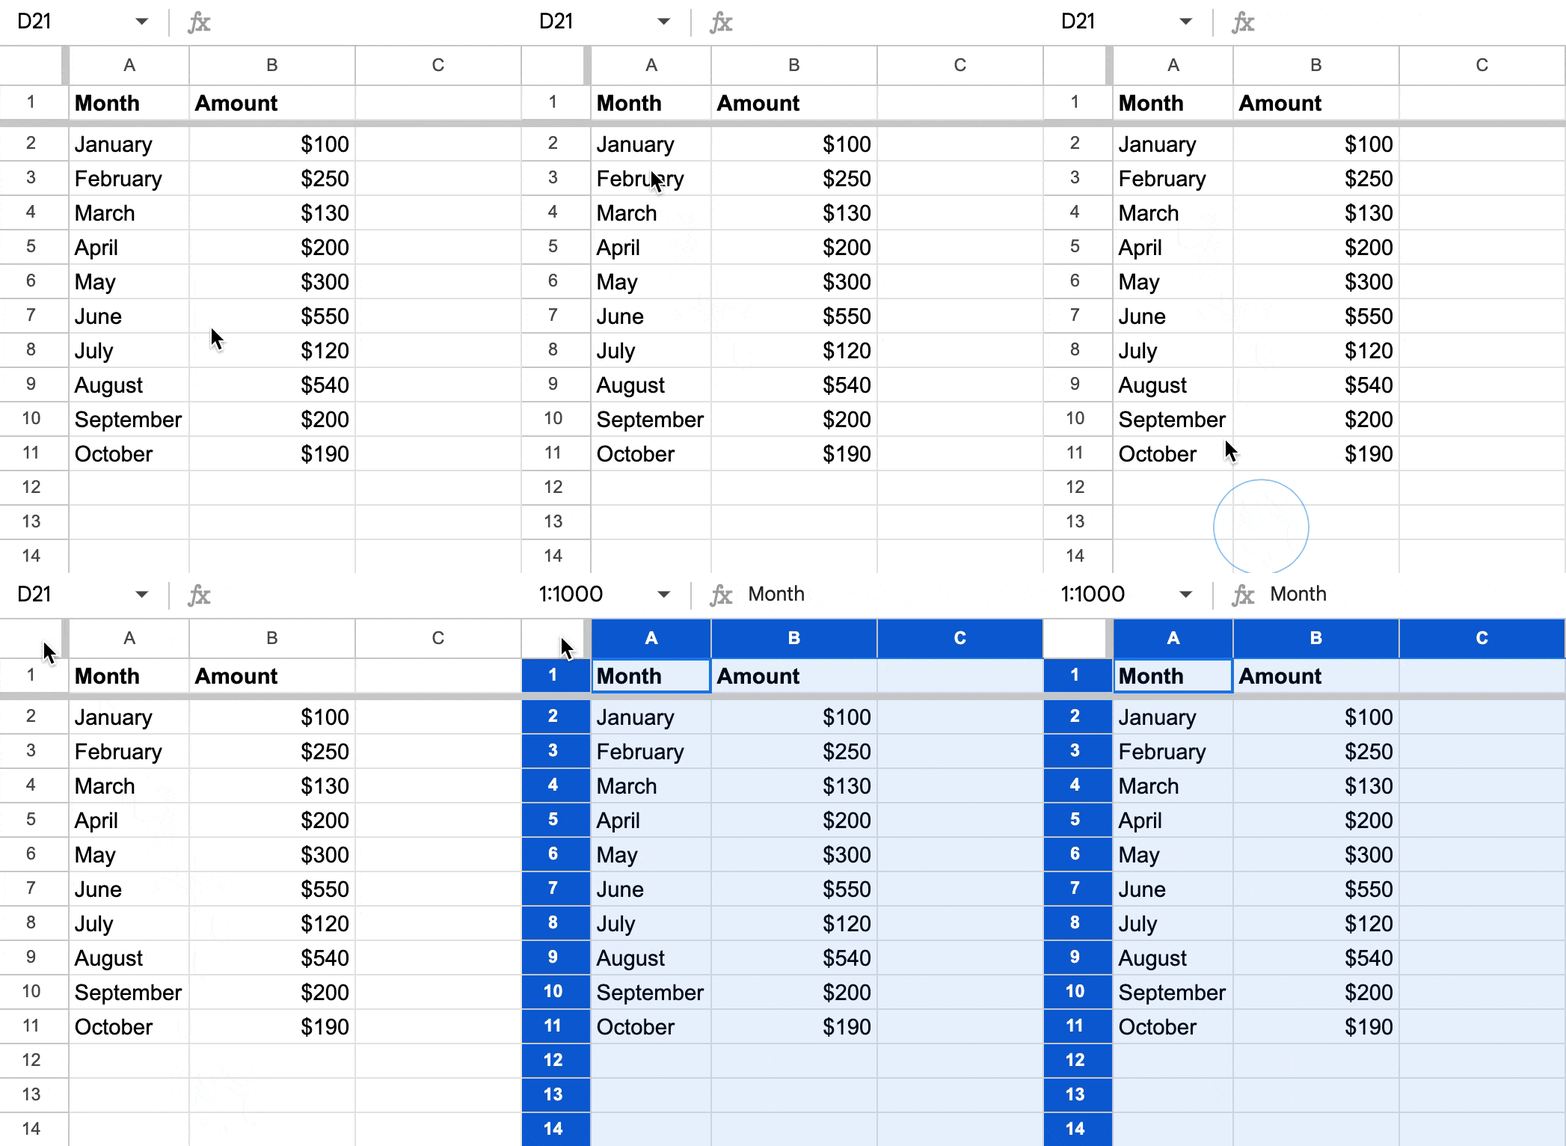
Click on the rectangle located at the top-left corner of your Google Sheets, right above row 1 and to the left of column A. This action selects all cells in the spreadsheet:
Adjust column width
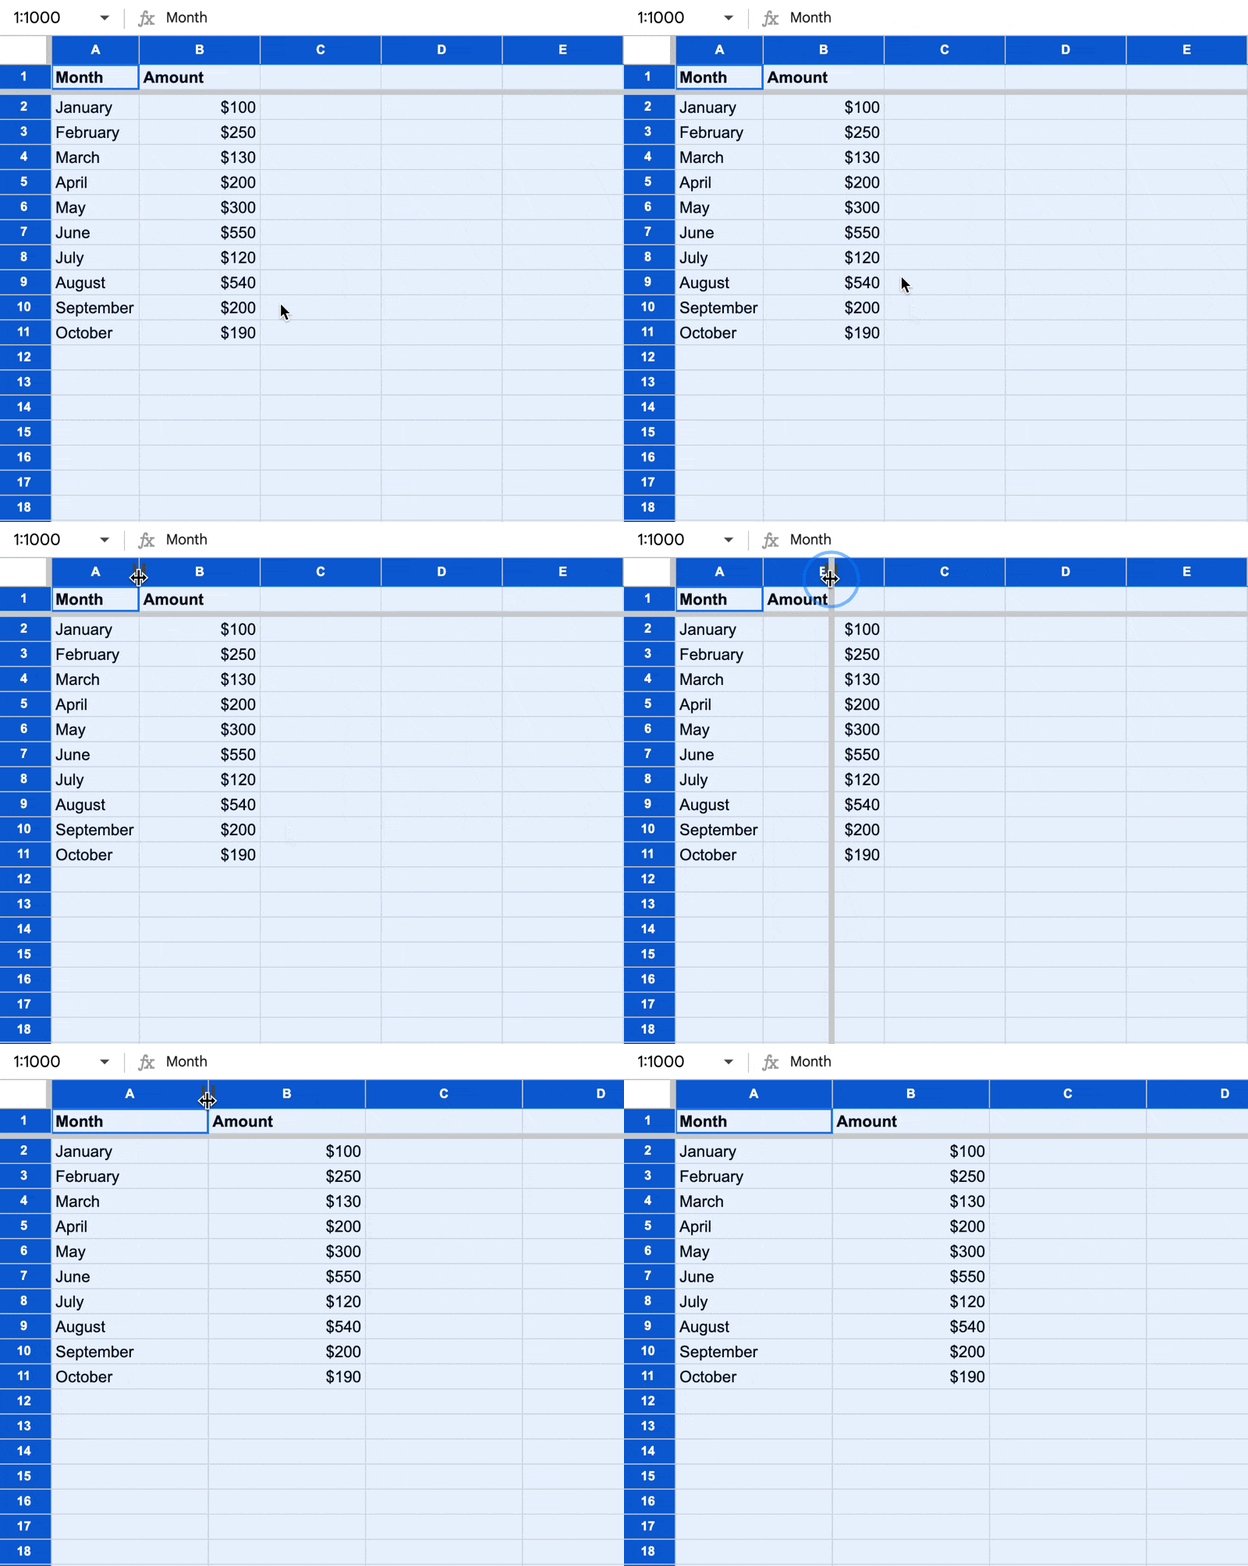
Position your cursor over the boundary line of any column header until it turns into a double-sided arrow. Drag to adjust the width. Since all columns are selected, the width you set for this column will apply to all columns in the sheet:
Changing the height of all rows
Select all rows: Like above, do the same initial step to select all cells by clicking on the top-left corner rectangle.
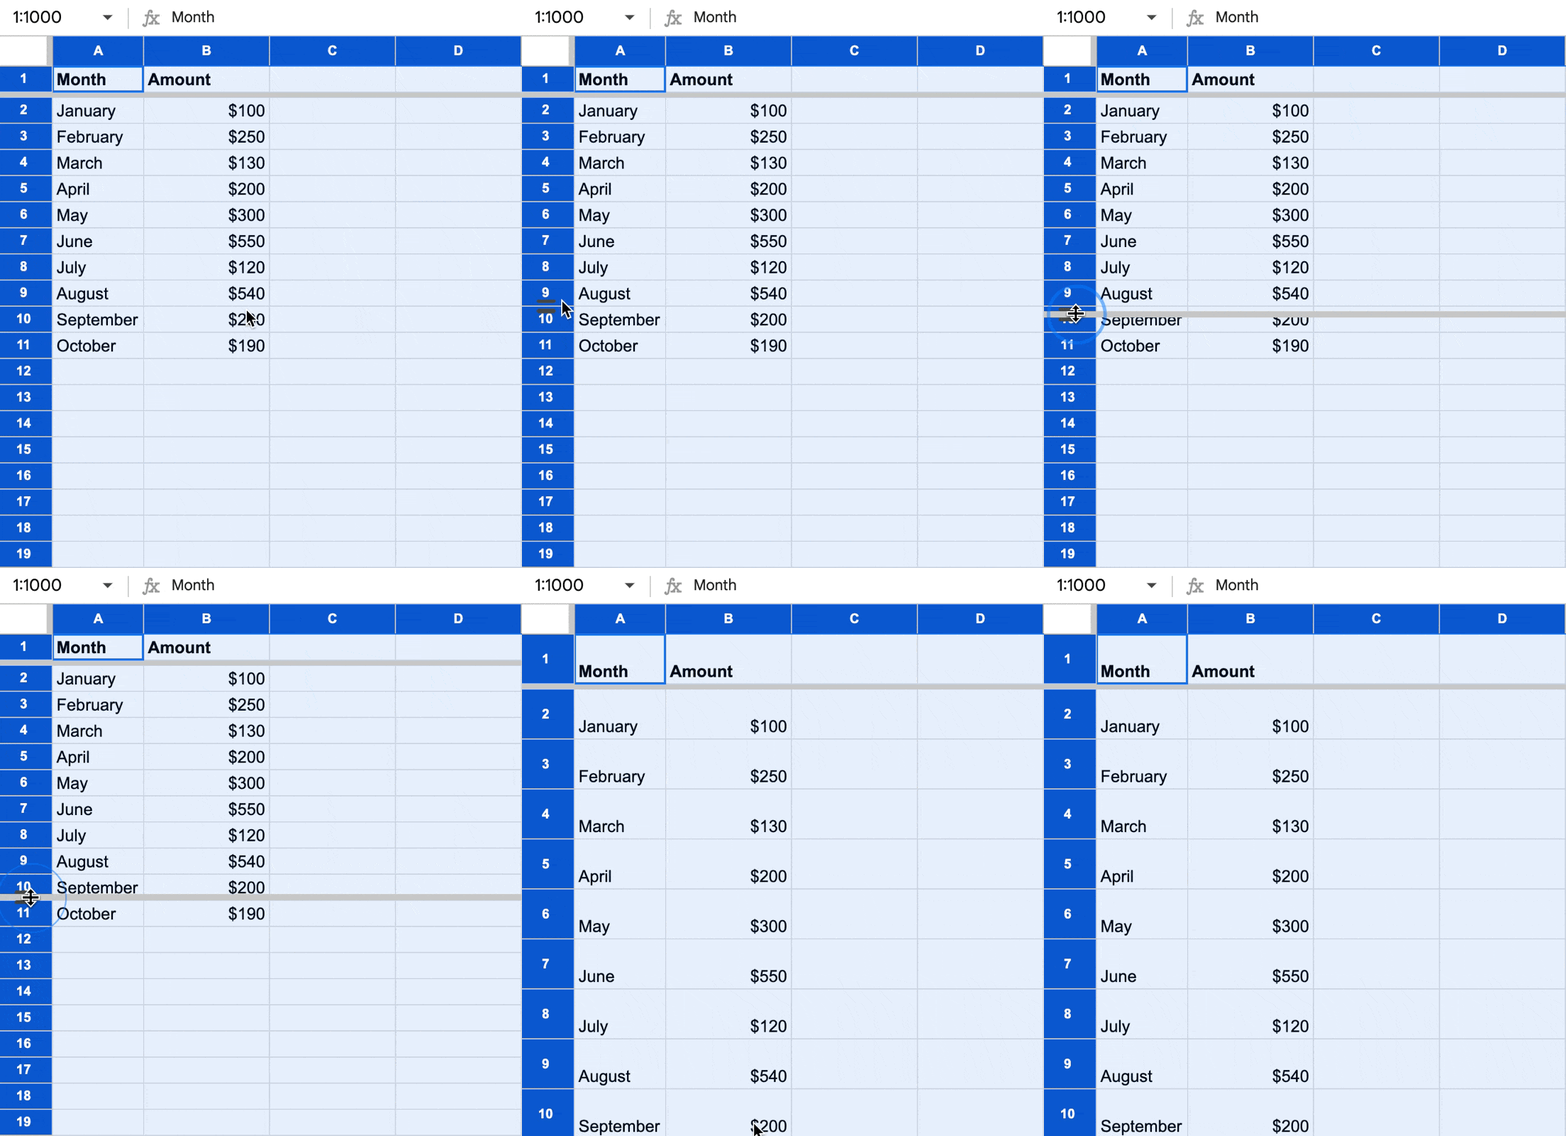
Adjust row height: Move your cursor to the boundary line of any row number until it changes to a double-sided arrow. Drag to adjust the height. This adjustment will affect the height of all rows in the spreadsheet:
Using the format menu for uniform sizing
Another way to uniformly adjust cell size across your entire spreadsheet is by using the Format menu:
Select all cells: Click the rectangle at the top-left corner to select all cells.
Open the format menu: Go to the menu bar at the top and click on "Format."
Set column width: Choose "Column width" from the drop-down menu, then enter a specific number for the desired width in pixels and click “OK.”
Set row height: Similarly, select "Row height" from the Format menu, enter the desired height in pixels, and confirm by clicking “OK.”
How to change multiple cell sizes in Google Sheets?
To change the size of multiple, but not all, cells in Google Sheets, you essentially adjust the widths of specific columns and the heights of specific rows that contain those cells. Since cells in a spreadsheet are bound by the row and column dimensions, you cannot change the size of individual cells independently of their row or column. Here's how to efficiently manage this:
How to change the width of multiple columns
Select multiple columns: Click on the first column header you want to adjust. Then, hold down the
Shiftkey and click on the last column header in your range. This action will select all the columns between and including your initial and final selections. Alternatively, you can use theCtrl(orCmdon Mac) key to select non-adjacent columns.Adjust column width: Hover your cursor over the boundary on the column header of one of the selected columns until it turns into a double-sided arrow. Click and drag to adjust the width. All selected columns will adjust to the same width.
How to change the height of multiple rows
Select multiple rows: Click on the row number for the first row you wish to adjust. Hold down the
Shiftkey and click on the last row number in your desired range. For non-adjacent rows, use theCtrl(orCmdon Mac) key while clicking on each row number you want to select.Adjust row height: Place your cursor over the boundary of one of the selected row numbers until it turns into a double-sided arrow. Click and drag to set a new height. The new height will be applied to all selected rows.
How to make precise adjustments
Automatic adjustment: For both rows and columns, you can double-click the boundary line after selecting multiple rows or columns. This will automatically resize each selected column or row to fit the content specifically within each column or row, independently of each other.
Uniform sizing using menu: To set a specific height or width for multiple rows or columns, first select them as described above. Then, go to the
Formatmenu, chooseRow heightorColumn width, and enter the desired dimension. This action will apply the specified size uniformly to all selected rows or columns.
How to change cell size in Google Sheets on iPad?
Adjusting cell sizes in Google Sheets on an iPad involves a touch interface, which slightly changes the process compared to using Google Sheets on a desktop with a mouse and keyboard. Here’s a step-by-step guide to help you change the size of cells—specifically the width of columns and the height of rows—using the Google Sheets app on an iPad:
How to adjust the column width in Google Sheets on iPad?
Open the Google Sheets app: Launch the Google Sheets app on your iPad. Open the spreadsheet where you want to adjust the column width.
Select the column: Tap on the letter at the top of the column whose width you want to change. This action selects the entire column.
Adjust the width: With the column selected, touch and hold the border of the column header. You’ll see this border at the right side of the column header. Once you've grabbed it, drag it left or right to decrease or increase the width of the column. Release when you're satisfied with the new width.
How to adjust row height in Google Sheets on iPad?
Open Google Sheets app: Make sure you’re in the correct spreadsheet.
Select the row: Tap on the number on the left side of the row you want to adjust.
Adjust the height: Press and hold the border at the bottom of the row header. Drag up or down to change the row height. Release your hold when you have set the desired height.
About the Author

Kris Lachance
Managing Editor
Kris is the Managing Editor of Spreadsheet Secrets. He is a finance professional, writer and entrepreneur based in Canada.

How to Change Cell Size in Google Sheets
Formatting
Apr 24, 2024
This guide covers everything you need to know about how to change the size of a cell in your Google Sheets spreadsheet.
Introduction to adjusting cell size in Google Sheets
Google Sheets helps you organize and present your data. One way it does this is the ability to adjust the size of cells. The main reason to do this is honestly just that it makes your spreadsheets look nicer. This guide will explain how to change cell sizes in Google Sheets, covering both width and height adjustments for rows and columns.
What is cell size adjustment in Google Sheets?
When working with data in Google Sheets, you might find that the default cell sizes don't perfectly fit your content. For instance, longer text entries may be clipped, or numerical data might look cramped. Adjusting the cell size lets you tailor the spreadsheet layout to better accommodate your data, making it more accessible and easier to analyze.
How to change column width in Google Sheets?
To change the width of a column in Google Sheets, first place your cursor on the line between two column headers (e.g., between columns A and B). Your cursor will transform into a double-sided arrow. Click and hold the line, then drag it left or right to decrease or increase the width of the column on the left. Release the mouse button once you're satisfied with the new width:

Alternatively, you can adjust column width to fit your content automatically. Double-click the boundary line between two column headers. Google Sheets will automatically resize the column on the left to accommodate the longest piece of data in that column:

How to adjust row height in Google Sheets?
Modifying the height of rows in Google Sheets is similar to adjusting column widths. Hover your cursor over the boundary line between two row numbers (e.g., between rows 1 and 2). When the cursor changes to a double-sided arrow, click and drag the line up or down to change the height of the row above it. This manual adjustment allows you to make precise modifications to row height, ensuring that all types of content, from text to images, fit neatly within the cell:

For automatic adjustment, double-click the boundary line between two row numbers. Google Sheets will expand or contract the row height based on the tallest content in that row:

How to change all cell size in Google Sheets?
To change the size of all cells in a Google Sheets document simultaneously, you can adjust the width of all columns and the height of all rows in one go. This is particularly useful if you want a uniform appearance for your entire spreadsheet.
Changing the width of all columns
Select all columns
Click on the rectangle located at the top-left corner of your Google Sheets, right above row 1 and to the left of column A. This action selects all cells in the spreadsheet:

Adjust column width
Position your cursor over the boundary line of any column header until it turns into a double-sided arrow. Drag to adjust the width. Since all columns are selected, the width you set for this column will apply to all columns in the sheet:

Changing the height of all rows
Select all rows: Like above, do the same initial step to select all cells by clicking on the top-left corner rectangle.
Adjust row height: Move your cursor to the boundary line of any row number until it changes to a double-sided arrow. Drag to adjust the height. This adjustment will affect the height of all rows in the spreadsheet:

Using the format menu for uniform sizing
Another way to uniformly adjust cell size across your entire spreadsheet is by using the Format menu:
Select all cells: Click the rectangle at the top-left corner to select all cells.
Open the format menu: Go to the menu bar at the top and click on "Format."
Set column width: Choose "Column width" from the drop-down menu, then enter a specific number for the desired width in pixels and click “OK.”
Set row height: Similarly, select "Row height" from the Format menu, enter the desired height in pixels, and confirm by clicking “OK.”
How to change multiple cell sizes in Google Sheets?
To change the size of multiple, but not all, cells in Google Sheets, you essentially adjust the widths of specific columns and the heights of specific rows that contain those cells. Since cells in a spreadsheet are bound by the row and column dimensions, you cannot change the size of individual cells independently of their row or column. Here's how to efficiently manage this:
How to change the width of multiple columns
Select multiple columns: Click on the first column header you want to adjust. Then, hold down the
Shiftkey and click on the last column header in your range. This action will select all the columns between and including your initial and final selections. Alternatively, you can use theCtrl(orCmdon Mac) key to select non-adjacent columns.Adjust column width: Hover your cursor over the boundary on the column header of one of the selected columns until it turns into a double-sided arrow. Click and drag to adjust the width. All selected columns will adjust to the same width.
How to change the height of multiple rows
Select multiple rows: Click on the row number for the first row you wish to adjust. Hold down the
Shiftkey and click on the last row number in your desired range. For non-adjacent rows, use theCtrl(orCmdon Mac) key while clicking on each row number you want to select.Adjust row height: Place your cursor over the boundary of one of the selected row numbers until it turns into a double-sided arrow. Click and drag to set a new height. The new height will be applied to all selected rows.
How to make precise adjustments
Automatic adjustment: For both rows and columns, you can double-click the boundary line after selecting multiple rows or columns. This will automatically resize each selected column or row to fit the content specifically within each column or row, independently of each other.
Uniform sizing using menu: To set a specific height or width for multiple rows or columns, first select them as described above. Then, go to the
Formatmenu, chooseRow heightorColumn width, and enter the desired dimension. This action will apply the specified size uniformly to all selected rows or columns.
How to change cell size in Google Sheets on iPad?
Adjusting cell sizes in Google Sheets on an iPad involves a touch interface, which slightly changes the process compared to using Google Sheets on a desktop with a mouse and keyboard. Here’s a step-by-step guide to help you change the size of cells—specifically the width of columns and the height of rows—using the Google Sheets app on an iPad:
How to adjust the column width in Google Sheets on iPad?
Open the Google Sheets app: Launch the Google Sheets app on your iPad. Open the spreadsheet where you want to adjust the column width.
Select the column: Tap on the letter at the top of the column whose width you want to change. This action selects the entire column.
Adjust the width: With the column selected, touch and hold the border of the column header. You’ll see this border at the right side of the column header. Once you've grabbed it, drag it left or right to decrease or increase the width of the column. Release when you're satisfied with the new width.
How to adjust row height in Google Sheets on iPad?
Open Google Sheets app: Make sure you’re in the correct spreadsheet.
Select the row: Tap on the number on the left side of the row you want to adjust.
Adjust the height: Press and hold the border at the bottom of the row header. Drag up or down to change the row height. Release your hold when you have set the desired height.
About the Author

Kris Lachance
Managing Editor
Kris is the Managing Editor of Spreadsheet Secrets. He is a finance professional, writer and entrepreneur based in Canada.

How to Change Cell Size in Google Sheets
Formatting
Apr 24, 2024
This guide covers everything you need to know about how to change the size of a cell in your Google Sheets spreadsheet.
Introduction to adjusting cell size in Google Sheets
Google Sheets helps you organize and present your data. One way it does this is the ability to adjust the size of cells. The main reason to do this is honestly just that it makes your spreadsheets look nicer. This guide will explain how to change cell sizes in Google Sheets, covering both width and height adjustments for rows and columns.
What is cell size adjustment in Google Sheets?
When working with data in Google Sheets, you might find that the default cell sizes don't perfectly fit your content. For instance, longer text entries may be clipped, or numerical data might look cramped. Adjusting the cell size lets you tailor the spreadsheet layout to better accommodate your data, making it more accessible and easier to analyze.
How to change column width in Google Sheets?
To change the width of a column in Google Sheets, first place your cursor on the line between two column headers (e.g., between columns A and B). Your cursor will transform into a double-sided arrow. Click and hold the line, then drag it left or right to decrease or increase the width of the column on the left. Release the mouse button once you're satisfied with the new width:

Alternatively, you can adjust column width to fit your content automatically. Double-click the boundary line between two column headers. Google Sheets will automatically resize the column on the left to accommodate the longest piece of data in that column:

How to adjust row height in Google Sheets?
Modifying the height of rows in Google Sheets is similar to adjusting column widths. Hover your cursor over the boundary line between two row numbers (e.g., between rows 1 and 2). When the cursor changes to a double-sided arrow, click and drag the line up or down to change the height of the row above it. This manual adjustment allows you to make precise modifications to row height, ensuring that all types of content, from text to images, fit neatly within the cell:

For automatic adjustment, double-click the boundary line between two row numbers. Google Sheets will expand or contract the row height based on the tallest content in that row:

How to change all cell size in Google Sheets?
To change the size of all cells in a Google Sheets document simultaneously, you can adjust the width of all columns and the height of all rows in one go. This is particularly useful if you want a uniform appearance for your entire spreadsheet.
Changing the width of all columns
Select all columns
Click on the rectangle located at the top-left corner of your Google Sheets, right above row 1 and to the left of column A. This action selects all cells in the spreadsheet:

Adjust column width
Position your cursor over the boundary line of any column header until it turns into a double-sided arrow. Drag to adjust the width. Since all columns are selected, the width you set for this column will apply to all columns in the sheet:

Changing the height of all rows
Select all rows: Like above, do the same initial step to select all cells by clicking on the top-left corner rectangle.
Adjust row height: Move your cursor to the boundary line of any row number until it changes to a double-sided arrow. Drag to adjust the height. This adjustment will affect the height of all rows in the spreadsheet:

Using the format menu for uniform sizing
Another way to uniformly adjust cell size across your entire spreadsheet is by using the Format menu:
Select all cells: Click the rectangle at the top-left corner to select all cells.
Open the format menu: Go to the menu bar at the top and click on "Format."
Set column width: Choose "Column width" from the drop-down menu, then enter a specific number for the desired width in pixels and click “OK.”
Set row height: Similarly, select "Row height" from the Format menu, enter the desired height in pixels, and confirm by clicking “OK.”
How to change multiple cell sizes in Google Sheets?
To change the size of multiple, but not all, cells in Google Sheets, you essentially adjust the widths of specific columns and the heights of specific rows that contain those cells. Since cells in a spreadsheet are bound by the row and column dimensions, you cannot change the size of individual cells independently of their row or column. Here's how to efficiently manage this:
How to change the width of multiple columns
Select multiple columns: Click on the first column header you want to adjust. Then, hold down the
Shiftkey and click on the last column header in your range. This action will select all the columns between and including your initial and final selections. Alternatively, you can use theCtrl(orCmdon Mac) key to select non-adjacent columns.Adjust column width: Hover your cursor over the boundary on the column header of one of the selected columns until it turns into a double-sided arrow. Click and drag to adjust the width. All selected columns will adjust to the same width.
How to change the height of multiple rows
Select multiple rows: Click on the row number for the first row you wish to adjust. Hold down the
Shiftkey and click on the last row number in your desired range. For non-adjacent rows, use theCtrl(orCmdon Mac) key while clicking on each row number you want to select.Adjust row height: Place your cursor over the boundary of one of the selected row numbers until it turns into a double-sided arrow. Click and drag to set a new height. The new height will be applied to all selected rows.
How to make precise adjustments
Automatic adjustment: For both rows and columns, you can double-click the boundary line after selecting multiple rows or columns. This will automatically resize each selected column or row to fit the content specifically within each column or row, independently of each other.
Uniform sizing using menu: To set a specific height or width for multiple rows or columns, first select them as described above. Then, go to the
Formatmenu, chooseRow heightorColumn width, and enter the desired dimension. This action will apply the specified size uniformly to all selected rows or columns.
How to change cell size in Google Sheets on iPad?
Adjusting cell sizes in Google Sheets on an iPad involves a touch interface, which slightly changes the process compared to using Google Sheets on a desktop with a mouse and keyboard. Here’s a step-by-step guide to help you change the size of cells—specifically the width of columns and the height of rows—using the Google Sheets app on an iPad:
How to adjust the column width in Google Sheets on iPad?
Open the Google Sheets app: Launch the Google Sheets app on your iPad. Open the spreadsheet where you want to adjust the column width.
Select the column: Tap on the letter at the top of the column whose width you want to change. This action selects the entire column.
Adjust the width: With the column selected, touch and hold the border of the column header. You’ll see this border at the right side of the column header. Once you've grabbed it, drag it left or right to decrease or increase the width of the column. Release when you're satisfied with the new width.
How to adjust row height in Google Sheets on iPad?
Open Google Sheets app: Make sure you’re in the correct spreadsheet.
Select the row: Tap on the number on the left side of the row you want to adjust.
Adjust the height: Press and hold the border at the bottom of the row header. Drag up or down to change the row height. Release your hold when you have set the desired height.
About the Author

Kris Lachance
Managing Editor
Kris is the Managing Editor of Spreadsheet Secrets. He is a finance professional, writer and entrepreneur based in Canada.
Spreadsheet Secrets
Helping you get better at all things spreadsheets. From learning functions to helpful tips and tricks. Microsoft Excel, Google Sheets, Apple Numbers, Office 365, whatever you use we can help you with.
Contact us here: ssheetsecrets@gmail.com
© 2024 Spreadsheet Secrets.
Spreadsheet Secrets
Helping you get better at all things spreadsheets. From learning functions to helpful tips and tricks. Microsoft Excel, Google Sheets, Apple Numbers, Office 365, whatever you use we can help you with.
Contact us here: ssheetsecrets@gmail.com
© 2024 Spreadsheet Secrets.
Spreadsheet Secrets
Helping you get better at all things spreadsheets. From learning functions to helpful tips and tricks. Microsoft Excel, Google Sheets, Apple Numbers, Office 365, whatever you use we can help you with.
Contact us here: ssheetsecrets@gmail.com
© 2024 Spreadsheet Secrets.
