How to Clear Cells in Google Sheets
Basics
May 11, 2024
Google Sheets is a versatile tool used by millions for data organization, analysis, and collaboration. At times, you might find yourself needing to clear out information from your sheets without deleting the cells themselves. This guide will walk you through the steps and options available for clearing cells in Google Sheets, ensuring you can do so efficiently and effectively.
How to Clear Data From Cells in Google Sheets
Clearing cells in Google Sheets is a straightforward process that can be accomplished in several ways, depending on what exactly you need to remove—whether it’s just the content, the formatting, or both. When you clear cells, you are essentially making them empty without altering the structure of the grid. This is particularly useful when you want to retain the cell’s borders, formulas, or any conditional formatting rules that have been applied.
To begin, open your Google Sheets document and locate the cells or range of cells that you want to clear. You can select a single cell, drag to select a range, or use the Shift or Ctrl keys to select multiple non-adjacent cells.
Once you’ve made your selection, click on the Edit button in the top menu:

Now, navigate down to the Delete submenu. You’ll see some options:
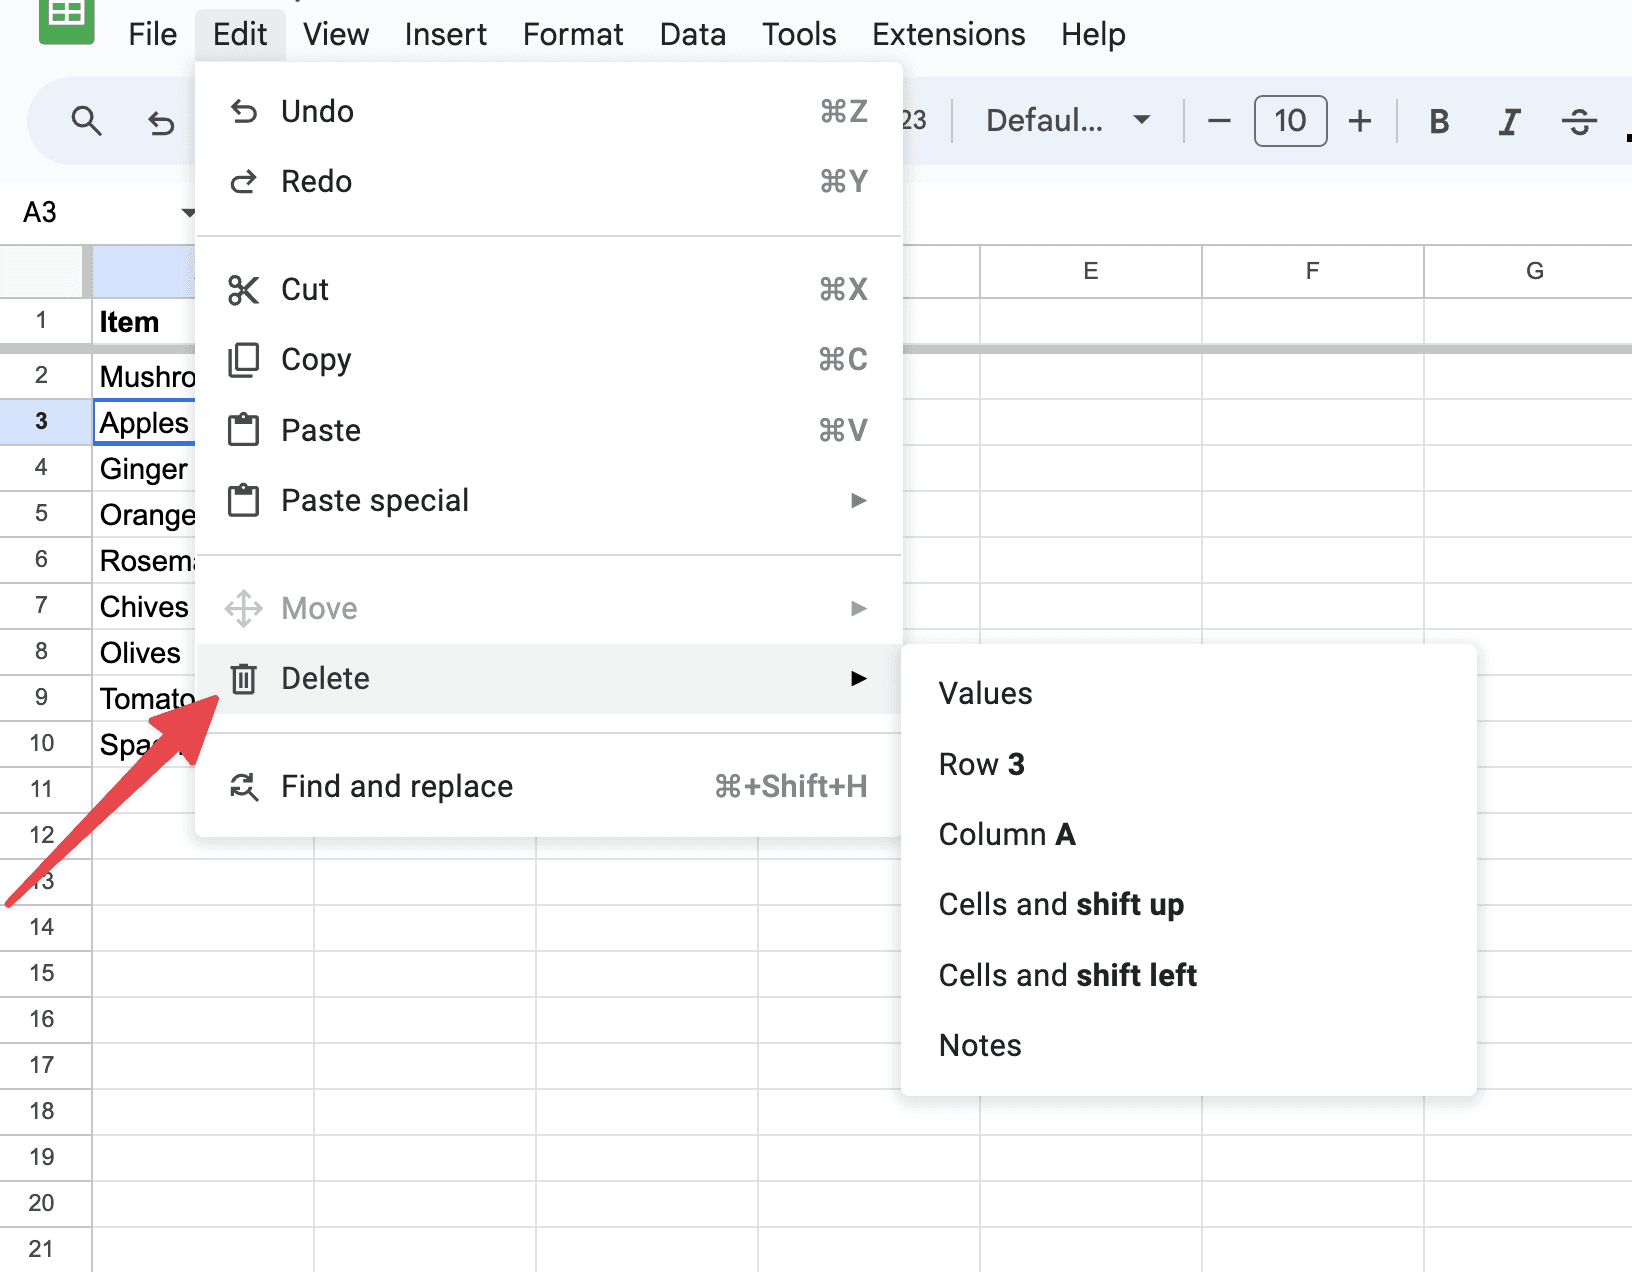
You can either delete the values in the cell, the row, the column or any notes in the cell.
Clearing the values will remove the cell's content such as numbers, text, or dates, but leaves any cell formatting and data validation rules intact.
If you need to delete everything, just delete the row or column in question. This is a comprehensive clean-up option that returns the cells to their default state.
How to Clear Cells Without Deleting a Formula
To clear cells in Google Sheets without deleting the formulas, you'll want to specifically remove only the content that is not part of a formula. You’ll do this with the “Delete values” option selected from the edit menu.
Using the “Delete values” option ensures that all formula configurations remain intact and only the values produced by or entered in those cells are removed. This is particularly useful in situations where you need to reset the output of the formulas without altering the formulas themselves.
This method ensures that your spreadsheet remains functional with all the formulas active, allowing you to continue calculations or data processing without interruption.
Practical Example
Clearing cells in Google Sheets is useful in various scenarios, particularly when managing data that frequently updates or needs reformatting. Here are a few examples of when you might find it necessary to clear cells:
Preparing Templates: If you frequently use the same spreadsheet structure for tasks like monthly reports, inventory updates, or financial tracking, you might create a template with predefined formulas, formatting, and data validation rules. Each time you start a new period, you can clear the old data while keeping the necessary formulas and formats intact, making the template ready for new data.
Resetting Forms or Surveys: When using Google Sheets to collect responses from forms or surveys, you might need to clear the previous responses to make room for new ones without disturbing the setup, such as formulas used for calculating totals or averages.
Data Entry Errors: If data entry errors occur, clearing specific cells can help correct these mistakes. For instance, if a column of data has been entered in the wrong format or contains incorrect information, you can clear the values without removing any conditional formatting or data validation that helps guide correct data entry.
Updating Information: In dynamic environments like sales or inventory management, data can change frequently. You might need to clear outdated information, such as old stock numbers or past sales figures, to update them with new, accurate data while retaining all underlying calculations and conditional formats.
Analyzing Different Scenarios: When performing financial analyses or projections, you might want to test various scenarios by changing the input values. Clearing cells allows you to easily reset the scenario inputs without affecting the formulae that perform the calculations.
Each of these examples demonstrates the practicality of being able to clear cells without removing the structural elements of the spreadsheet, ensuring the document remains functional and adaptable to ongoing changes.
Additional Tips and Shortcuts
For those who prefer using keyboard shortcuts, Google Sheets offers a quick way to clear content. Simply select the cells you want to clear and press Ctrl + \\\\ (on Windows) or Cmd + \\\\ (on Mac). This shortcut will immediately clear the contents of the selected cells.
Another practical tip involves the use of the undo function. If you accidentally clear something you didn’t intend to, you can quickly press Ctrl + Z (or Cmd + Z on a Mac) to restore the data. This makes clearing cells a less risky operation, especially when you're dealing with large amounts of data.
Making Sure Cells are Empty
After clearing the contents or formatting from cells in Google Sheets, it's important to ensure that the cells have been properly emptied or reset to your specifications. This verification step is essential to avoid any unintended data or formatting issues, especially before entering new data or sharing the document with others. Here's how you can confirm that your cells are indeed empty:
Visual Inspection:
For Values: The simplest way to check if the values have been cleared is through a visual inspection. After using the "Delete values" option from the "Edit" menu, the cells should appear empty, without any visible data. For cells with formulas, ensure that the formulas are still present in the formula bar when the cell is selected but that their output, if any, is as expected (e.g., errors or blanks if dependent on cleared cells).
For Formatting: If you have cleared formatting, visually inspect the cells to see that all formatting (such as background color, text styles, and borders) has been removed and reverted to the default. Cells should look uniform with the rest of the spreadsheet that has not been formatted.
Check Cell Content Using the Formula Bar:
To further verify that data or formulas have been cleared or retained as intended, click on a cell and look at the formula bar at the top of the Google Sheets interface. This area displays the contents or formulas contained within a cell. After clearing, it should show nothing if you’ve removed values, or display the formula if only values were deleted.
Use the “Find and Replace” Feature:
If you need to verify that specific data is no longer present across a large range or entire sheet, use the "Find and replace" feature found under the "Edit" menu. Enter the data you previously cleared, and make sure the search returns no results, confirming that the cells no longer contain those values.
Testing Formulas:
For sheets where formulas are involved, test the functionality of these formulas by inputting new data that they should react to. This is a practical way to ensure that while the data was removed, the formulas are still active and correctly set up to handle new inputs.
Review Conditional Formatting and Data Validation:
If your cells had conditional formatting or data validation rules applied, verify that these are still functioning correctly. Conditional formatting should not trigger if its conditions are no longer met, and data validation should prompt correctly according to the existing rules.
By following these steps to verify that cells have been correctly cleared, you can proceed with confidence, knowing that your spreadsheet is accurately prepared for further use. This is crucial in maintaining the integrity and usefulness of your data management in Google Sheets.
TLDR
Clearing cells in Google Sheets can be a simple and effective way to organize and prepare your spreadsheets for new data. Whether you need to remove just the text, the formatting, or everything from a cell, Google Sheets provides you with the flexibility to do so without disrupting the overall layout of your document. With these tips and steps, you can manage your sheets more effectively, ensuring that your data is presented clearly and precisely.
About the Author

Kris Lachance
Managing Editor
Kris is the Managing Editor of Spreadsheet Secrets. He is a finance professional, writer and entrepreneur based in Canada.
How to Clear Cells in Google Sheets
Basics
May 11, 2024
Google Sheets is a versatile tool used by millions for data organization, analysis, and collaboration. At times, you might find yourself needing to clear out information from your sheets without deleting the cells themselves. This guide will walk you through the steps and options available for clearing cells in Google Sheets, ensuring you can do so efficiently and effectively.
How to Clear Data From Cells in Google Sheets
Clearing cells in Google Sheets is a straightforward process that can be accomplished in several ways, depending on what exactly you need to remove—whether it’s just the content, the formatting, or both. When you clear cells, you are essentially making them empty without altering the structure of the grid. This is particularly useful when you want to retain the cell’s borders, formulas, or any conditional formatting rules that have been applied.
To begin, open your Google Sheets document and locate the cells or range of cells that you want to clear. You can select a single cell, drag to select a range, or use the Shift or Ctrl keys to select multiple non-adjacent cells.
Once you’ve made your selection, click on the Edit button in the top menu:
Now, navigate down to the Delete submenu. You’ll see some options:
You can either delete the values in the cell, the row, the column or any notes in the cell.
Clearing the values will remove the cell's content such as numbers, text, or dates, but leaves any cell formatting and data validation rules intact.
If you need to delete everything, just delete the row or column in question. This is a comprehensive clean-up option that returns the cells to their default state.
How to Clear Cells Without Deleting a Formula
To clear cells in Google Sheets without deleting the formulas, you'll want to specifically remove only the content that is not part of a formula. You’ll do this with the “Delete values” option selected from the edit menu.
Using the “Delete values” option ensures that all formula configurations remain intact and only the values produced by or entered in those cells are removed. This is particularly useful in situations where you need to reset the output of the formulas without altering the formulas themselves.
This method ensures that your spreadsheet remains functional with all the formulas active, allowing you to continue calculations or data processing without interruption.
Practical Example
Clearing cells in Google Sheets is useful in various scenarios, particularly when managing data that frequently updates or needs reformatting. Here are a few examples of when you might find it necessary to clear cells:
Preparing Templates: If you frequently use the same spreadsheet structure for tasks like monthly reports, inventory updates, or financial tracking, you might create a template with predefined formulas, formatting, and data validation rules. Each time you start a new period, you can clear the old data while keeping the necessary formulas and formats intact, making the template ready for new data.
Resetting Forms or Surveys: When using Google Sheets to collect responses from forms or surveys, you might need to clear the previous responses to make room for new ones without disturbing the setup, such as formulas used for calculating totals or averages.
Data Entry Errors: If data entry errors occur, clearing specific cells can help correct these mistakes. For instance, if a column of data has been entered in the wrong format or contains incorrect information, you can clear the values without removing any conditional formatting or data validation that helps guide correct data entry.
Updating Information: In dynamic environments like sales or inventory management, data can change frequently. You might need to clear outdated information, such as old stock numbers or past sales figures, to update them with new, accurate data while retaining all underlying calculations and conditional formats.
Analyzing Different Scenarios: When performing financial analyses or projections, you might want to test various scenarios by changing the input values. Clearing cells allows you to easily reset the scenario inputs without affecting the formulae that perform the calculations.
Each of these examples demonstrates the practicality of being able to clear cells without removing the structural elements of the spreadsheet, ensuring the document remains functional and adaptable to ongoing changes.
Additional Tips and Shortcuts
For those who prefer using keyboard shortcuts, Google Sheets offers a quick way to clear content. Simply select the cells you want to clear and press Ctrl + \\\\ (on Windows) or Cmd + \\\\ (on Mac). This shortcut will immediately clear the contents of the selected cells.
Another practical tip involves the use of the undo function. If you accidentally clear something you didn’t intend to, you can quickly press Ctrl + Z (or Cmd + Z on a Mac) to restore the data. This makes clearing cells a less risky operation, especially when you're dealing with large amounts of data.
Making Sure Cells are Empty
After clearing the contents or formatting from cells in Google Sheets, it's important to ensure that the cells have been properly emptied or reset to your specifications. This verification step is essential to avoid any unintended data or formatting issues, especially before entering new data or sharing the document with others. Here's how you can confirm that your cells are indeed empty:
Visual Inspection:
For Values: The simplest way to check if the values have been cleared is through a visual inspection. After using the "Delete values" option from the "Edit" menu, the cells should appear empty, without any visible data. For cells with formulas, ensure that the formulas are still present in the formula bar when the cell is selected but that their output, if any, is as expected (e.g., errors or blanks if dependent on cleared cells).
For Formatting: If you have cleared formatting, visually inspect the cells to see that all formatting (such as background color, text styles, and borders) has been removed and reverted to the default. Cells should look uniform with the rest of the spreadsheet that has not been formatted.
Check Cell Content Using the Formula Bar:
To further verify that data or formulas have been cleared or retained as intended, click on a cell and look at the formula bar at the top of the Google Sheets interface. This area displays the contents or formulas contained within a cell. After clearing, it should show nothing if you’ve removed values, or display the formula if only values were deleted.
Use the “Find and Replace” Feature:
If you need to verify that specific data is no longer present across a large range or entire sheet, use the "Find and replace" feature found under the "Edit" menu. Enter the data you previously cleared, and make sure the search returns no results, confirming that the cells no longer contain those values.
Testing Formulas:
For sheets where formulas are involved, test the functionality of these formulas by inputting new data that they should react to. This is a practical way to ensure that while the data was removed, the formulas are still active and correctly set up to handle new inputs.
Review Conditional Formatting and Data Validation:
If your cells had conditional formatting or data validation rules applied, verify that these are still functioning correctly. Conditional formatting should not trigger if its conditions are no longer met, and data validation should prompt correctly according to the existing rules.
By following these steps to verify that cells have been correctly cleared, you can proceed with confidence, knowing that your spreadsheet is accurately prepared for further use. This is crucial in maintaining the integrity and usefulness of your data management in Google Sheets.
TLDR
Clearing cells in Google Sheets can be a simple and effective way to organize and prepare your spreadsheets for new data. Whether you need to remove just the text, the formatting, or everything from a cell, Google Sheets provides you with the flexibility to do so without disrupting the overall layout of your document. With these tips and steps, you can manage your sheets more effectively, ensuring that your data is presented clearly and precisely.
About the Author
Kris Lachance
Managing Editor
Kris is the Managing Editor of Spreadsheet Secrets. He is a finance professional, writer and entrepreneur based in Canada.

Spreadsheet Secrets
Helping you get better at all things spreadsheets. From learning functions to helpful tips and tricks. Microsoft Excel, Google Sheets, Apple Numbers, Office 365, whatever you use we can help you with.
Contact us here: ssheetsecrets@gmail.com
© 2024 Spreadsheet Secrets.
Spreadsheet Secrets
Helping you get better at all things spreadsheets. From learning functions to helpful tips and tricks. Microsoft Excel, Google Sheets, Apple Numbers, Office 365, whatever you use we can help you with.
Contact us here: ssheetsecrets@gmail.com
© 2024 Spreadsheet Secrets.
Spreadsheet Secrets
Helping you get better at all things spreadsheets. From learning functions to helpful tips and tricks. Microsoft Excel, Google Sheets, Apple Numbers, Office 365, whatever you use we can help you with.
Contact us here: ssheetsecrets@gmail.com
© 2024 Spreadsheet Secrets.