How to Delete Empty Rows in Google Sheets
Tips & Tricks
May 10, 2024
When managing data in Google Sheets, it's common to encounter empty rows that can disrupt your data analysis or presentation. Removing these empty rows not only tidies up your sheets but also ensures the accuracy of any operations or functions you might apply. In this guide, we'll walk through detailed steps to efficiently delete empty rows in your Google Sheets, enhancing both the usability and appearance of your data.
How to Remove Empty Rows in Google Sheets
Before you can delete empty rows, you must first identify them. Google Sheets does not have a built-in tool that specifically flags empty rows, so you will need to use a combination of manual observation and functions to locate them. A practical approach is to click on each column header to sort the data alphabetically or numerically:
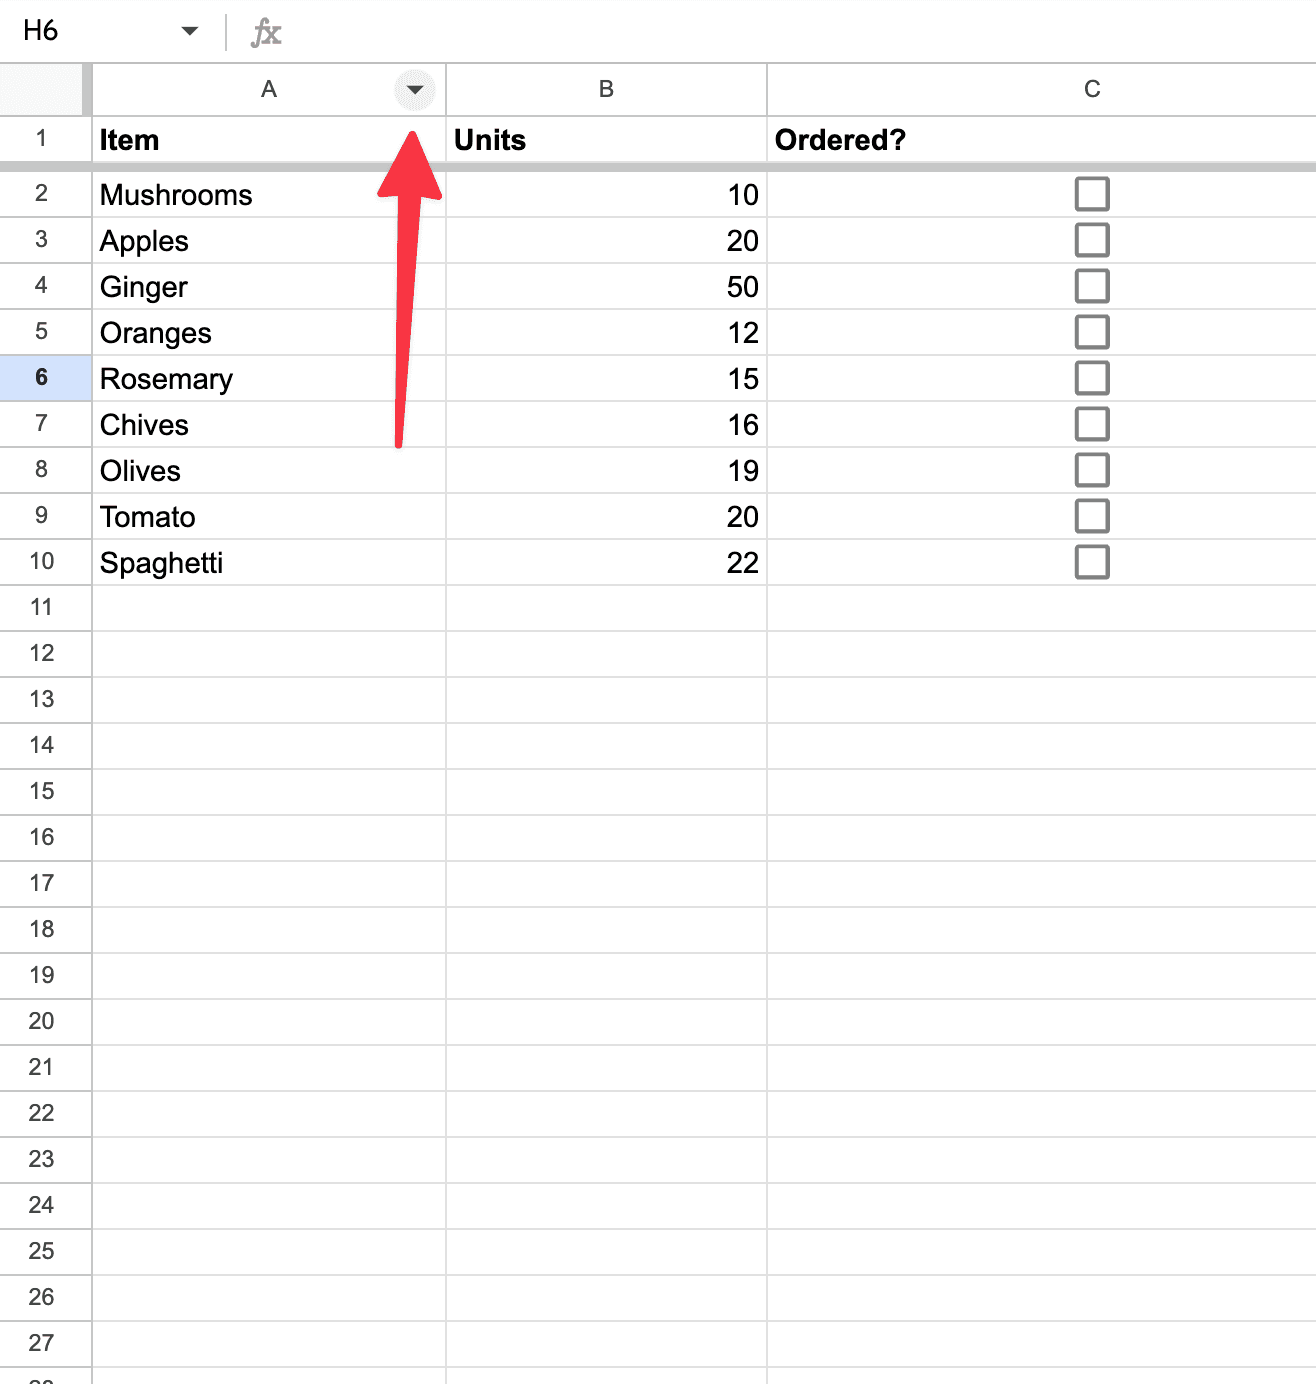
This method brings all the empty cells to the top or bottom of the spreadsheet, making them easier to identify.
Using Google Sheets Functions to Detect Empty Rows
For a more automated approach, you can use the Google Sheets function ISBLANK(). This function checks whether a cell is empty. However, to check an entire row, you need to combine it with other functions like ARRAYFORMULA(). Here’s how you can do it:
Add a new column to your sheet; this will be used to identify empty rows.
In the first cell of the new column, enter the formula:
=ARRAYFORMULA(IF(COUNTA(A2:Z2)=0, "Empty", "Not Empty")). ReplaceA2:Z2with the range that corresponds to your row width.Drag the fill handle down to copy this formula to other cells in the column.
This formula counts the number of non-empty cells in each row. If a row has no non-empty cells, it will be labeled as "Empty."
Deleting the Rows
Once you've identified the empty rows using either the sorting method or the formula, the next step is to delete them.
First, click on the row number of the first empty row to select it:
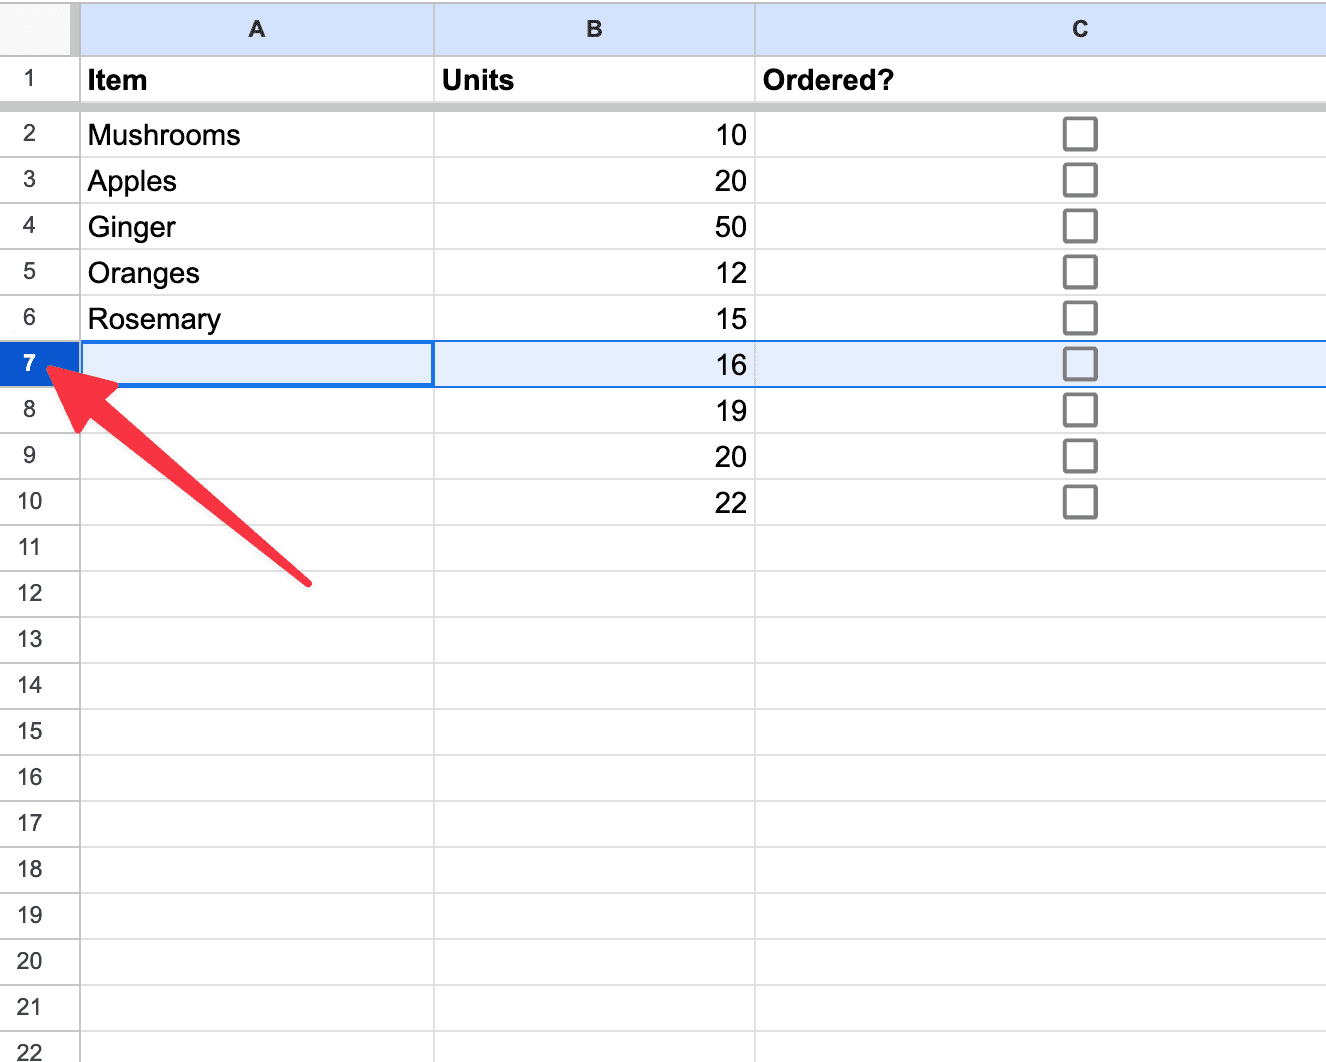
Then, press and hold the Shift key and click on the row number of the last empty row in the sequence. This action selects all the empty rows in between.
Lastly, right-click on one of the selected row numbers and choose "Delete rows." This will remove all selected rows simultaneously.
How to Automatically Delete Empty Rows
If you find yourself frequently needing to delete empty rows, you can automate this process using Google Apps Script. Here's a simple script to get you started:
function deleteEmptyRows() { var sheet = SpreadsheetApp.getActiveSpreadsheet().getActiveSheet(); var range = sheet.getDataRange(); var values = range.getValues(); var rowsToDelete = []; for (var i = values.length - 1; i >= 0; i--) { if (values[i].join("") == "") { rowsToDelete.push(i+1); } } for (var j = 0; j < rowsToDelete.length; j++) { sheet.deleteRow(rowsToDelete[j]); } }
This script examines each row in the active sheet and checks if it's entirely empty. If so, it adds the row to a list of rows to delete. Because deleting rows one by one can be slow, especially in large datasets, this script compiles all empty rows first and then deletes them, starting from the bottom of the sheet to avoid indexing issues.
Real-World Example
Imagine you have a Google Sheets document containing sales data collected from different regions. This sheet includes columns for the date, region, product, quantity sold, and revenue. However, due to irregular data entries and deletions, there are several empty rows scattered throughout the sheet. These empty rows can cause issues when sorting, filtering, or applying formulas. Therefore, it’s essential to remove them to ensure data integrity.
Is it Hard to Do?
No, deleting empty rows in Google Sheets is not particularly hard, especially if you follow the steps outlined and use the available functions and tools effectively. For most users, even those with only basic familiarity with Google Sheets, the process is straightforward. Just read above to get a sense of what it requires!
Why Is This Important?
Removing empty rows in Google Sheets is an important task for several reasons, all of which contribute to more effective data management and analysis:
Enhances Data Accuracy
Empty rows can interfere with the accuracy of your data analyses and calculations. For example, if you're using functions like SUM, AVERAGE, or COUNT, having empty rows can lead to incorrect results or errors because some functions may interpret these rows differently depending on their settings. Ensuring that your data set is free from empty or null values allows these functions to operate correctly.
Improves Visual Presentation
For both viewing and presenting data, a clean spreadsheet without empty rows looks more professional and is easier to read. Empty rows can be distracting and can make it hard to accurately interpret data trends at a glance. Removing them helps provide a clearer visual representation of the data, which is particularly important in a business or presentation setting.
Streamlines Data Processing
When working with large datasets or preparing data for export to other software or databases, having a compact, clean dataset can reduce processing time and minimize potential errors during data transfer. For instance, if data is being exported from Google Sheets to a CRM or an ERP system, having concise and clean data ensures smoother and more reliable integration.
Facilitates Easier Sorting and Filtering
Sorting and filtering are common functions used in data analysis to organize or find specific data within a spreadsheet. Empty rows can disrupt these processes, leading to incomplete sorting or incorrectly displayed data. By removing empty rows, you ensure that these tools work as efficiently as possible, giving you accurate and relevant results.
Prevents Misinterpretation
In any analysis, the integrity of the data is crucial. Empty rows could be misinterpreted as incomplete data entries, missing data, or even as errors in data collection or entry. Cleaning up your spreadsheet avoids these potential misunderstandings, ensuring that the dataset you or others are working with is understood to be complete and accurate.
Saves Time
Ultimately, removing empty rows saves time during the data management and analysis process. When spreadsheets are kept tidy and without unnecessary blank spaces, navigating and modifying them becomes much quicker and easier, which is especially beneficial when dealing with large amounts of data.
By maintaining regular upkeep of your data, including the removal of empty rows, you help ensure that your Google Sheets remain a robust and reliable tool for whatever data tasks you may need.
In Summary
Maintaining clean data is crucial for any data analysis or reporting task. Deleting empty rows in Google Sheets can significantly contribute to the integrity and clarity of your data. Whether you choose to manually identify and remove these rows or automate the process with scripts, the steps provided above will help you manage your data more effectively and efficiently. Keep your Google Sheets organized and functional by regularly purging unnecessary blank rows.
About the Author

Kris Lachance
Managing Editor
Kris is the Managing Editor of Spreadsheet Secrets. He is a finance professional, writer and entrepreneur based in Canada.
How to Delete Empty Rows in Google Sheets
Tips & Tricks
May 10, 2024
When managing data in Google Sheets, it's common to encounter empty rows that can disrupt your data analysis or presentation. Removing these empty rows not only tidies up your sheets but also ensures the accuracy of any operations or functions you might apply. In this guide, we'll walk through detailed steps to efficiently delete empty rows in your Google Sheets, enhancing both the usability and appearance of your data.
How to Remove Empty Rows in Google Sheets
Before you can delete empty rows, you must first identify them. Google Sheets does not have a built-in tool that specifically flags empty rows, so you will need to use a combination of manual observation and functions to locate them. A practical approach is to click on each column header to sort the data alphabetically or numerically:
This method brings all the empty cells to the top or bottom of the spreadsheet, making them easier to identify.
Using Google Sheets Functions to Detect Empty Rows
For a more automated approach, you can use the Google Sheets function ISBLANK(). This function checks whether a cell is empty. However, to check an entire row, you need to combine it with other functions like ARRAYFORMULA(). Here’s how you can do it:
Add a new column to your sheet; this will be used to identify empty rows.
In the first cell of the new column, enter the formula:
=ARRAYFORMULA(IF(COUNTA(A2:Z2)=0, "Empty", "Not Empty")). ReplaceA2:Z2with the range that corresponds to your row width.Drag the fill handle down to copy this formula to other cells in the column.
This formula counts the number of non-empty cells in each row. If a row has no non-empty cells, it will be labeled as "Empty."
Deleting the Rows
Once you've identified the empty rows using either the sorting method or the formula, the next step is to delete them.
First, click on the row number of the first empty row to select it:
Then, press and hold the Shift key and click on the row number of the last empty row in the sequence. This action selects all the empty rows in between.
Lastly, right-click on one of the selected row numbers and choose "Delete rows." This will remove all selected rows simultaneously.
How to Automatically Delete Empty Rows
If you find yourself frequently needing to delete empty rows, you can automate this process using Google Apps Script. Here's a simple script to get you started:
function deleteEmptyRows() { var sheet = SpreadsheetApp.getActiveSpreadsheet().getActiveSheet(); var range = sheet.getDataRange(); var values = range.getValues(); var rowsToDelete = []; for (var i = values.length - 1; i >= 0; i--) { if (values[i].join("") == "") { rowsToDelete.push(i+1); } } for (var j = 0; j < rowsToDelete.length; j++) { sheet.deleteRow(rowsToDelete[j]); } }
This script examines each row in the active sheet and checks if it's entirely empty. If so, it adds the row to a list of rows to delete. Because deleting rows one by one can be slow, especially in large datasets, this script compiles all empty rows first and then deletes them, starting from the bottom of the sheet to avoid indexing issues.
Real-World Example
Imagine you have a Google Sheets document containing sales data collected from different regions. This sheet includes columns for the date, region, product, quantity sold, and revenue. However, due to irregular data entries and deletions, there are several empty rows scattered throughout the sheet. These empty rows can cause issues when sorting, filtering, or applying formulas. Therefore, it’s essential to remove them to ensure data integrity.
Is it Hard to Do?
No, deleting empty rows in Google Sheets is not particularly hard, especially if you follow the steps outlined and use the available functions and tools effectively. For most users, even those with only basic familiarity with Google Sheets, the process is straightforward. Just read above to get a sense of what it requires!
Why Is This Important?
Removing empty rows in Google Sheets is an important task for several reasons, all of which contribute to more effective data management and analysis:
Enhances Data Accuracy
Empty rows can interfere with the accuracy of your data analyses and calculations. For example, if you're using functions like SUM, AVERAGE, or COUNT, having empty rows can lead to incorrect results or errors because some functions may interpret these rows differently depending on their settings. Ensuring that your data set is free from empty or null values allows these functions to operate correctly.
Improves Visual Presentation
For both viewing and presenting data, a clean spreadsheet without empty rows looks more professional and is easier to read. Empty rows can be distracting and can make it hard to accurately interpret data trends at a glance. Removing them helps provide a clearer visual representation of the data, which is particularly important in a business or presentation setting.
Streamlines Data Processing
When working with large datasets or preparing data for export to other software or databases, having a compact, clean dataset can reduce processing time and minimize potential errors during data transfer. For instance, if data is being exported from Google Sheets to a CRM or an ERP system, having concise and clean data ensures smoother and more reliable integration.
Facilitates Easier Sorting and Filtering
Sorting and filtering are common functions used in data analysis to organize or find specific data within a spreadsheet. Empty rows can disrupt these processes, leading to incomplete sorting or incorrectly displayed data. By removing empty rows, you ensure that these tools work as efficiently as possible, giving you accurate and relevant results.
Prevents Misinterpretation
In any analysis, the integrity of the data is crucial. Empty rows could be misinterpreted as incomplete data entries, missing data, or even as errors in data collection or entry. Cleaning up your spreadsheet avoids these potential misunderstandings, ensuring that the dataset you or others are working with is understood to be complete and accurate.
Saves Time
Ultimately, removing empty rows saves time during the data management and analysis process. When spreadsheets are kept tidy and without unnecessary blank spaces, navigating and modifying them becomes much quicker and easier, which is especially beneficial when dealing with large amounts of data.
By maintaining regular upkeep of your data, including the removal of empty rows, you help ensure that your Google Sheets remain a robust and reliable tool for whatever data tasks you may need.
In Summary
Maintaining clean data is crucial for any data analysis or reporting task. Deleting empty rows in Google Sheets can significantly contribute to the integrity and clarity of your data. Whether you choose to manually identify and remove these rows or automate the process with scripts, the steps provided above will help you manage your data more effectively and efficiently. Keep your Google Sheets organized and functional by regularly purging unnecessary blank rows.
About the Author
Kris Lachance
Managing Editor
Kris is the Managing Editor of Spreadsheet Secrets. He is a finance professional, writer and entrepreneur based in Canada.

Spreadsheet Secrets
Helping you get better at all things spreadsheets. From learning functions to helpful tips and tricks. Microsoft Excel, Google Sheets, Apple Numbers, Office 365, whatever you use we can help you with.
Contact us here: ssheetsecrets@gmail.com
© 2024 Spreadsheet Secrets.
Spreadsheet Secrets
Helping you get better at all things spreadsheets. From learning functions to helpful tips and tricks. Microsoft Excel, Google Sheets, Apple Numbers, Office 365, whatever you use we can help you with.
Contact us here: ssheetsecrets@gmail.com
© 2024 Spreadsheet Secrets.
Spreadsheet Secrets
Helping you get better at all things spreadsheets. From learning functions to helpful tips and tricks. Microsoft Excel, Google Sheets, Apple Numbers, Office 365, whatever you use we can help you with.
Contact us here: ssheetsecrets@gmail.com
© 2024 Spreadsheet Secrets.