How to Add Borders in Google Sheets: A Guide
Formatting
May 4, 2024
Spreadsheets are usually more about function than about form but let’s be honest… we want them to look pretty. That often means adding stuff like borders to your Google Sheets spreadsheet. This guide walks you through how to do exactly that.
So, how to add borders to cells in Google Sheets? Keep reading to find out.
What are borders in Google Sheets?
Adding borders in Google Sheets is a fundamental skill that can greatly enhance the readability and visual appeal of your spreadsheets. Borders define the edges of cells, making the structure of the spreadsheet more apparent. This organization is particularly important in complex spreadsheets where data is densely packed. Borders help in distinguishing individual cells, rows, and columns, preventing data from appearing jumbled.
Whether you're organizing data, preparing a report, or creating a schedule, understanding how to effectively use borders can make your work more presentable and easier to understand. In this guide, we'll walk through the process of adding, customizing, and utilizing borders in Google Sheets to elevate your spreadsheet game.
How to add borders in Google Sheets?
When you first open Google Sheets and begin your work, you'll notice that cells typically don’t have distinct borders. This default setting provides a clean slate but can make distinguishing between different data sets challenging.
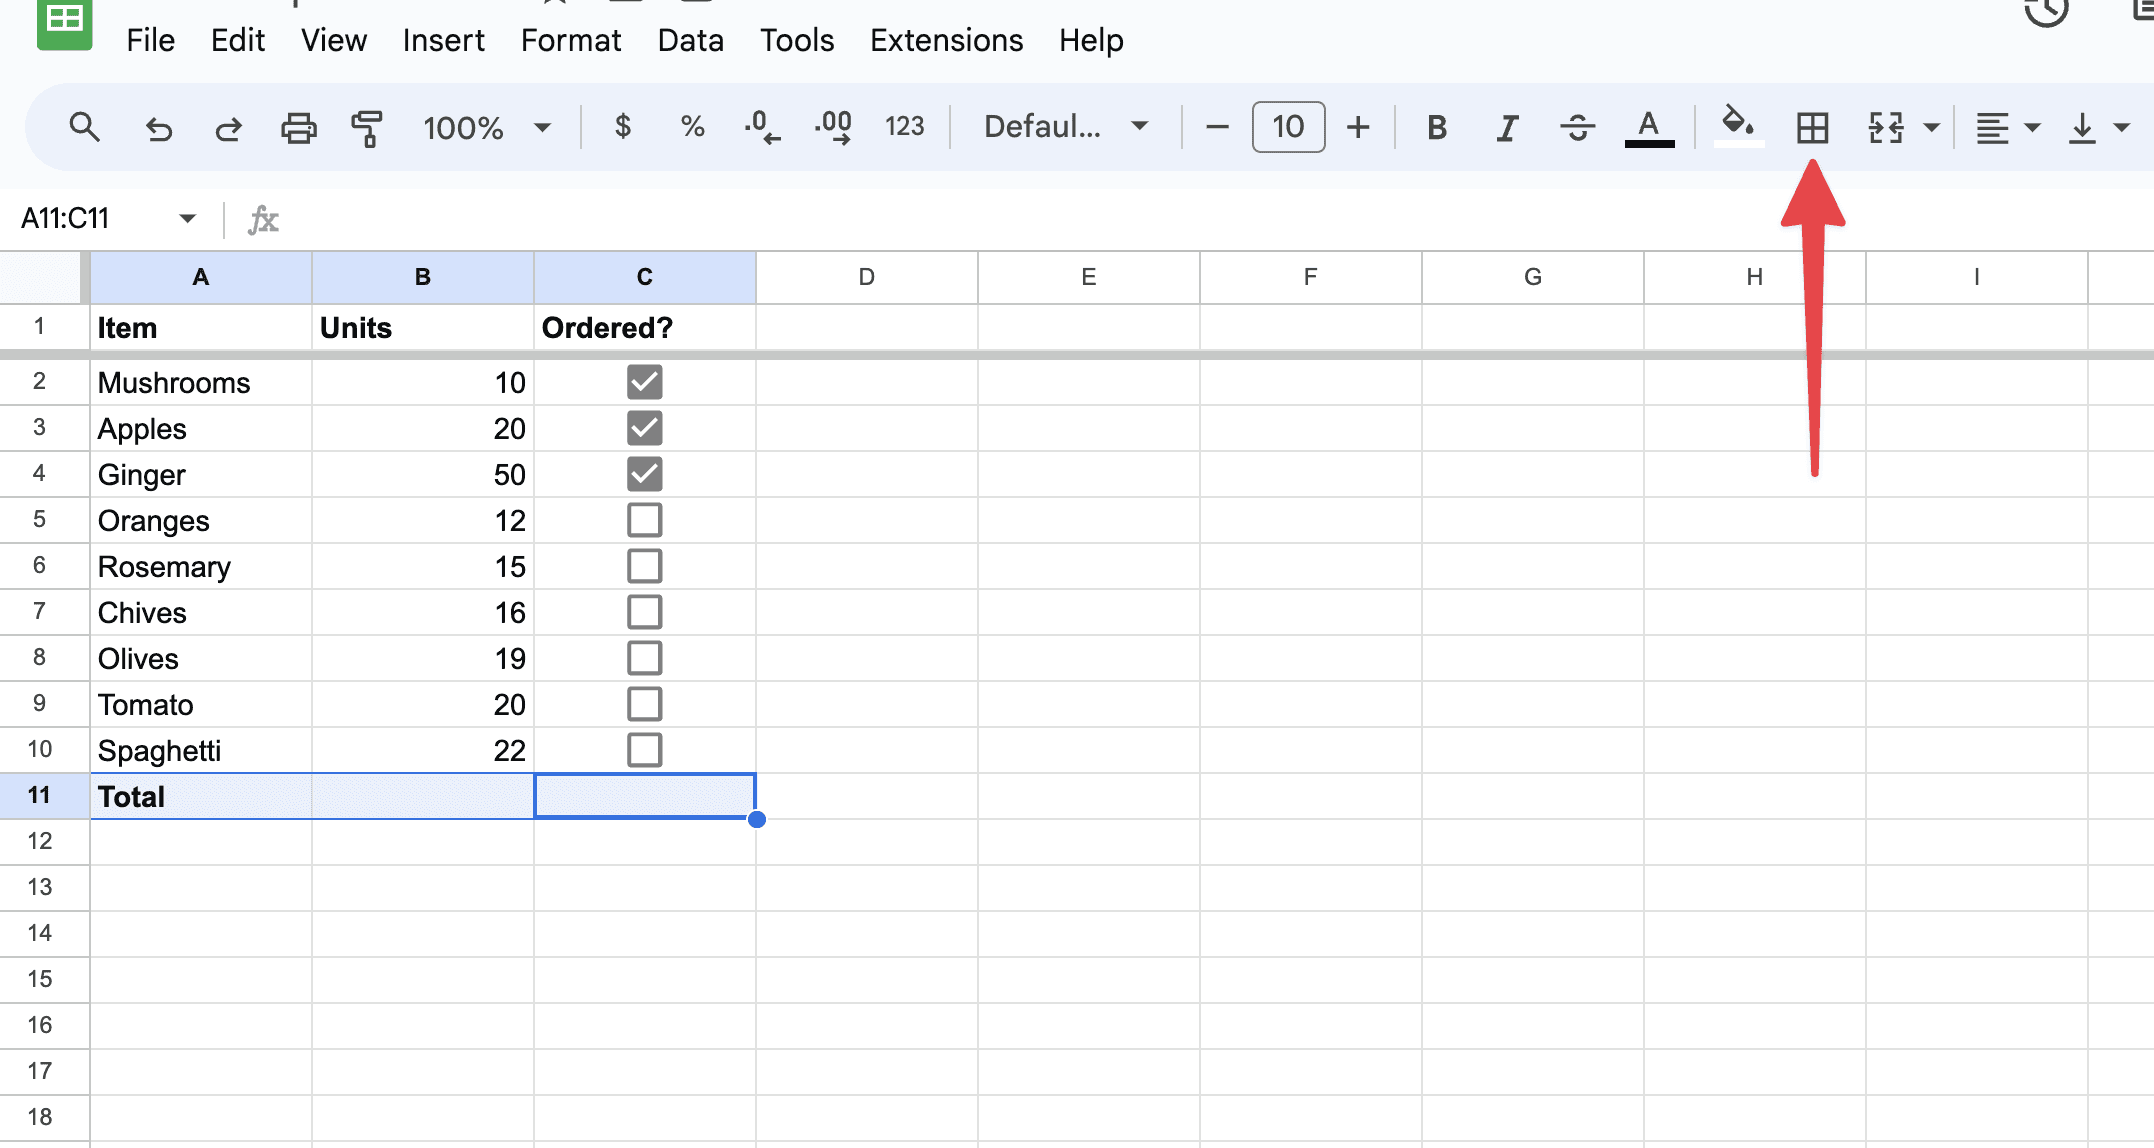
To start adding borders, you first need to select the cells where you want the borders to appear. You can do this by clicking and dragging your mouse over the desired cells. Once you have your cells selected, you'll find the border options in the toolbar, represented by an icon that looks like a grid or window pane:
How to customize your borders in Google Sheets?
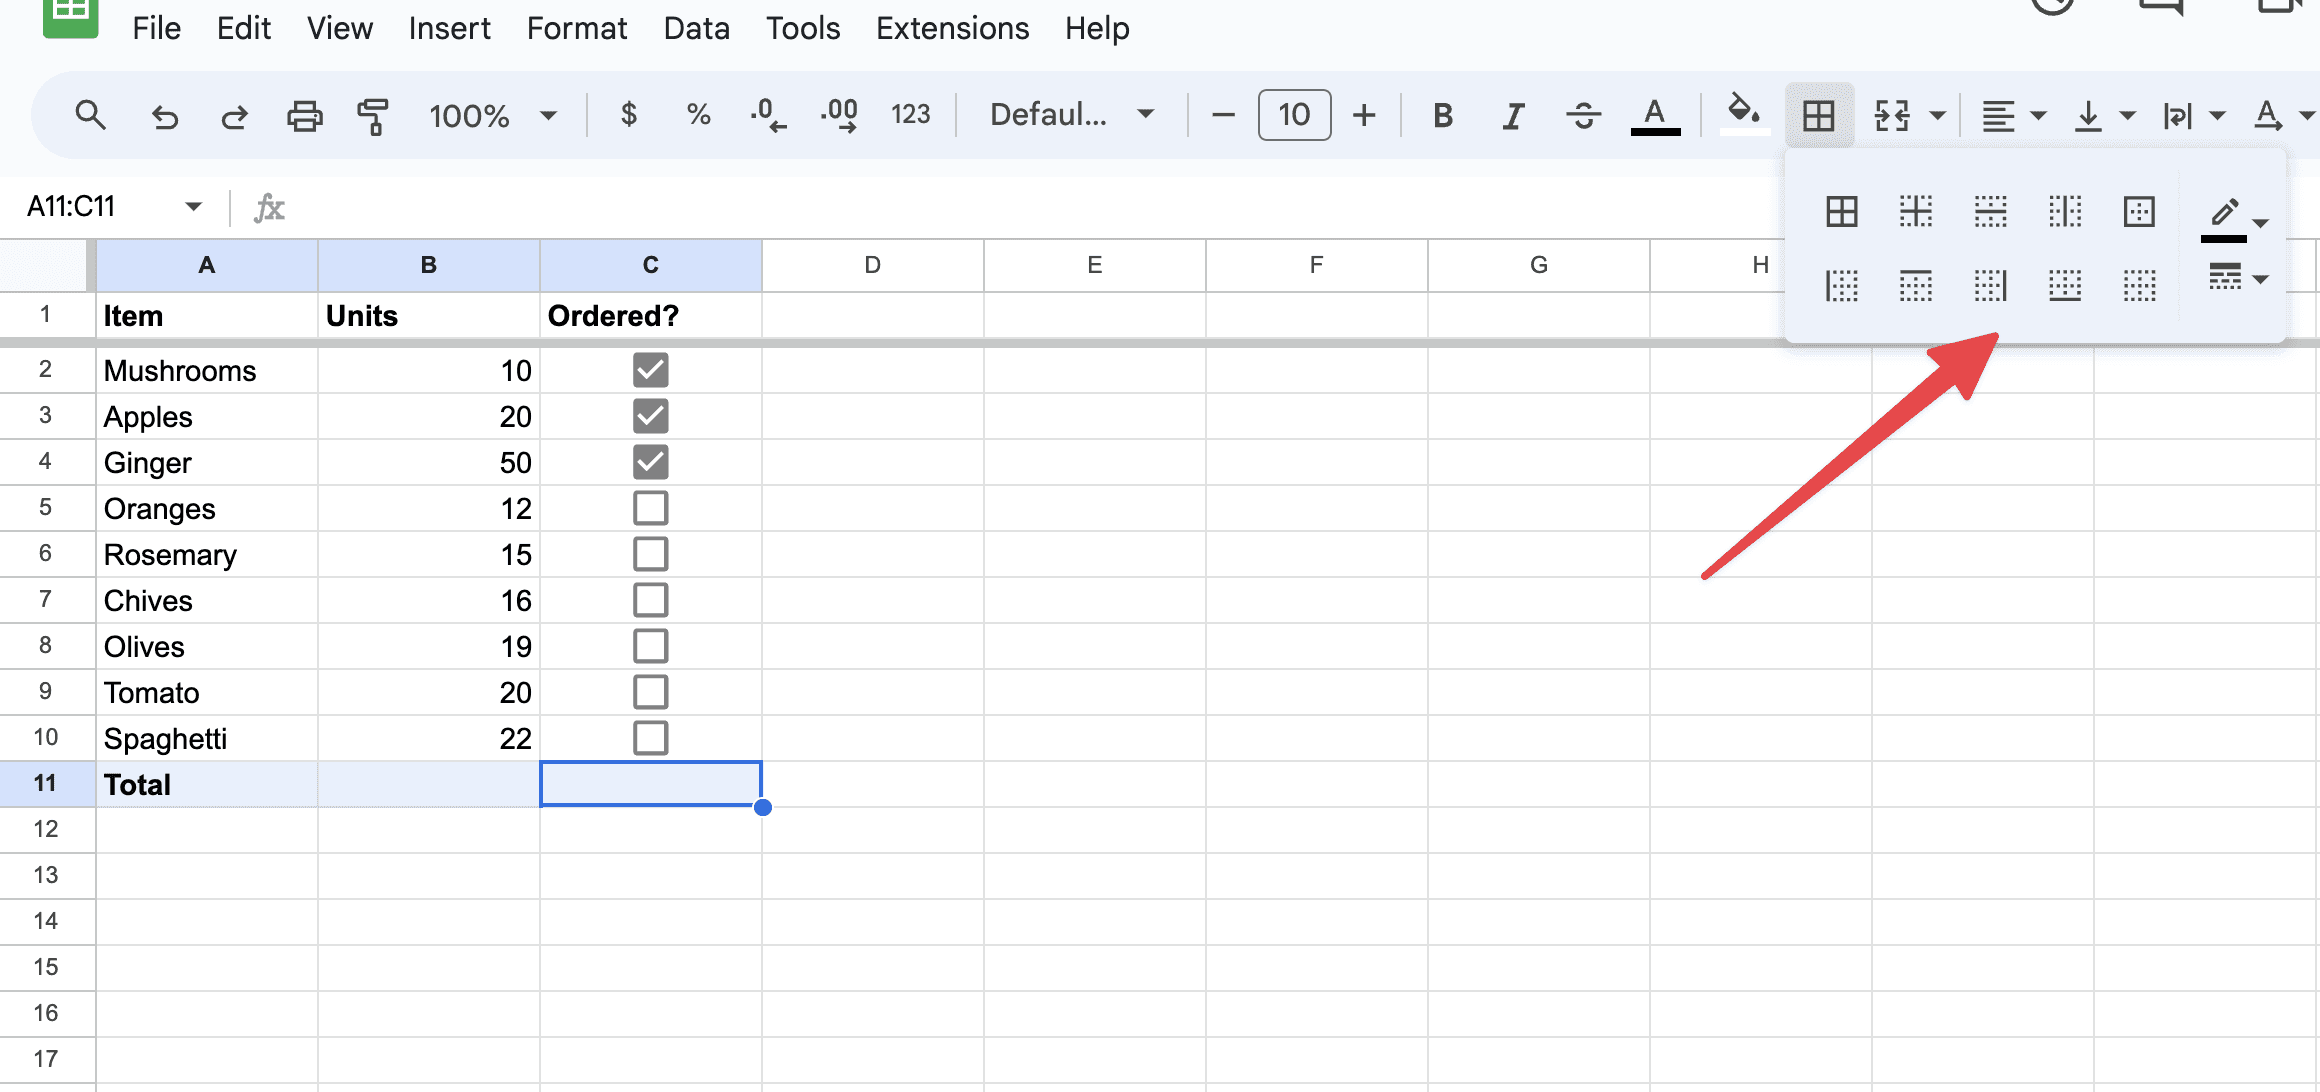
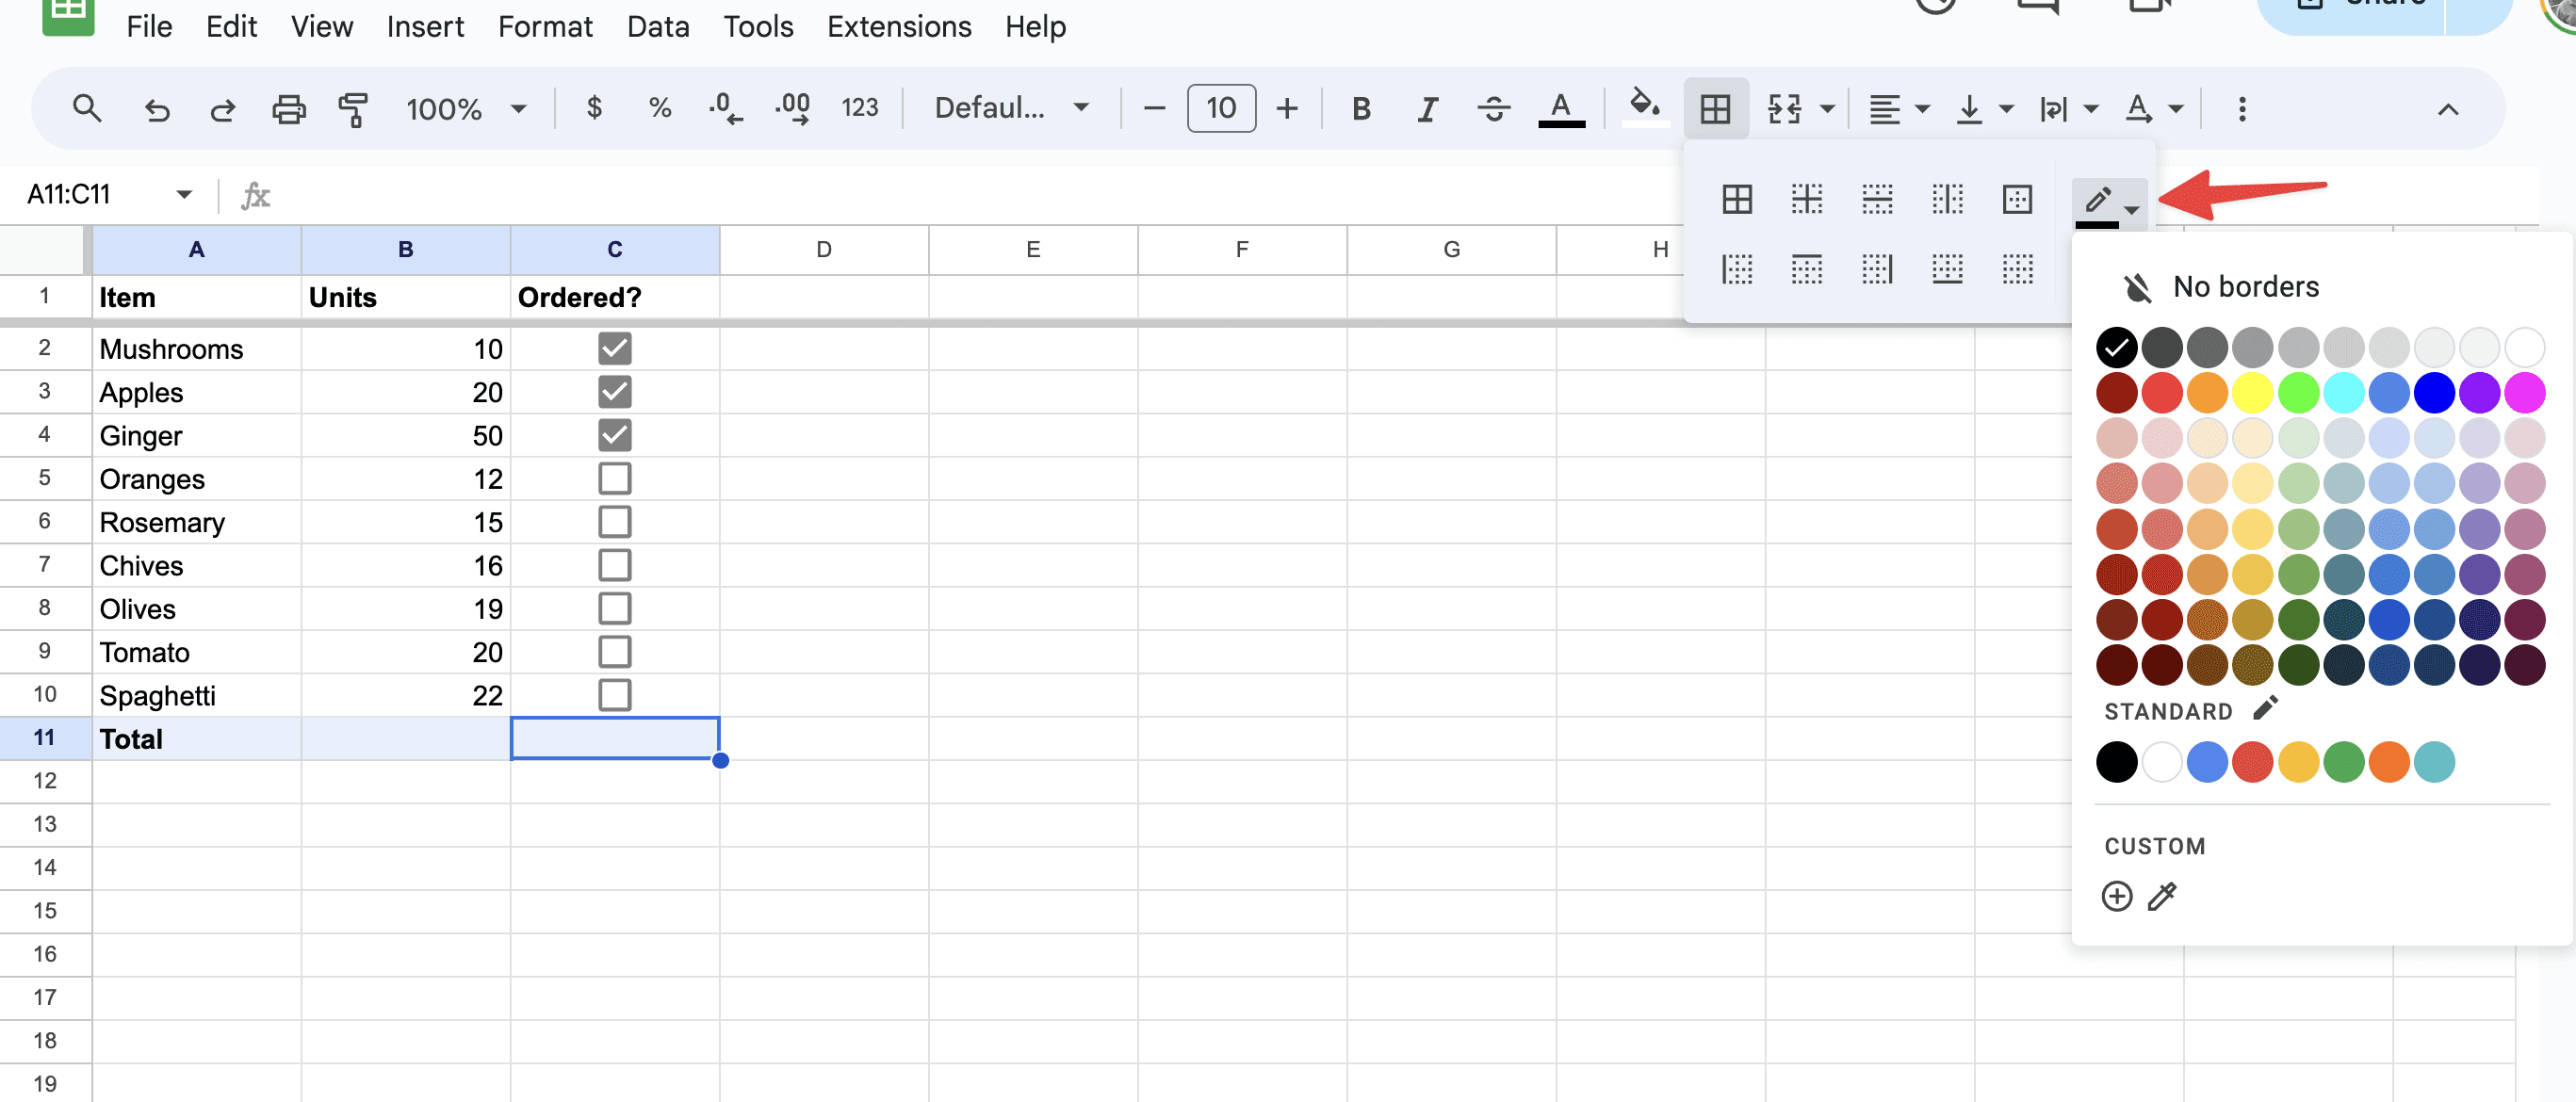
Clicking on the border icon opens a dropdown menu with various border options. These include options for outer borders, inner borders, and individual borders for top, bottom, left, and right sides:
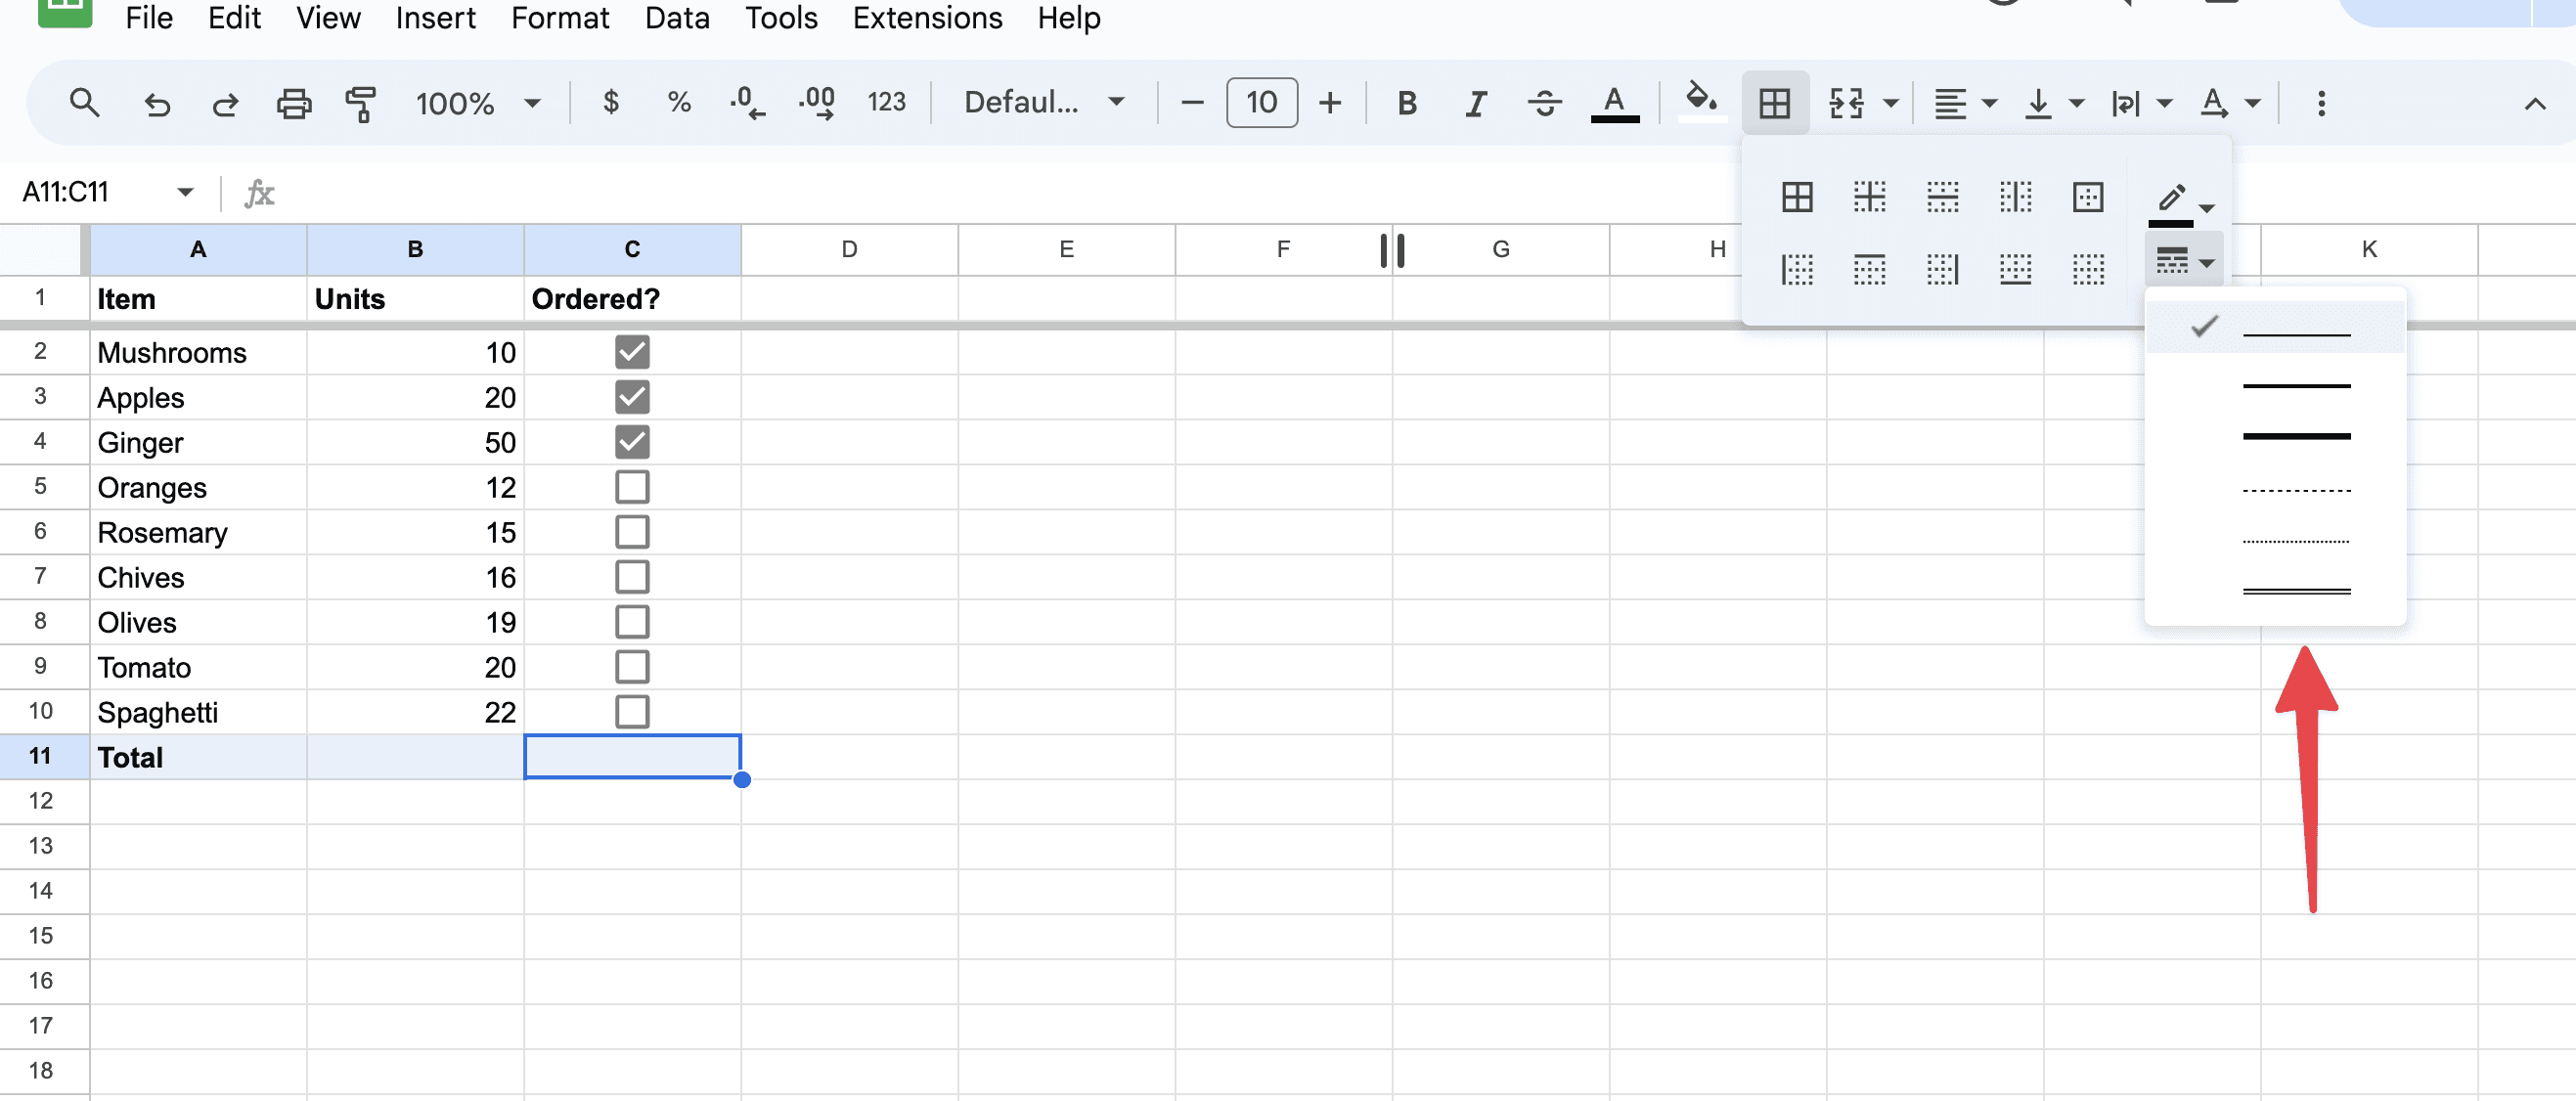
Alongside these options, Google Sheets also offers different styles and colors for borders. You can choose from solid, dotted, or dashed lines:
…and a range of colors to match the theme or style of your spreadsheet:
Advanced border techniques
Beyond the basic application of borders, there are advanced techniques that can be useful in certain scenarios. For instance, if you're dealing with a large dataset, you might find it helpful to use thick outer borders to define the entire set, with thinner inner borders to separate individual entries or categories. This technique helps to create a clear visual hierarchy, making your data easier to scan and understand.
Another advanced technique involves using color-coded borders. In scenarios where your spreadsheet contains multiple categories of data, applying different colored borders to each category can significantly enhance the clarity of your presentation. For instance, you could use blue borders for financial data, red for urgent items, and green for completed tasks. This not only adds a visual element to your spreadsheet but also aids in quick identification of different sections.
Why do cell borders look nicer?
With borders, it's easier to follow a row or column with your eyes. This is especially useful when dealing with large spreadsheets, as it reduces the chance of losing your place or reading across the wrong row or column.
Humans are generally inclined towards order and symmetry. A spreadsheet with well-placed borders creates a sense of order and can make the information seem more reliable and carefully prepared.
How to automatically add borders in Google Sheets?
Automating the process of adding borders in Google Sheets can significantly enhance efficiency, especially when dealing with large or frequently updated spreadsheets. While Google Sheets doesn't have a native feature for fully automatic border application, there are a couple of methods you can use to streamline the process: using the Paint Format tool and employing Google Apps Script.
Paint Format
The Paint Format tool in Google Sheets is a handy feature for quickly copying formatting, including borders, from one cell or range of cells to another. Here’s how you can use it to semi-automatically apply borders:
First, format a cell or a range of cells with the desired border style and color.
Next, click on this formatted cell or range, and then click the Paint Format icon (it looks like a paint roller) in the toolbar.
Once the Paint Format tool is activated, click on or drag over the cells where you want the same border style to be applied. The borders, along with any other formatting from the original cells, will be copied to these new cells.
This method is particularly useful for applying consistent border styles across different parts of your spreadsheet without having to set up each border individually.
Google Apps Script
For a more automated approach, you can use Google Apps Script, which lets you create custom functions in Google Sheets. With a simple script, you can set up borders to be added automatically based on certain triggers or conditions. Here's a basic example of how you might use a script to add borders:
Open your Google Sheets document and click on
Extensionsin the menu bar.From the dropdown, select
Apps Script. This will open a new tab where you can write your script.In the script editor, you can write a function to add borders to a specific range. Here's a simple script as an example:
function addBorders() { var sheet = SpreadsheetApp.getActiveSpreadsheet().getActiveSheet(); var range = sheet.getRange('A1:C10'); // Specify your range here var borderStyle = SpreadsheetApp.BorderStyle.SOLID; range.setBorder(true, true, true, true, true, true, 'black', borderStyle); }
After writing the script, save it and close the script editor.
You can run this function directly from the script editor to apply borders, or set up a trigger to run it automatically at certain intervals or upon specific events (like editing a cell).
Conclusion
In conclusion, borders in Google Sheets are more than just decorative elements. They are essential tools that help in organizing data, enhancing readability, and making your spreadsheets more professional. By mastering the basics and experimenting with advanced techniques, you can transform your spreadsheets from simple grids of data into well-structured, visually appealing documents. Remember, the key to effective use of borders lies in balancing functionality and aesthetics - your borders should serve to make your data more accessible and understandable, without overwhelming the content itself. Happy spreadsheeting!
About the Author

Kris Lachance
Managing Editor
Kris is the Managing Editor of Spreadsheet Secrets. He is a finance professional, writer and entrepreneur based in Canada.
How to Add Borders in Google Sheets: A Guide
Formatting
May 4, 2024
Spreadsheets are usually more about function than about form but let’s be honest… we want them to look pretty. That often means adding stuff like borders to your Google Sheets spreadsheet. This guide walks you through how to do exactly that.
So, how to add borders to cells in Google Sheets? Keep reading to find out.
What are borders in Google Sheets?
Adding borders in Google Sheets is a fundamental skill that can greatly enhance the readability and visual appeal of your spreadsheets. Borders define the edges of cells, making the structure of the spreadsheet more apparent. This organization is particularly important in complex spreadsheets where data is densely packed. Borders help in distinguishing individual cells, rows, and columns, preventing data from appearing jumbled.
Whether you're organizing data, preparing a report, or creating a schedule, understanding how to effectively use borders can make your work more presentable and easier to understand. In this guide, we'll walk through the process of adding, customizing, and utilizing borders in Google Sheets to elevate your spreadsheet game.
How to add borders in Google Sheets?
When you first open Google Sheets and begin your work, you'll notice that cells typically don’t have distinct borders. This default setting provides a clean slate but can make distinguishing between different data sets challenging.
To start adding borders, you first need to select the cells where you want the borders to appear. You can do this by clicking and dragging your mouse over the desired cells. Once you have your cells selected, you'll find the border options in the toolbar, represented by an icon that looks like a grid or window pane:
How to customize your borders in Google Sheets?
Clicking on the border icon opens a dropdown menu with various border options. These include options for outer borders, inner borders, and individual borders for top, bottom, left, and right sides:
Alongside these options, Google Sheets also offers different styles and colors for borders. You can choose from solid, dotted, or dashed lines:
…and a range of colors to match the theme or style of your spreadsheet:
Advanced border techniques
Beyond the basic application of borders, there are advanced techniques that can be useful in certain scenarios. For instance, if you're dealing with a large dataset, you might find it helpful to use thick outer borders to define the entire set, with thinner inner borders to separate individual entries or categories. This technique helps to create a clear visual hierarchy, making your data easier to scan and understand.
Another advanced technique involves using color-coded borders. In scenarios where your spreadsheet contains multiple categories of data, applying different colored borders to each category can significantly enhance the clarity of your presentation. For instance, you could use blue borders for financial data, red for urgent items, and green for completed tasks. This not only adds a visual element to your spreadsheet but also aids in quick identification of different sections.
Why do cell borders look nicer?
With borders, it's easier to follow a row or column with your eyes. This is especially useful when dealing with large spreadsheets, as it reduces the chance of losing your place or reading across the wrong row or column.
Humans are generally inclined towards order and symmetry. A spreadsheet with well-placed borders creates a sense of order and can make the information seem more reliable and carefully prepared.
How to automatically add borders in Google Sheets?
Automating the process of adding borders in Google Sheets can significantly enhance efficiency, especially when dealing with large or frequently updated spreadsheets. While Google Sheets doesn't have a native feature for fully automatic border application, there are a couple of methods you can use to streamline the process: using the Paint Format tool and employing Google Apps Script.
Paint Format
The Paint Format tool in Google Sheets is a handy feature for quickly copying formatting, including borders, from one cell or range of cells to another. Here’s how you can use it to semi-automatically apply borders:
First, format a cell or a range of cells with the desired border style and color.
Next, click on this formatted cell or range, and then click the Paint Format icon (it looks like a paint roller) in the toolbar.
Once the Paint Format tool is activated, click on or drag over the cells where you want the same border style to be applied. The borders, along with any other formatting from the original cells, will be copied to these new cells.
This method is particularly useful for applying consistent border styles across different parts of your spreadsheet without having to set up each border individually.
Google Apps Script
For a more automated approach, you can use Google Apps Script, which lets you create custom functions in Google Sheets. With a simple script, you can set up borders to be added automatically based on certain triggers or conditions. Here's a basic example of how you might use a script to add borders:
Open your Google Sheets document and click on
Extensionsin the menu bar.From the dropdown, select
Apps Script. This will open a new tab where you can write your script.In the script editor, you can write a function to add borders to a specific range. Here's a simple script as an example:
function addBorders() { var sheet = SpreadsheetApp.getActiveSpreadsheet().getActiveSheet(); var range = sheet.getRange('A1:C10'); // Specify your range here var borderStyle = SpreadsheetApp.BorderStyle.SOLID; range.setBorder(true, true, true, true, true, true, 'black', borderStyle); }
After writing the script, save it and close the script editor.
You can run this function directly from the script editor to apply borders, or set up a trigger to run it automatically at certain intervals or upon specific events (like editing a cell).
Conclusion
In conclusion, borders in Google Sheets are more than just decorative elements. They are essential tools that help in organizing data, enhancing readability, and making your spreadsheets more professional. By mastering the basics and experimenting with advanced techniques, you can transform your spreadsheets from simple grids of data into well-structured, visually appealing documents. Remember, the key to effective use of borders lies in balancing functionality and aesthetics - your borders should serve to make your data more accessible and understandable, without overwhelming the content itself. Happy spreadsheeting!
About the Author
Kris Lachance
Managing Editor
Kris is the Managing Editor of Spreadsheet Secrets. He is a finance professional, writer and entrepreneur based in Canada.

Spreadsheet Secrets
Helping you get better at all things spreadsheets. From learning functions to helpful tips and tricks. Microsoft Excel, Google Sheets, Apple Numbers, Office 365, whatever you use we can help you with.
Contact us here: ssheetsecrets@gmail.com
© 2024 Spreadsheet Secrets.
Spreadsheet Secrets
Helping you get better at all things spreadsheets. From learning functions to helpful tips and tricks. Microsoft Excel, Google Sheets, Apple Numbers, Office 365, whatever you use we can help you with.
Contact us here: ssheetsecrets@gmail.com
© 2024 Spreadsheet Secrets.
Spreadsheet Secrets
Helping you get better at all things spreadsheets. From learning functions to helpful tips and tricks. Microsoft Excel, Google Sheets, Apple Numbers, Office 365, whatever you use we can help you with.
Contact us here: ssheetsecrets@gmail.com
© 2024 Spreadsheet Secrets.