How to Highlight Text in Google Sheets
Functions
May 15, 2024
Highlighting text in Google Sheets is a fundamental skill that can greatly enhance the readability and organization of your data. Whether you're preparing a report, analyzing data, or simply organizing your information, knowing how to effectively highlight text can make your spreadsheets more visually appealing and easier to navigate. In this guide, we'll explore several methods to highlight text in Google Sheets, including using conditional formatting, manual formatting, and using scripts for more advanced tasks.
How to Highlight Text in a Cell in Google Sheets
Using Conditional Formatting
One of the most powerful tools for highlighting text in Google Sheets is conditional formatting. This feature allows you to automatically apply formatting to cells based on the data they contain. For instance, you can highlight all cells that contain a specific word, number, or meet a certain condition.
To use conditional formatting, start by selecting the range of cells you want to format. Next, navigate to the "Format" menu and choose "Conditional formatting." This opens a sidebar where you can set the rules for when and how text should be highlighted:
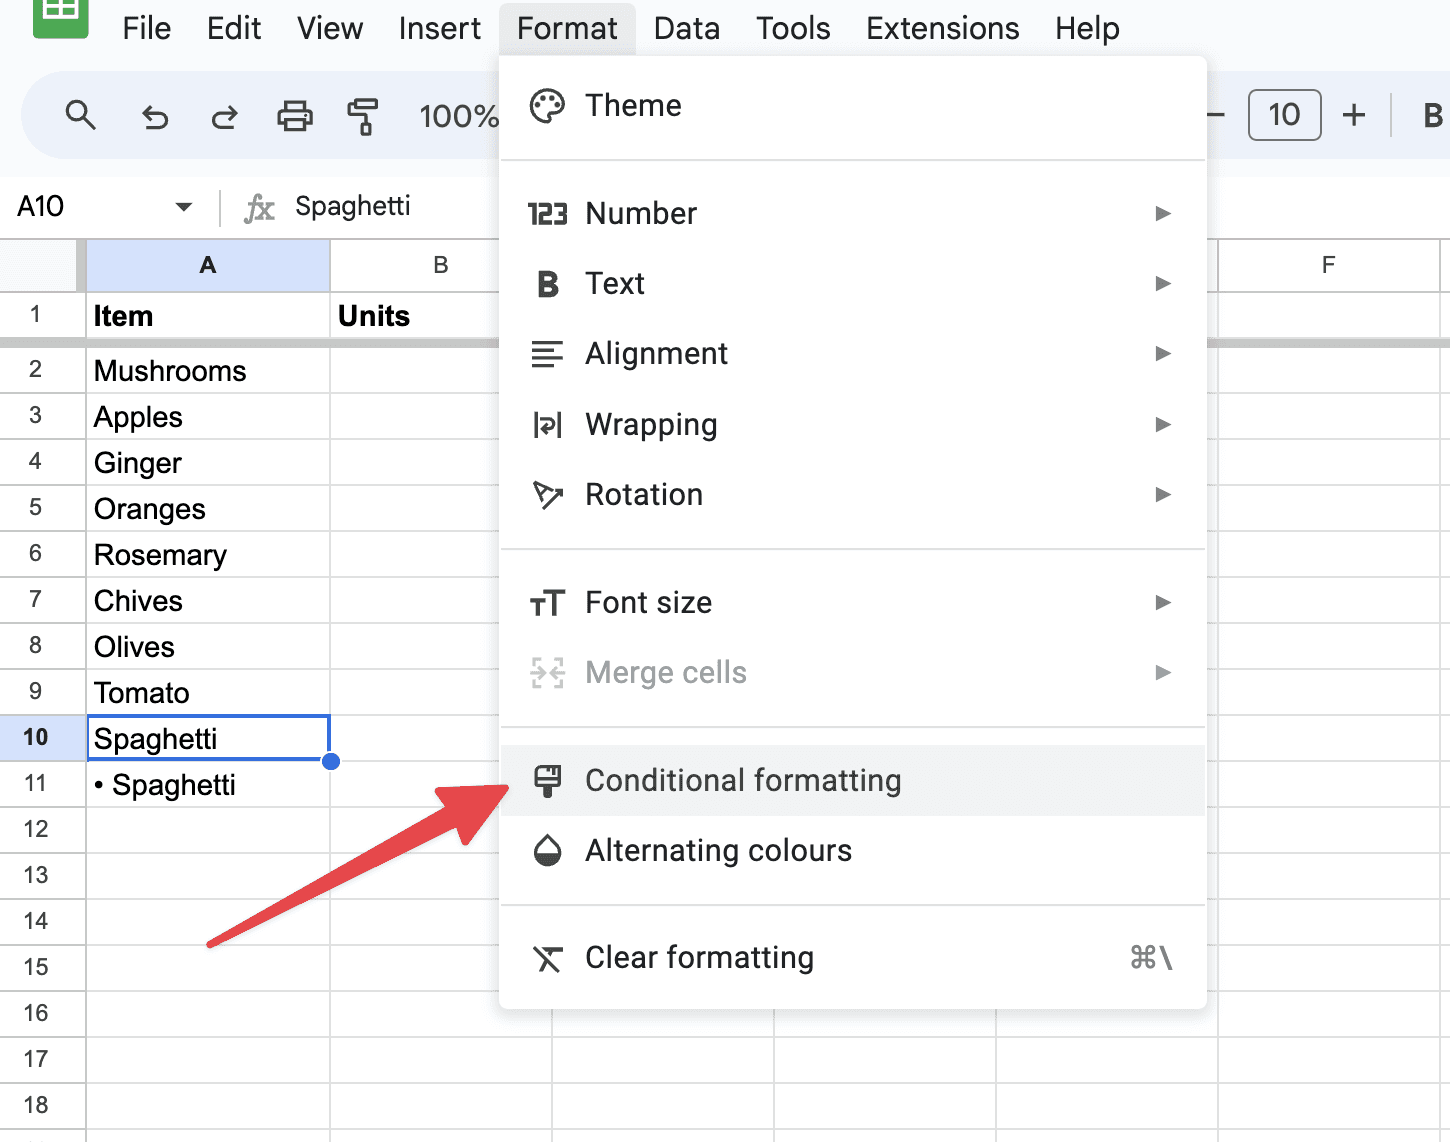
You can choose from a variety of conditions such as “Text contains,” “Date is,” “Cell is empty,” and more. After setting your condition, choose a formatting style such as a background color. Once you've configured your settings, click "Done" to apply the formatting.
Manual Text Highlighting
For simpler needs, manual text highlighting is straightforward and quick. Simply select the cells you wish to highlight, then click on the "Fill color" icon in the toolbar, which looks like a paint bucket. Choose your desired color from the dropdown menu to change the background color of the selected cells. This method is ideal for quickly marking important data, categorizing information, or just adding a visual distinction to specific entries.
Advanced Techniques with Google Apps Script
For those who need more customization and control over their text highlighting, Google Apps Script offers a solution. With basic scripting knowledge, you can write custom scripts to automate complex formatting tasks. For example, you can create a script that highlights cells based on multiple conditions or dynamically changes formatting based on external data.
To get started with Google Apps Script, open the "Extensions" menu, select "Apps Script," and start a new project. Here, you can write functions in JavaScript to interact with your Google Sheets data. For highlighting text, you could write a function that loops through rows and applies formatting if certain conditions are met.
What's a Shortcut to Highlight Text in a Google Sheet?
In Google Sheets, there isn't a direct keyboard shortcut to highlight text specifically, but there is a shortcut to open the "Fill color" menu, which you can use to change the background color of selected cells (effectively highlighting them). Here’s how you can do it:
Select the cells you want to highlight.
Press
Alt+Shift+Fon Windows orOption+Shift+Fon macOS to open the "Fill color" menu.Use the arrow keys to select the color you want and press
Enterto apply it.
This sequence allows you to quickly change the background color of cells without reaching for the mouse, thus highlighting your data more efficiently.
What’s a Practical Example?
A practical example of highlighting text in Google Sheets can be seen in managing a project timeline or task list, where different colors are used to indicate the status of various tasks. This helps in quickly assessing the progress of the project at a glance.
Example: Project Timeline Management
Imagine you are managing a project with various tasks, each with different completion statuses like "Not Started", "In Progress", and "Completed". Here’s how you could use highlighting in Google Sheets to manage and visualize this efficiently:
Set up your sheet: Organize your sheet with columns for Task Name, Start Date, Due Date, and Status. Fill in each row with the details of different tasks.
Apply conditional formatting:
Select the column where the status of each task is recorded.
Go to the "Format" menu and select "Conditional formatting".
Set up three different rules for the statuses:
For "Not Started", choose a rule where the text is exactly "Not Started" and set the format to have a red background. This immediately shows that these tasks need attention.
For "In Progress", create a rule for text exactly matching "In Progress" and choose a yellow background. This color indicates that the task is underway.
For "Completed", set the rule to format cells with the exact text "Completed" with a green background, signaling completion.
Update and review: As tasks progress, update the status in the Google Sheet. The colors will automatically change based on the status due to conditional formatting, providing a clear, visual representation of project progress.
By utilizing this method, you create a dynamic, color-coded project timeline that can be easily updated and instantly understood by anyone reviewing the sheet. This helps in maintaining clarity and improving communication among team members or stakeholders regarding the status of project tasks.
What Are Some Things People Like About This Functionality?
The functionality of highlighting text in Google Sheets through conditional formatting and other methods offers numerous benefits that many users appreciate:
Visual Clarity: Highlighting helps users quickly discern patterns, trends, and outliers in data. By using different colors to represent different data conditions, users can easily spot what is important, what requires immediate attention, or how things are progressing.
Automated Updates: With conditional formatting, the highlights or colors update automatically when the data changes. This is particularly useful in dynamic environments where data entries are frequently modified, as it ensures that the visual cues always reflect the current state of the data without additional manual intervention.
Error Reduction: Highlighting can help reduce errors by making incorrect, unusual, or unexpected values stand out. For instance, if a financial spreadsheet is set up to highlight any negative numbers in red, it makes it much easier to catch potentially erroneous entries quickly.
Enhanced Productivity: By reducing the time needed to interpret complex data sets, highlighting speeds up data analysis. It makes it easier for users to focus on the right areas, leading to faster decision-making and increased productivity.
Customization: Users can tailor highlighting rules to meet specific needs. Whether it’s tracking project milestones, auditing financial records, or managing inventory, conditional formatting can be customized to highlight different statuses, dates, quantities, and more, aligning with the specific requirements of a project or task.
Improved Communication: When sharing spreadsheets among team members or presenting data to stakeholders, the use of highlighting makes the information more accessible and understandable to everyone, regardless of their familiarity with the data. This aids in more effective communication and ensures that everyone is on the same page.
Data Organization: Highlighting also aids in organizing data by segmenting it visually. This can be particularly useful in large spreadsheets where different sections require distinct visual treatments for easy navigation.
These advantages make text highlighting in Google Sheets a widely used and highly valued feature, particularly in scenarios involving data management, project tracking, and any situation requiring quick and clear data interpretation.
TLDR
Highlighting text in Google Sheets can significantly improve how you present and interact with data. Whether through conditional formatting for dynamic data-driven highlights, manual formatting for quick edits, or custom scripts for tailored solutions, Google Sheets provides a variety of tools to suit any need. By mastering these techniques, you'll be able to create more effective and attractive spreadsheets that better serve your purposes.
About the Author

Kris Lachance
Managing Editor
Kris is the Managing Editor of Spreadsheet Secrets. He is a finance professional, writer and entrepreneur based in Canada.
FAQs
What is highlighting?
Text
What is text?
How to Highlight Text in Google Sheets
Functions
May 15, 2024
Highlighting text in Google Sheets is a fundamental skill that can greatly enhance the readability and organization of your data. Whether you're preparing a report, analyzing data, or simply organizing your information, knowing how to effectively highlight text can make your spreadsheets more visually appealing and easier to navigate. In this guide, we'll explore several methods to highlight text in Google Sheets, including using conditional formatting, manual formatting, and using scripts for more advanced tasks.
How to Highlight Text in a Cell in Google Sheets
Using Conditional Formatting
One of the most powerful tools for highlighting text in Google Sheets is conditional formatting. This feature allows you to automatically apply formatting to cells based on the data they contain. For instance, you can highlight all cells that contain a specific word, number, or meet a certain condition.
To use conditional formatting, start by selecting the range of cells you want to format. Next, navigate to the "Format" menu and choose "Conditional formatting." This opens a sidebar where you can set the rules for when and how text should be highlighted:
You can choose from a variety of conditions such as “Text contains,” “Date is,” “Cell is empty,” and more. After setting your condition, choose a formatting style such as a background color. Once you've configured your settings, click "Done" to apply the formatting.
Manual Text Highlighting
For simpler needs, manual text highlighting is straightforward and quick. Simply select the cells you wish to highlight, then click on the "Fill color" icon in the toolbar, which looks like a paint bucket. Choose your desired color from the dropdown menu to change the background color of the selected cells. This method is ideal for quickly marking important data, categorizing information, or just adding a visual distinction to specific entries.
Advanced Techniques with Google Apps Script
For those who need more customization and control over their text highlighting, Google Apps Script offers a solution. With basic scripting knowledge, you can write custom scripts to automate complex formatting tasks. For example, you can create a script that highlights cells based on multiple conditions or dynamically changes formatting based on external data.
To get started with Google Apps Script, open the "Extensions" menu, select "Apps Script," and start a new project. Here, you can write functions in JavaScript to interact with your Google Sheets data. For highlighting text, you could write a function that loops through rows and applies formatting if certain conditions are met.
What's a Shortcut to Highlight Text in a Google Sheet?
In Google Sheets, there isn't a direct keyboard shortcut to highlight text specifically, but there is a shortcut to open the "Fill color" menu, which you can use to change the background color of selected cells (effectively highlighting them). Here’s how you can do it:
Select the cells you want to highlight.
Press
Alt+Shift+Fon Windows orOption+Shift+Fon macOS to open the "Fill color" menu.Use the arrow keys to select the color you want and press
Enterto apply it.
This sequence allows you to quickly change the background color of cells without reaching for the mouse, thus highlighting your data more efficiently.
What’s a Practical Example?
A practical example of highlighting text in Google Sheets can be seen in managing a project timeline or task list, where different colors are used to indicate the status of various tasks. This helps in quickly assessing the progress of the project at a glance.
Example: Project Timeline Management
Imagine you are managing a project with various tasks, each with different completion statuses like "Not Started", "In Progress", and "Completed". Here’s how you could use highlighting in Google Sheets to manage and visualize this efficiently:
Set up your sheet: Organize your sheet with columns for Task Name, Start Date, Due Date, and Status. Fill in each row with the details of different tasks.
Apply conditional formatting:
Select the column where the status of each task is recorded.
Go to the "Format" menu and select "Conditional formatting".
Set up three different rules for the statuses:
For "Not Started", choose a rule where the text is exactly "Not Started" and set the format to have a red background. This immediately shows that these tasks need attention.
For "In Progress", create a rule for text exactly matching "In Progress" and choose a yellow background. This color indicates that the task is underway.
For "Completed", set the rule to format cells with the exact text "Completed" with a green background, signaling completion.
Update and review: As tasks progress, update the status in the Google Sheet. The colors will automatically change based on the status due to conditional formatting, providing a clear, visual representation of project progress.
By utilizing this method, you create a dynamic, color-coded project timeline that can be easily updated and instantly understood by anyone reviewing the sheet. This helps in maintaining clarity and improving communication among team members or stakeholders regarding the status of project tasks.
What Are Some Things People Like About This Functionality?
The functionality of highlighting text in Google Sheets through conditional formatting and other methods offers numerous benefits that many users appreciate:
Visual Clarity: Highlighting helps users quickly discern patterns, trends, and outliers in data. By using different colors to represent different data conditions, users can easily spot what is important, what requires immediate attention, or how things are progressing.
Automated Updates: With conditional formatting, the highlights or colors update automatically when the data changes. This is particularly useful in dynamic environments where data entries are frequently modified, as it ensures that the visual cues always reflect the current state of the data without additional manual intervention.
Error Reduction: Highlighting can help reduce errors by making incorrect, unusual, or unexpected values stand out. For instance, if a financial spreadsheet is set up to highlight any negative numbers in red, it makes it much easier to catch potentially erroneous entries quickly.
Enhanced Productivity: By reducing the time needed to interpret complex data sets, highlighting speeds up data analysis. It makes it easier for users to focus on the right areas, leading to faster decision-making and increased productivity.
Customization: Users can tailor highlighting rules to meet specific needs. Whether it’s tracking project milestones, auditing financial records, or managing inventory, conditional formatting can be customized to highlight different statuses, dates, quantities, and more, aligning with the specific requirements of a project or task.
Improved Communication: When sharing spreadsheets among team members or presenting data to stakeholders, the use of highlighting makes the information more accessible and understandable to everyone, regardless of their familiarity with the data. This aids in more effective communication and ensures that everyone is on the same page.
Data Organization: Highlighting also aids in organizing data by segmenting it visually. This can be particularly useful in large spreadsheets where different sections require distinct visual treatments for easy navigation.
These advantages make text highlighting in Google Sheets a widely used and highly valued feature, particularly in scenarios involving data management, project tracking, and any situation requiring quick and clear data interpretation.
TLDR
Highlighting text in Google Sheets can significantly improve how you present and interact with data. Whether through conditional formatting for dynamic data-driven highlights, manual formatting for quick edits, or custom scripts for tailored solutions, Google Sheets provides a variety of tools to suit any need. By mastering these techniques, you'll be able to create more effective and attractive spreadsheets that better serve your purposes.
About the Author
Kris Lachance
Managing Editor
Kris is the Managing Editor of Spreadsheet Secrets. He is a finance professional, writer and entrepreneur based in Canada.
FAQs
What is highlighting?
Text
What is text?

Spreadsheet Secrets
Helping you get better at all things spreadsheets. From learning functions to helpful tips and tricks. Microsoft Excel, Google Sheets, Apple Numbers, Office 365, whatever you use we can help you with.
Contact us here: ssheetsecrets@gmail.com
© 2024 Spreadsheet Secrets.
Spreadsheet Secrets
Helping you get better at all things spreadsheets. From learning functions to helpful tips and tricks. Microsoft Excel, Google Sheets, Apple Numbers, Office 365, whatever you use we can help you with.
Contact us here: ssheetsecrets@gmail.com
© 2024 Spreadsheet Secrets.
Spreadsheet Secrets
Helping you get better at all things spreadsheets. From learning functions to helpful tips and tricks. Microsoft Excel, Google Sheets, Apple Numbers, Office 365, whatever you use we can help you with.
Contact us here: ssheetsecrets@gmail.com
© 2024 Spreadsheet Secrets.