How to Share Only One Tab in Google Sheets
Tips & Tricks
May 10, 2024
Google Sheets is a powerful tool for collaboration, allowing users to work together on spreadsheets in real-time. Sometimes, you may need to share only one specific tab within a spreadsheet without giving access to the entire document. This guide will walk you through the steps to do just that, ensuring you can share your data securely and efficiently.
Understanding the Basics of Google Sheets Sharing
Before diving into the specifics of sharing a single tab, it's important to understand the basic sharing functionalities of Google Sheets. Normally, when you share a Google Sheet, you're granting access to the entire document.
However, Google Sheets does not directly support sharing individual tabs within a spreadsheet. To share just one tab, you'll need to use a workaround that involves creating a new spreadsheet.
How to Share One Tab in Google Sheets
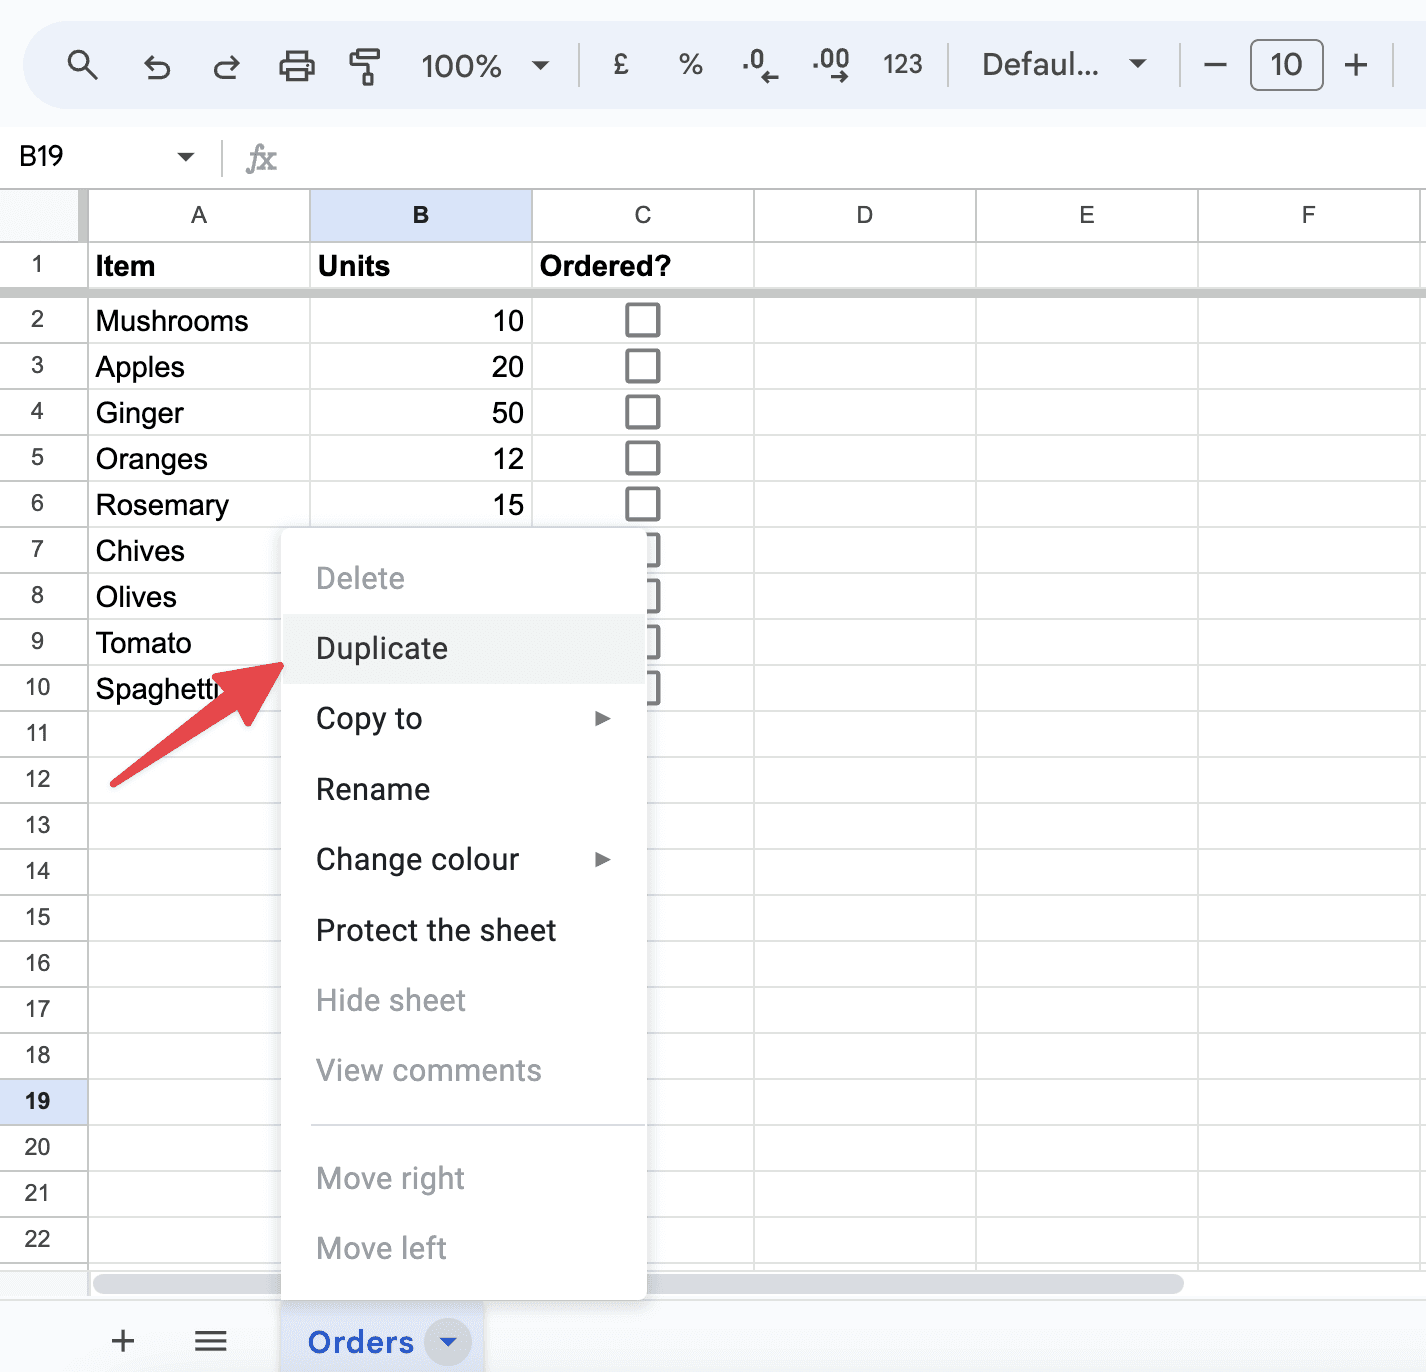
The first step in sharing a single tab is to open your Google Sheets document and locate the tab you want to share. Right-click on the tab's name to bring up a menu, and select "Duplicate" to create a copy of the tab. This duplicate will initially reside in the same spreadsheet:
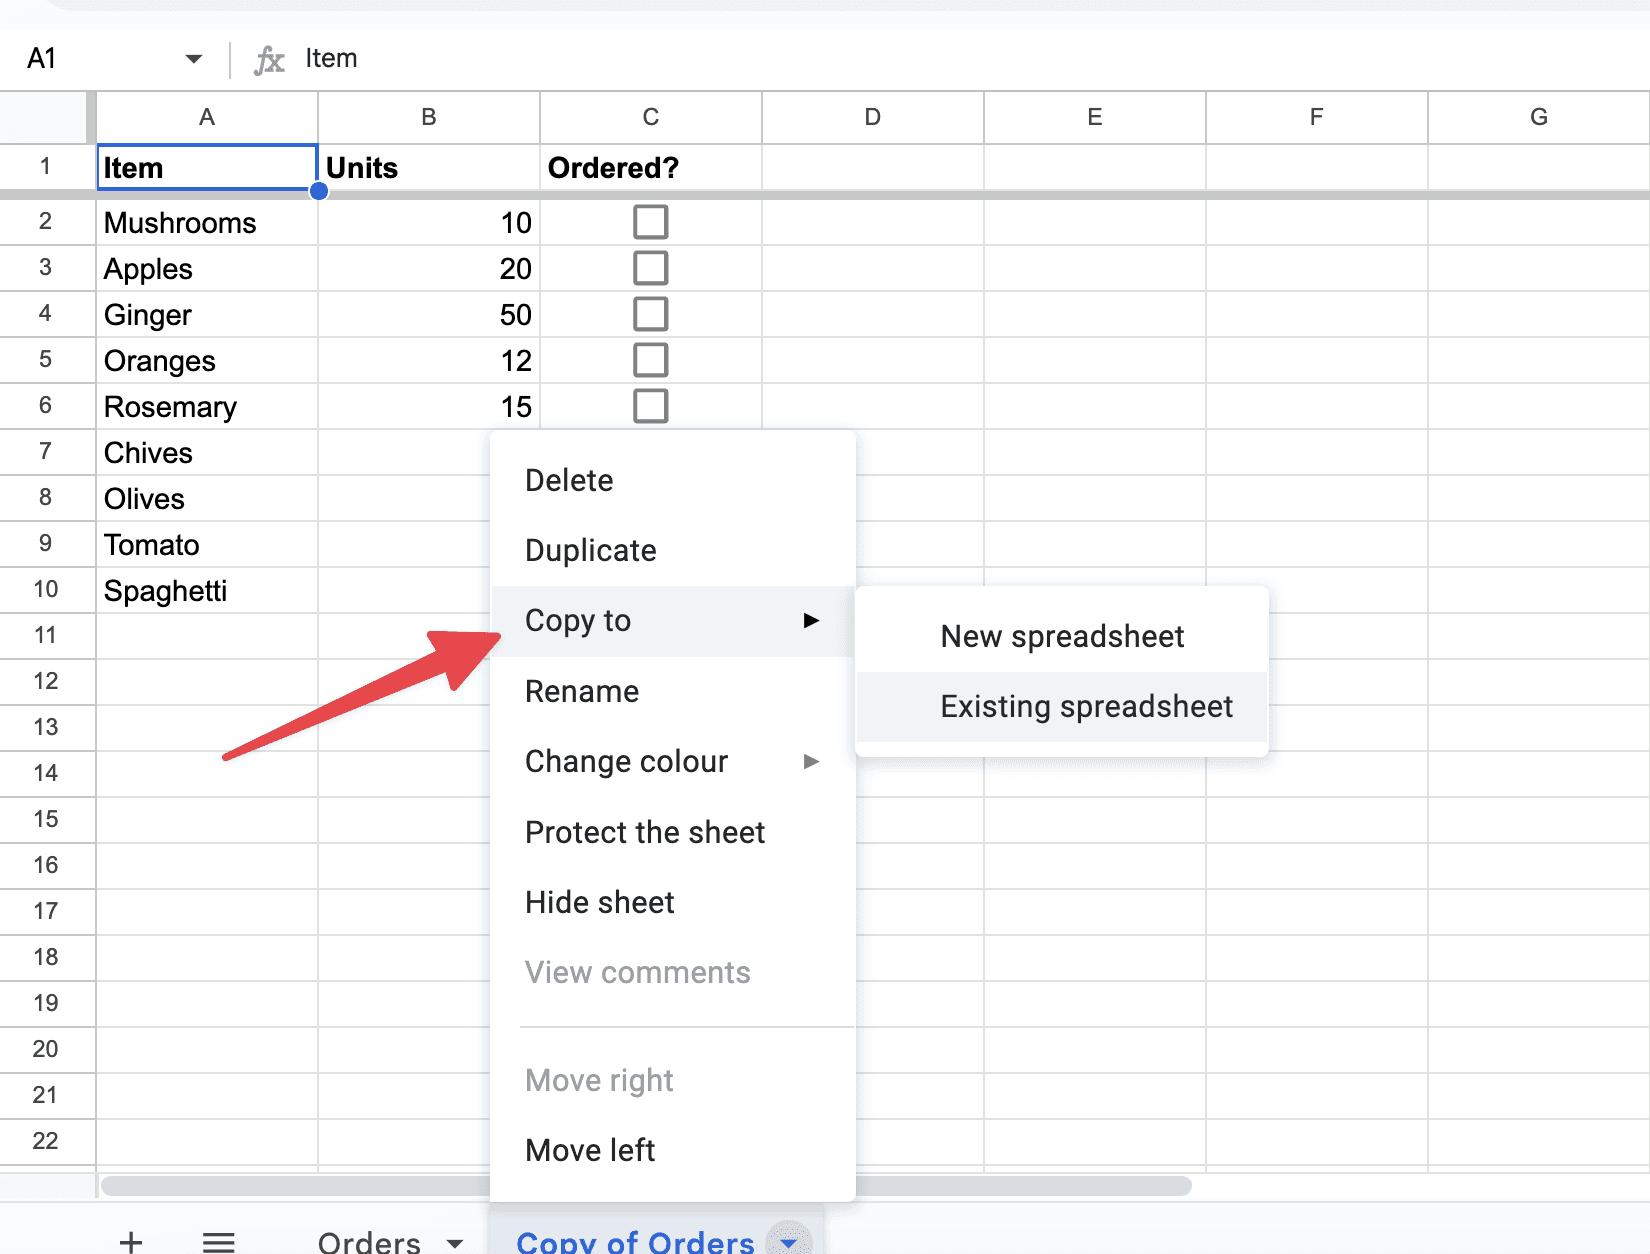
Next, create a new Google Sheets document by going to your Google Drive, clicking on "New," and then selecting "Google Sheets." This will open a new, blank spreadsheet. Return to your original spreadsheet and select the duplicate tab. Right-click on the tab again and choose "Copy to" from the menu. A new window will pop up, allowing you to select the destination for the tab. Choose the new spreadsheet you just created:
Once the tab has been copied to the new spreadsheet, you can proceed with sharing it as you would with any Google Sheet. Click on the "Share" button in the upper right corner of the spreadsheet window. In the sharing settings, enter the email addresses of those you wish to share the tab with, set the appropriate permissions (e.g., viewer, commenter, or editor), and send the invitation.
Share One Tab by Hiding Sheets
To share one tab in Google Sheets while keeping other tabs hidden from the viewer, you will need to carefully manage the visibility of sheets and permissions.
First, you need to ensure that the tab you want to share is ready. This means making sure it contains all the necessary information and does not link to data in hidden tabs, as these references might break or not display as intended if those tabs are not accessible to the viewer.
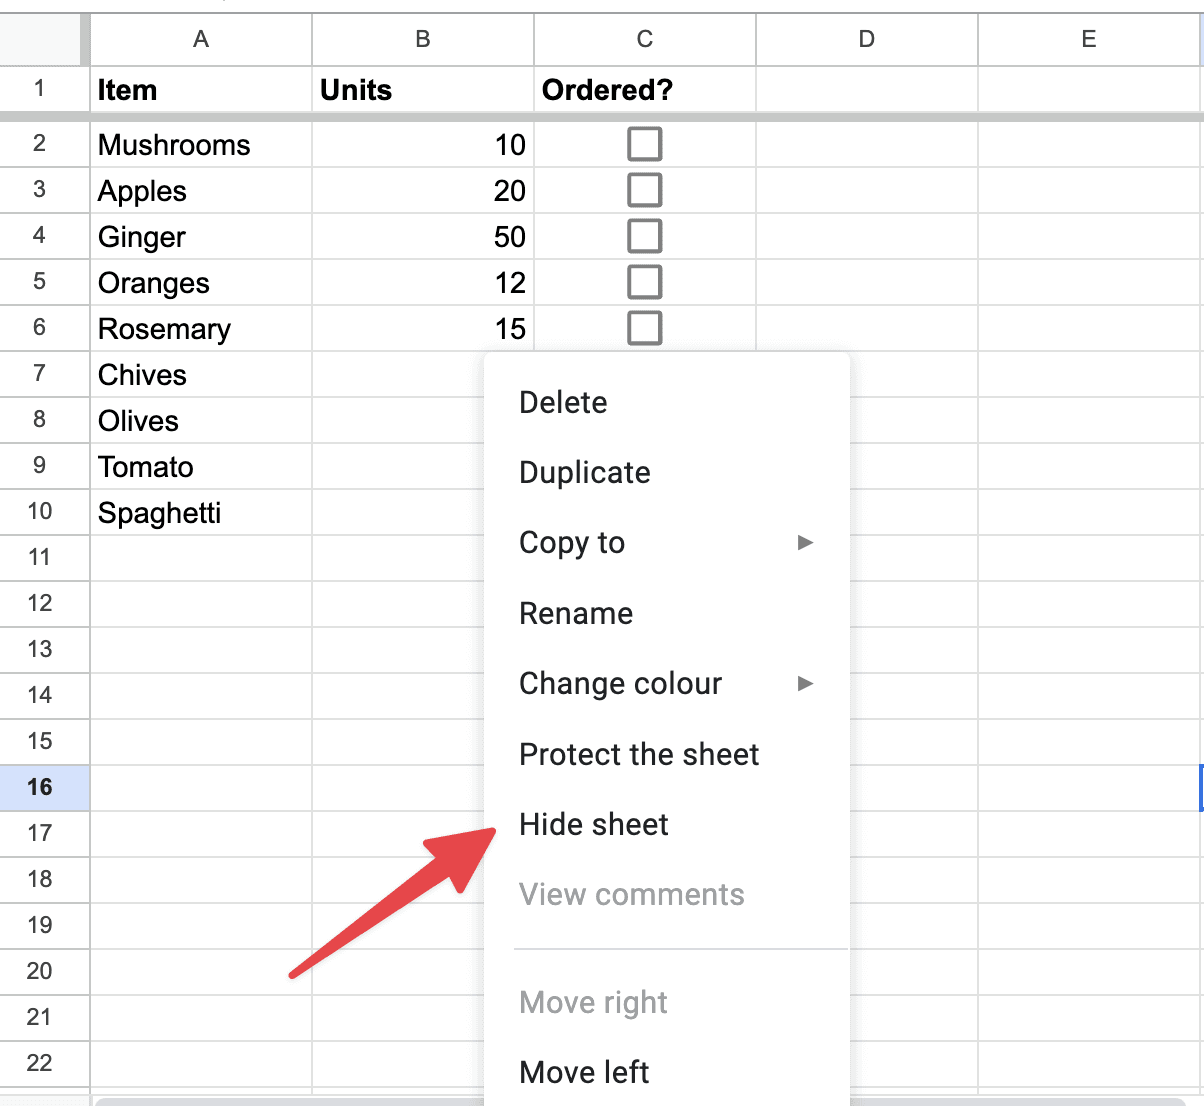
Next, go through your spreadsheet and hide all other tabs that you do not want to share. To hide a tab in Google Sheets right-click on the tab name at the bottom of the sheet. Then, select “Hide sheet” from the context menu:
This will make the tab invisible in the spreadsheet, but remember, hidden tabs are not securely concealed from users with Editor permissions; they can simply unhide these tabs.
If you need to grant someone Editor permissions, be cautious as editors can see and unhide all hidden tabs. If Editor-level access is necessary, consider copying the relevant tab to a new spreadsheet and sharing that instead, as described in a previous explanation.
Additional Tips and Considerations
When you duplicate a tab and move it to another spreadsheet, keep in mind that any updates made to the original tab will not be reflected in the shared copy. If the data needs to be updated regularly, you will need to repeat the process of duplicating and copying the tab to the new spreadsheet.
Additionally, if your tab contains formulas that reference other tabs or data within the original spreadsheet, these references might break when moved to a new document. You'll need to adjust these references or rethink how the data is structured if necessary.
Another Method: Exporting to PDF
Exporting a single tab from a Google Sheets document to PDF is a useful feature for distributing specific information without sharing the entire workbook. Here's a step-by-step guide on how to accomplish this:
Step 1: Prepare the Tab
Ensure the tab you want to export looks exactly how you want it to appear in the PDF. This includes checking the formatting, data layout, and any headers or footers. Remember that what you see in the sheet is what will get printed, so adjust the print settings accordingly.
Step 2: Open the Print Settings
Click on the tab you want to export.
Go to the File menu in the upper left corner of the screen.
Hover over Print or click directly on Print to open the print settings dialog. You can also use the keyboard shortcut Ctrl+P (on Windows) or Cmd+P (on Mac) as an alternative to accessing the print setup.
Step 3: Adjust the Print Settings
In the print settings dialog:
Under the Print section, choose the option Current sheet. This ensures that only the active sheet, which is the tab you're on, will be exported.
Adjust the Layout settings. You can choose the orientation (Portrait or Landscape) based on how you want your PDF to appear.
Set the Scale to fit all your data as needed. Options include "Normal," "Fit to width," and "Fit to height." Choose the one that best displays your data on a single page or across multiple pages as required.
Check other settings like margins, headers and footers, or if you want to show/hide gridlines and notes.
Step 4: Export as PDF
After setting up your print options, look for the Destination setting.
Click on the dropdown menu next to Destination and select Save as PDF.
Review your settings once more, then click on Next or Save (the button name might differ based on your browser).
Step 5: Save and Name Your PDF
Choose the location on your computer where you want to save the PDF.
Name your file appropriately.
Click Save to finalize the export.
This process will generate a PDF file of the selected tab, containing only the data visible and configured through the print settings. This method is efficient for sharing or archiving specific parts of your spreadsheet in a universally accessible format. Remember, the quality and appearance of your PDF can greatly depend on the print settings you choose, so it may take a few tries to get everything looking just right.
The TLDR
Sharing a single tab in Google Sheets requires a bit of maneuvering, but it's a straightforward process once you understand the steps. By duplicating the tab, creating a new document, and using the copy function, you can securely share just the portion of your spreadsheet that is needed. This method not only helps maintain the privacy of your data but also keeps your collaborations efficient and focused.
About the Author

Kris Lachance
Managing Editor
Kris is the Managing Editor of Spreadsheet Secrets. He is a finance professional, writer and entrepreneur based in Canada.
How to Share Only One Tab in Google Sheets
Tips & Tricks
May 10, 2024
Google Sheets is a powerful tool for collaboration, allowing users to work together on spreadsheets in real-time. Sometimes, you may need to share only one specific tab within a spreadsheet without giving access to the entire document. This guide will walk you through the steps to do just that, ensuring you can share your data securely and efficiently.
Understanding the Basics of Google Sheets Sharing
Before diving into the specifics of sharing a single tab, it's important to understand the basic sharing functionalities of Google Sheets. Normally, when you share a Google Sheet, you're granting access to the entire document.
However, Google Sheets does not directly support sharing individual tabs within a spreadsheet. To share just one tab, you'll need to use a workaround that involves creating a new spreadsheet.
How to Share One Tab in Google Sheets
The first step in sharing a single tab is to open your Google Sheets document and locate the tab you want to share. Right-click on the tab's name to bring up a menu, and select "Duplicate" to create a copy of the tab. This duplicate will initially reside in the same spreadsheet:
Next, create a new Google Sheets document by going to your Google Drive, clicking on "New," and then selecting "Google Sheets." This will open a new, blank spreadsheet. Return to your original spreadsheet and select the duplicate tab. Right-click on the tab again and choose "Copy to" from the menu. A new window will pop up, allowing you to select the destination for the tab. Choose the new spreadsheet you just created:
Once the tab has been copied to the new spreadsheet, you can proceed with sharing it as you would with any Google Sheet. Click on the "Share" button in the upper right corner of the spreadsheet window. In the sharing settings, enter the email addresses of those you wish to share the tab with, set the appropriate permissions (e.g., viewer, commenter, or editor), and send the invitation.
Share One Tab by Hiding Sheets
To share one tab in Google Sheets while keeping other tabs hidden from the viewer, you will need to carefully manage the visibility of sheets and permissions.
First, you need to ensure that the tab you want to share is ready. This means making sure it contains all the necessary information and does not link to data in hidden tabs, as these references might break or not display as intended if those tabs are not accessible to the viewer.
Next, go through your spreadsheet and hide all other tabs that you do not want to share. To hide a tab in Google Sheets right-click on the tab name at the bottom of the sheet. Then, select “Hide sheet” from the context menu:
This will make the tab invisible in the spreadsheet, but remember, hidden tabs are not securely concealed from users with Editor permissions; they can simply unhide these tabs.
If you need to grant someone Editor permissions, be cautious as editors can see and unhide all hidden tabs. If Editor-level access is necessary, consider copying the relevant tab to a new spreadsheet and sharing that instead, as described in a previous explanation.
Additional Tips and Considerations
When you duplicate a tab and move it to another spreadsheet, keep in mind that any updates made to the original tab will not be reflected in the shared copy. If the data needs to be updated regularly, you will need to repeat the process of duplicating and copying the tab to the new spreadsheet.
Additionally, if your tab contains formulas that reference other tabs or data within the original spreadsheet, these references might break when moved to a new document. You'll need to adjust these references or rethink how the data is structured if necessary.
Another Method: Exporting to PDF
Exporting a single tab from a Google Sheets document to PDF is a useful feature for distributing specific information without sharing the entire workbook. Here's a step-by-step guide on how to accomplish this:
Step 1: Prepare the Tab
Ensure the tab you want to export looks exactly how you want it to appear in the PDF. This includes checking the formatting, data layout, and any headers or footers. Remember that what you see in the sheet is what will get printed, so adjust the print settings accordingly.
Step 2: Open the Print Settings
Click on the tab you want to export.
Go to the File menu in the upper left corner of the screen.
Hover over Print or click directly on Print to open the print settings dialog. You can also use the keyboard shortcut Ctrl+P (on Windows) or Cmd+P (on Mac) as an alternative to accessing the print setup.
Step 3: Adjust the Print Settings
In the print settings dialog:
Under the Print section, choose the option Current sheet. This ensures that only the active sheet, which is the tab you're on, will be exported.
Adjust the Layout settings. You can choose the orientation (Portrait or Landscape) based on how you want your PDF to appear.
Set the Scale to fit all your data as needed. Options include "Normal," "Fit to width," and "Fit to height." Choose the one that best displays your data on a single page or across multiple pages as required.
Check other settings like margins, headers and footers, or if you want to show/hide gridlines and notes.
Step 4: Export as PDF
After setting up your print options, look for the Destination setting.
Click on the dropdown menu next to Destination and select Save as PDF.
Review your settings once more, then click on Next or Save (the button name might differ based on your browser).
Step 5: Save and Name Your PDF
Choose the location on your computer where you want to save the PDF.
Name your file appropriately.
Click Save to finalize the export.
This process will generate a PDF file of the selected tab, containing only the data visible and configured through the print settings. This method is efficient for sharing or archiving specific parts of your spreadsheet in a universally accessible format. Remember, the quality and appearance of your PDF can greatly depend on the print settings you choose, so it may take a few tries to get everything looking just right.
The TLDR
Sharing a single tab in Google Sheets requires a bit of maneuvering, but it's a straightforward process once you understand the steps. By duplicating the tab, creating a new document, and using the copy function, you can securely share just the portion of your spreadsheet that is needed. This method not only helps maintain the privacy of your data but also keeps your collaborations efficient and focused.
About the Author
Kris Lachance
Managing Editor
Kris is the Managing Editor of Spreadsheet Secrets. He is a finance professional, writer and entrepreneur based in Canada.

Spreadsheet Secrets
Helping you get better at all things spreadsheets. From learning functions to helpful tips and tricks. Microsoft Excel, Google Sheets, Apple Numbers, Office 365, whatever you use we can help you with.
Contact us here: ssheetsecrets@gmail.com
© 2024 Spreadsheet Secrets.
Spreadsheet Secrets
Helping you get better at all things spreadsheets. From learning functions to helpful tips and tricks. Microsoft Excel, Google Sheets, Apple Numbers, Office 365, whatever you use we can help you with.
Contact us here: ssheetsecrets@gmail.com
© 2024 Spreadsheet Secrets.
Spreadsheet Secrets
Helping you get better at all things spreadsheets. From learning functions to helpful tips and tricks. Microsoft Excel, Google Sheets, Apple Numbers, Office 365, whatever you use we can help you with.
Contact us here: ssheetsecrets@gmail.com
© 2024 Spreadsheet Secrets.